How to Migrate Data from QuickBooks Desktop to QuickBooks Desktop Using SaasAnt Desktop Migration Feature
August 5, 2026
Overview
The QuickBooks Desktop to QuickBooks Desktop Migration feature in SaasAnt Transactions allows you to migrate data directly from one QuickBooks Desktop company file to another without exporting or importing Excel, CSV, or IIF files.
The migration is performed within SaasAnt by connecting the source company file, exporting the selected data, and then connecting the destination company file to complete the migration.
Prerequisites
Before starting the migration, ensure the following:
You have Administrator access to both the source and destination QuickBooks Desktop company files.
Both company files are opened in Single-user Mode.
The source and destination company files can be on any supported version of QuickBooks Desktop.
Install and use the latest version of SaasAnt Transactions Desktop.
It is recommended to create a backup of both company files before starting the migration.
Note: During the migration process, you will first connect the source company file. After the export is completed, you will be prompted to connect the destination company file to complete the migration.
Steps to Migrate Data
Step 1: Open the Source Company File – Migration Selection
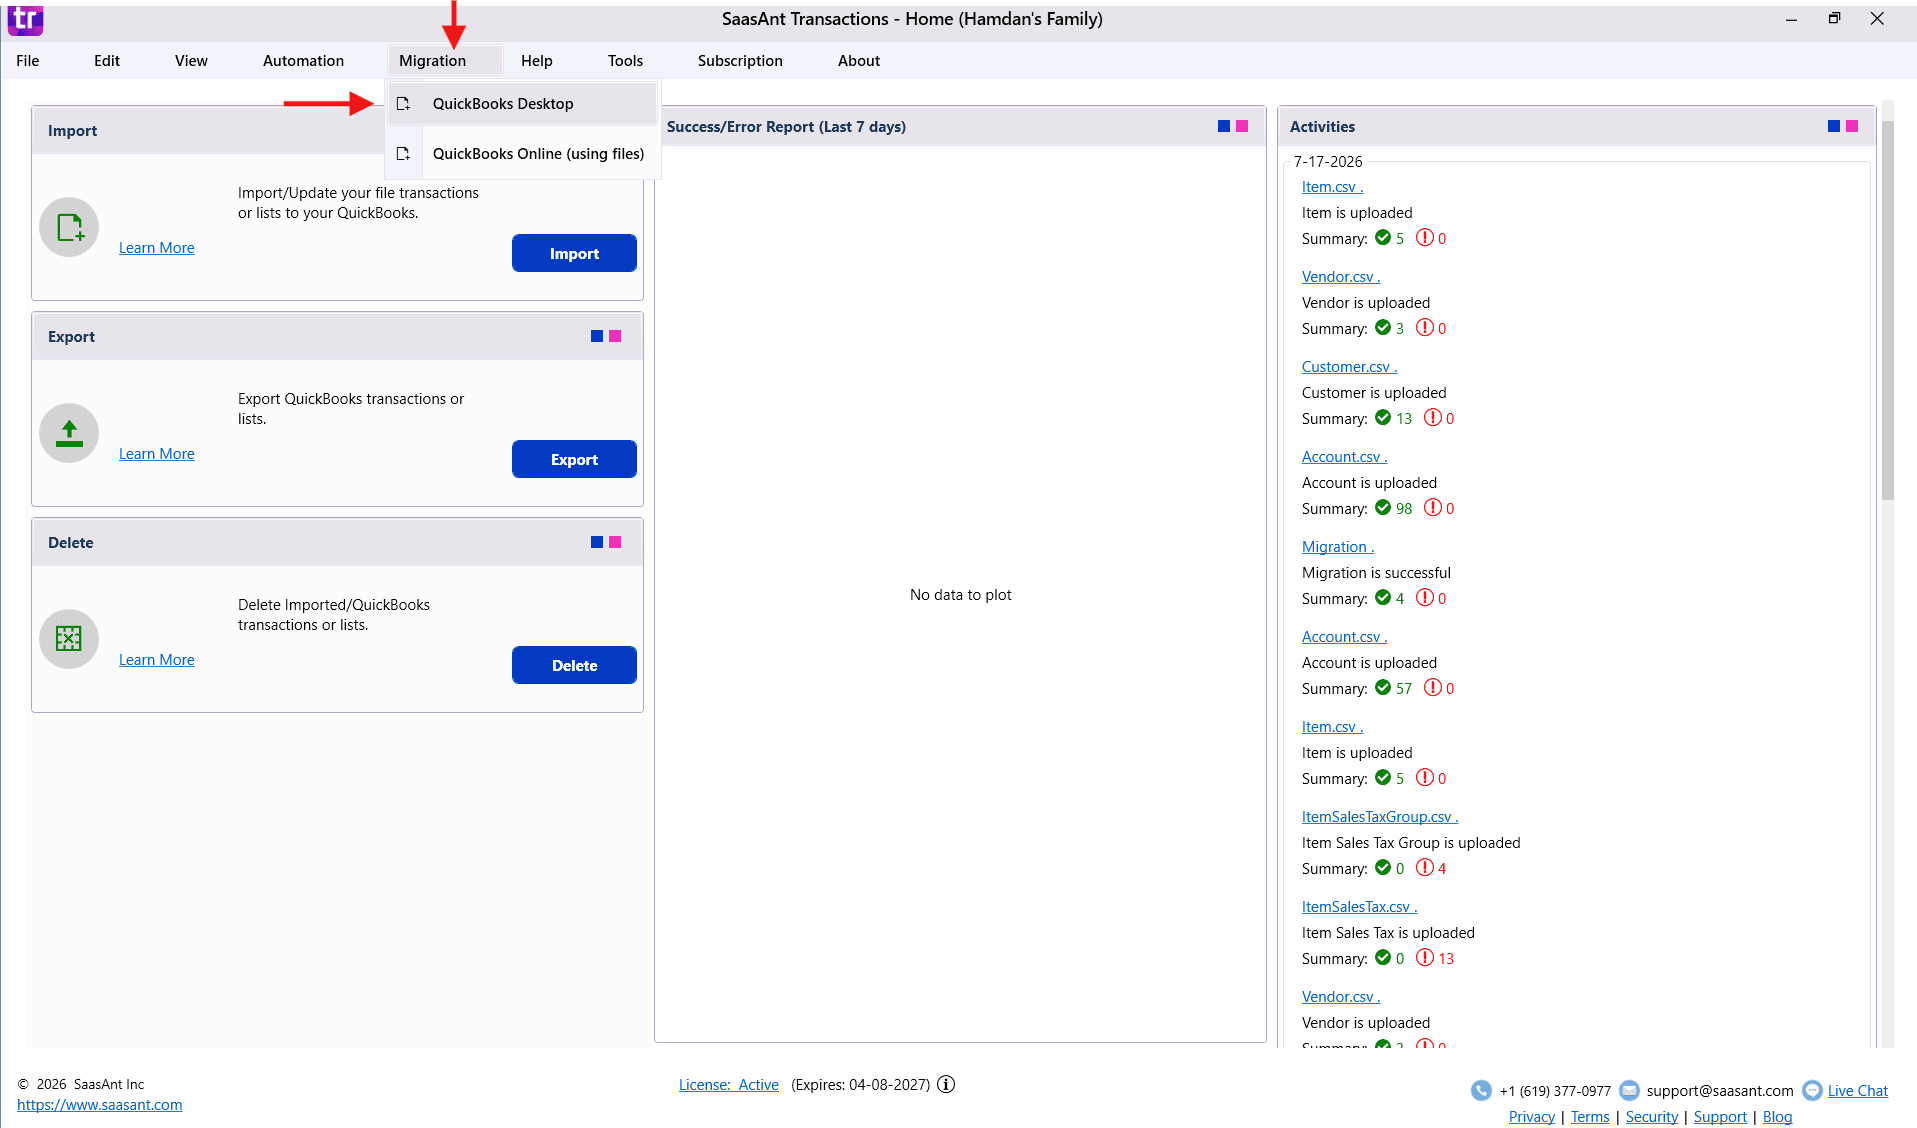
Open the source QuickBooks Desktop company file.
Launch SaasAnt Transactions.
From the top navigation menu, click Migration.
Select QuickBooks Desktop.
The source QB Desktop company file will get automatically connected.
Step 2: Configure the Migration – Migration Review
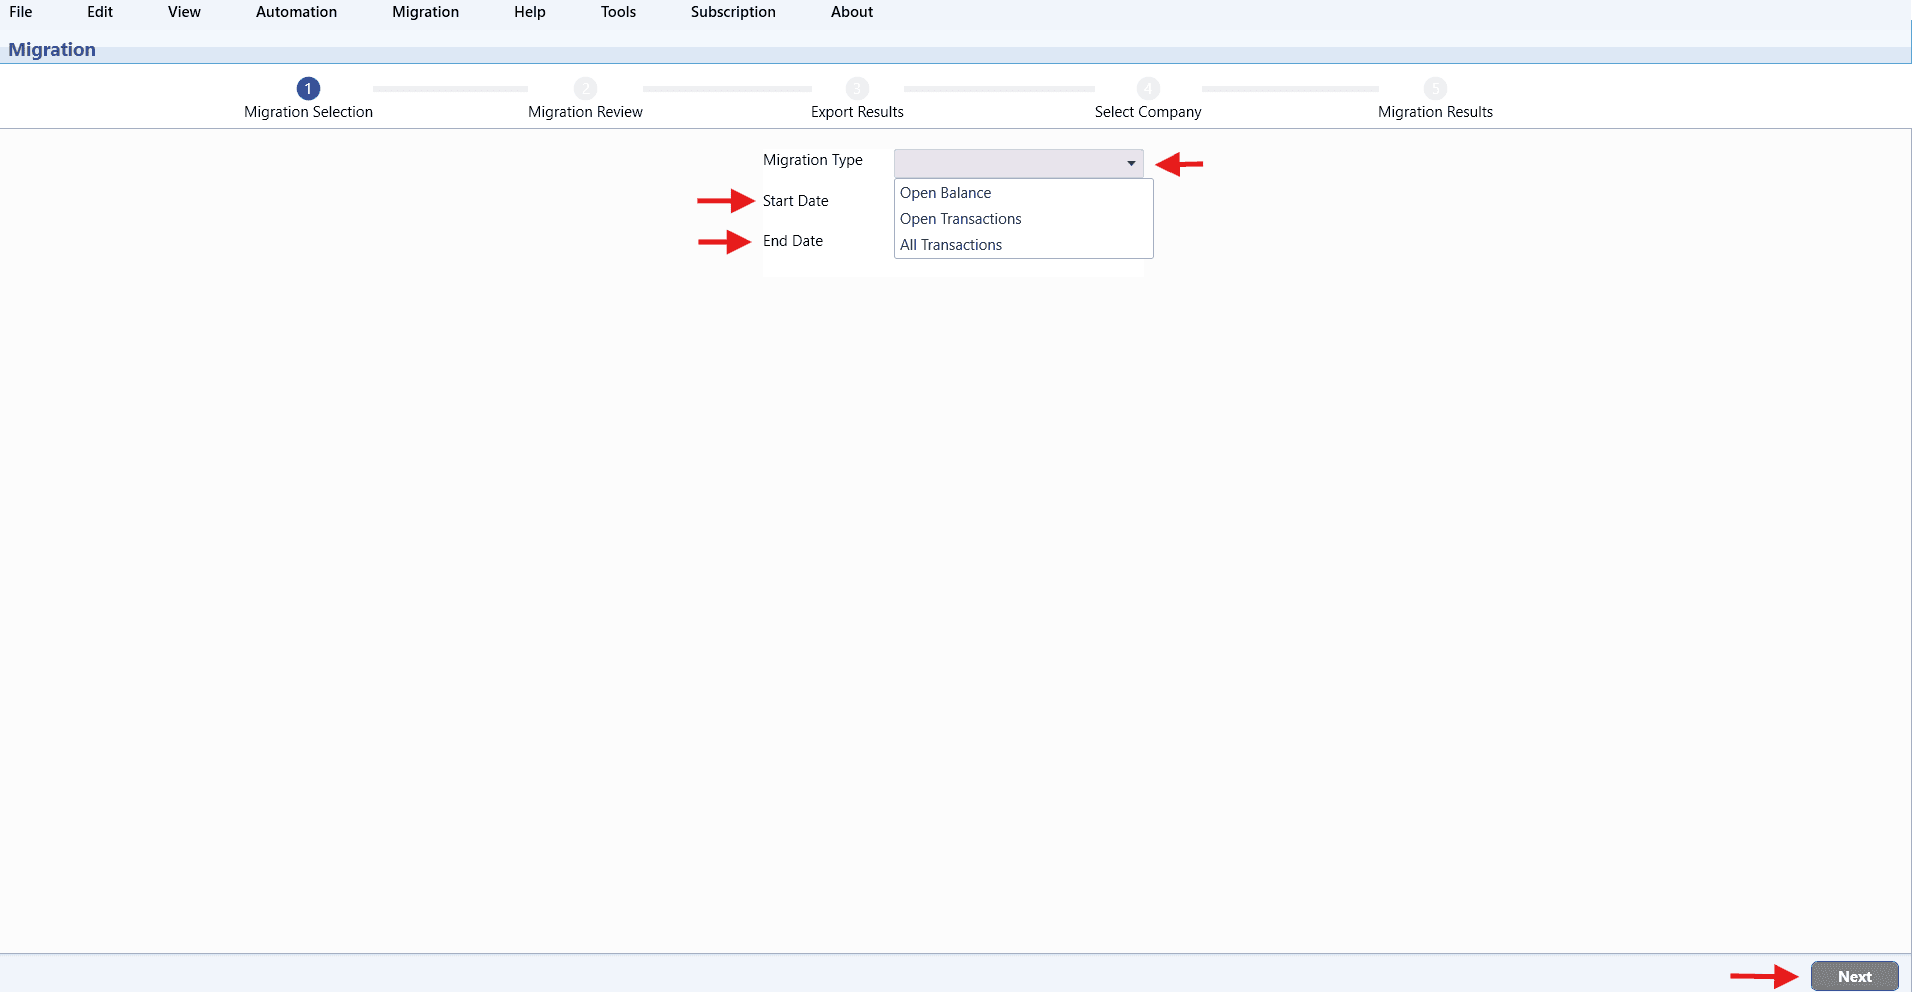
Choose the migration type based on your business requirement.
Available migration types:
Open Balance
Open Transactions
All Transactions
Select the appropriate:
Migration Type
Start Date
End Date
Click Next.
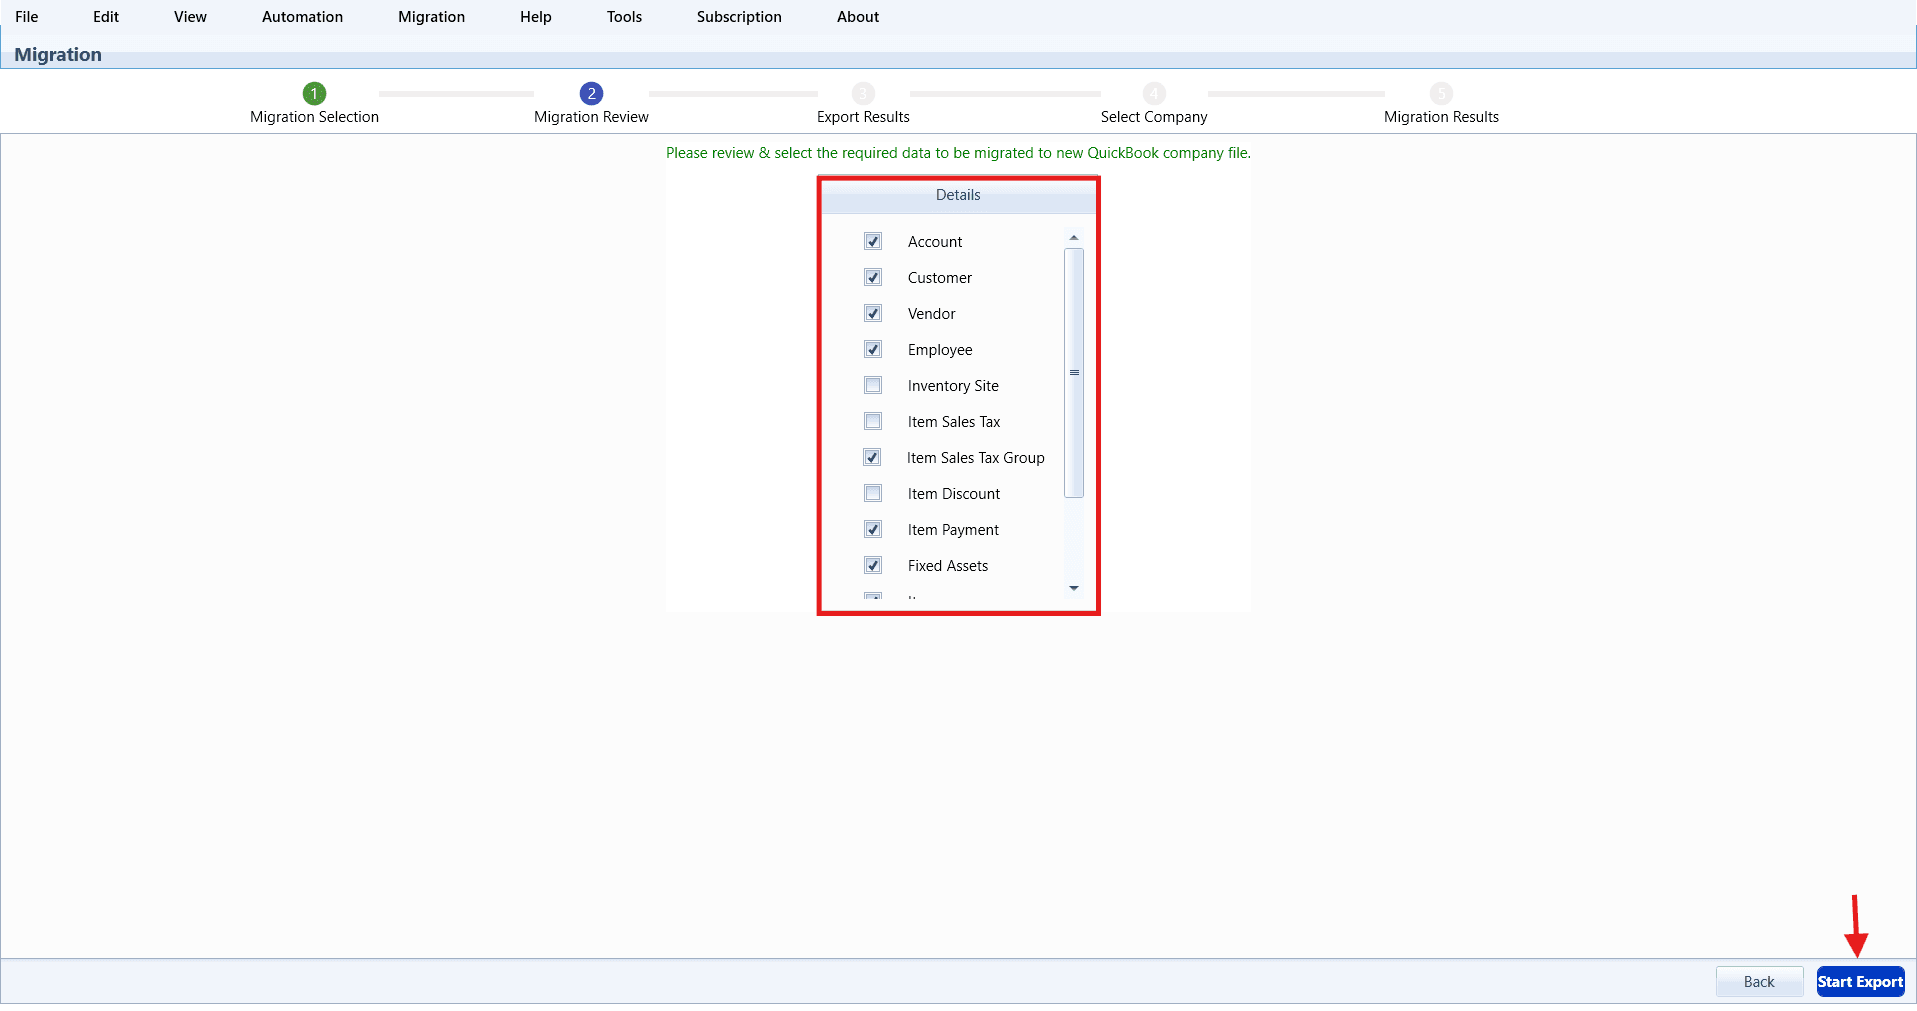
Step 3: Select the Data to Migrate – Export Results
Choose the data that you want to migrate.
Select or clear the checkboxes for the entities and transaction types as required.
Review your selections carefully.
Click Start Export.
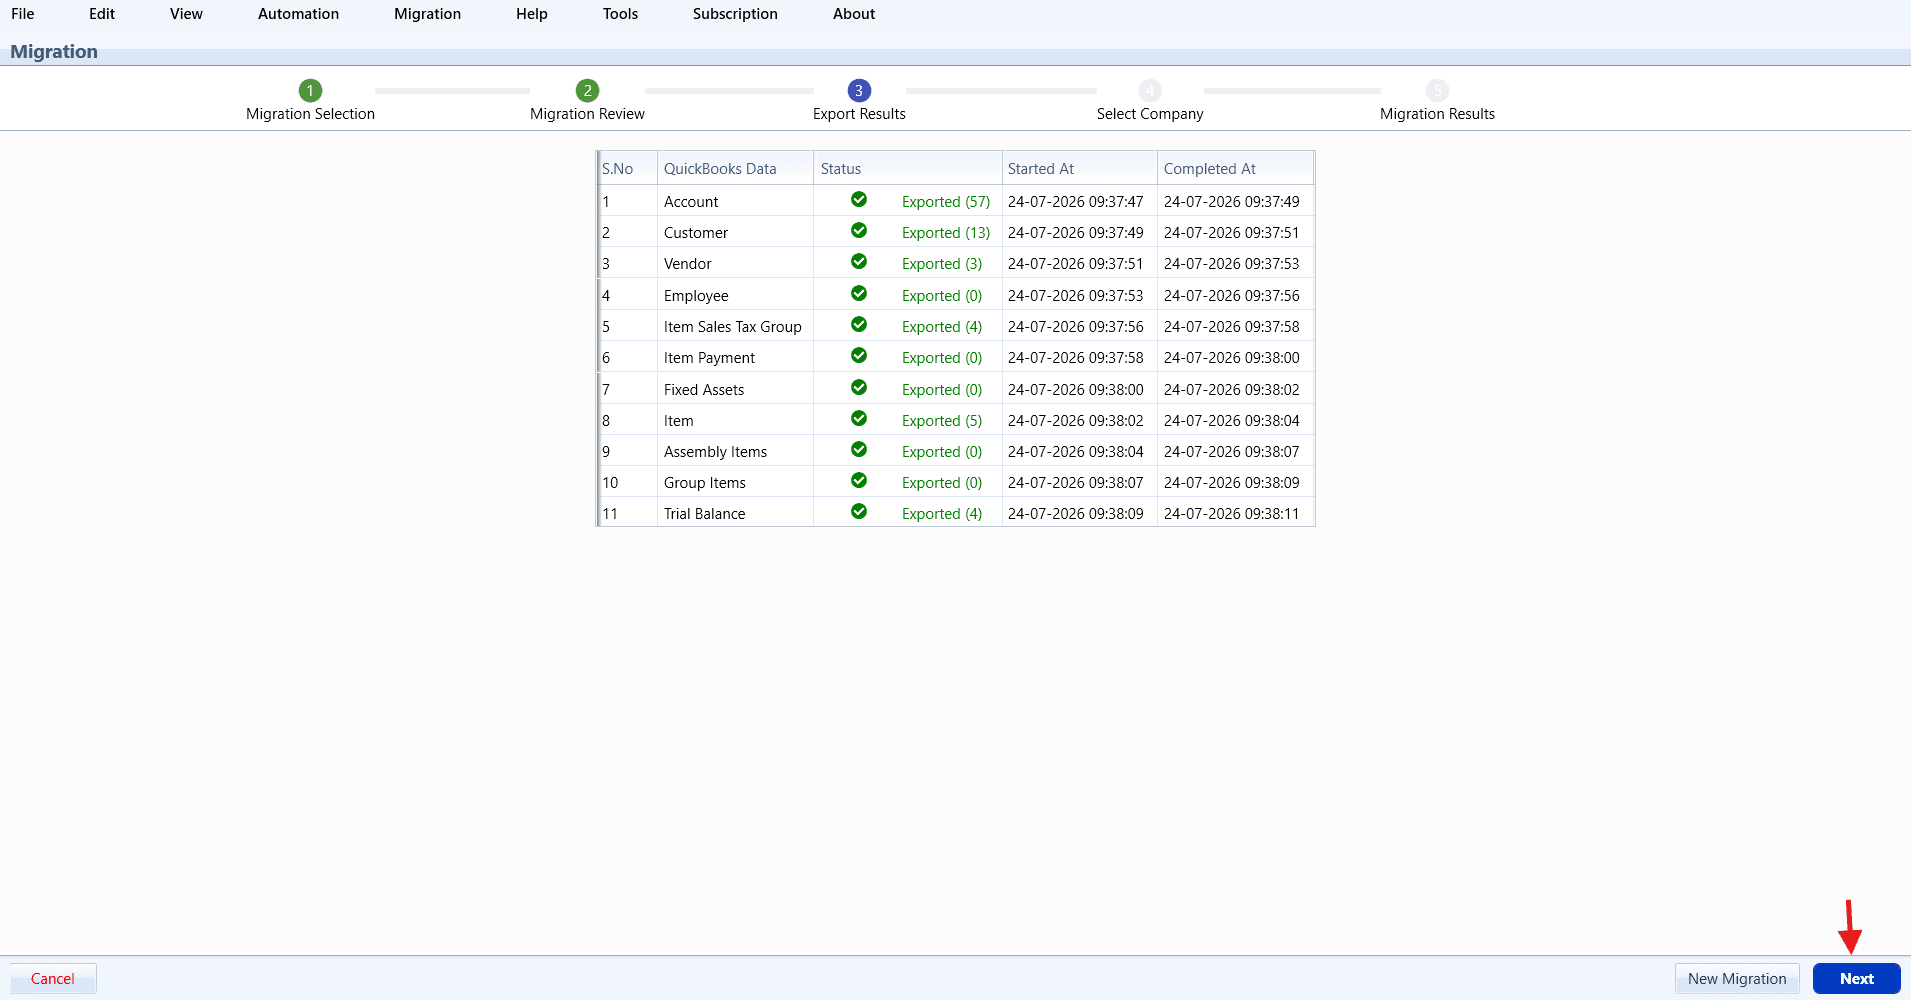
SaasAnt will export the selected data from the source company file.
After the export is completed successfully, click Next.
Step 4: Connect the Destination Company File – Select Company
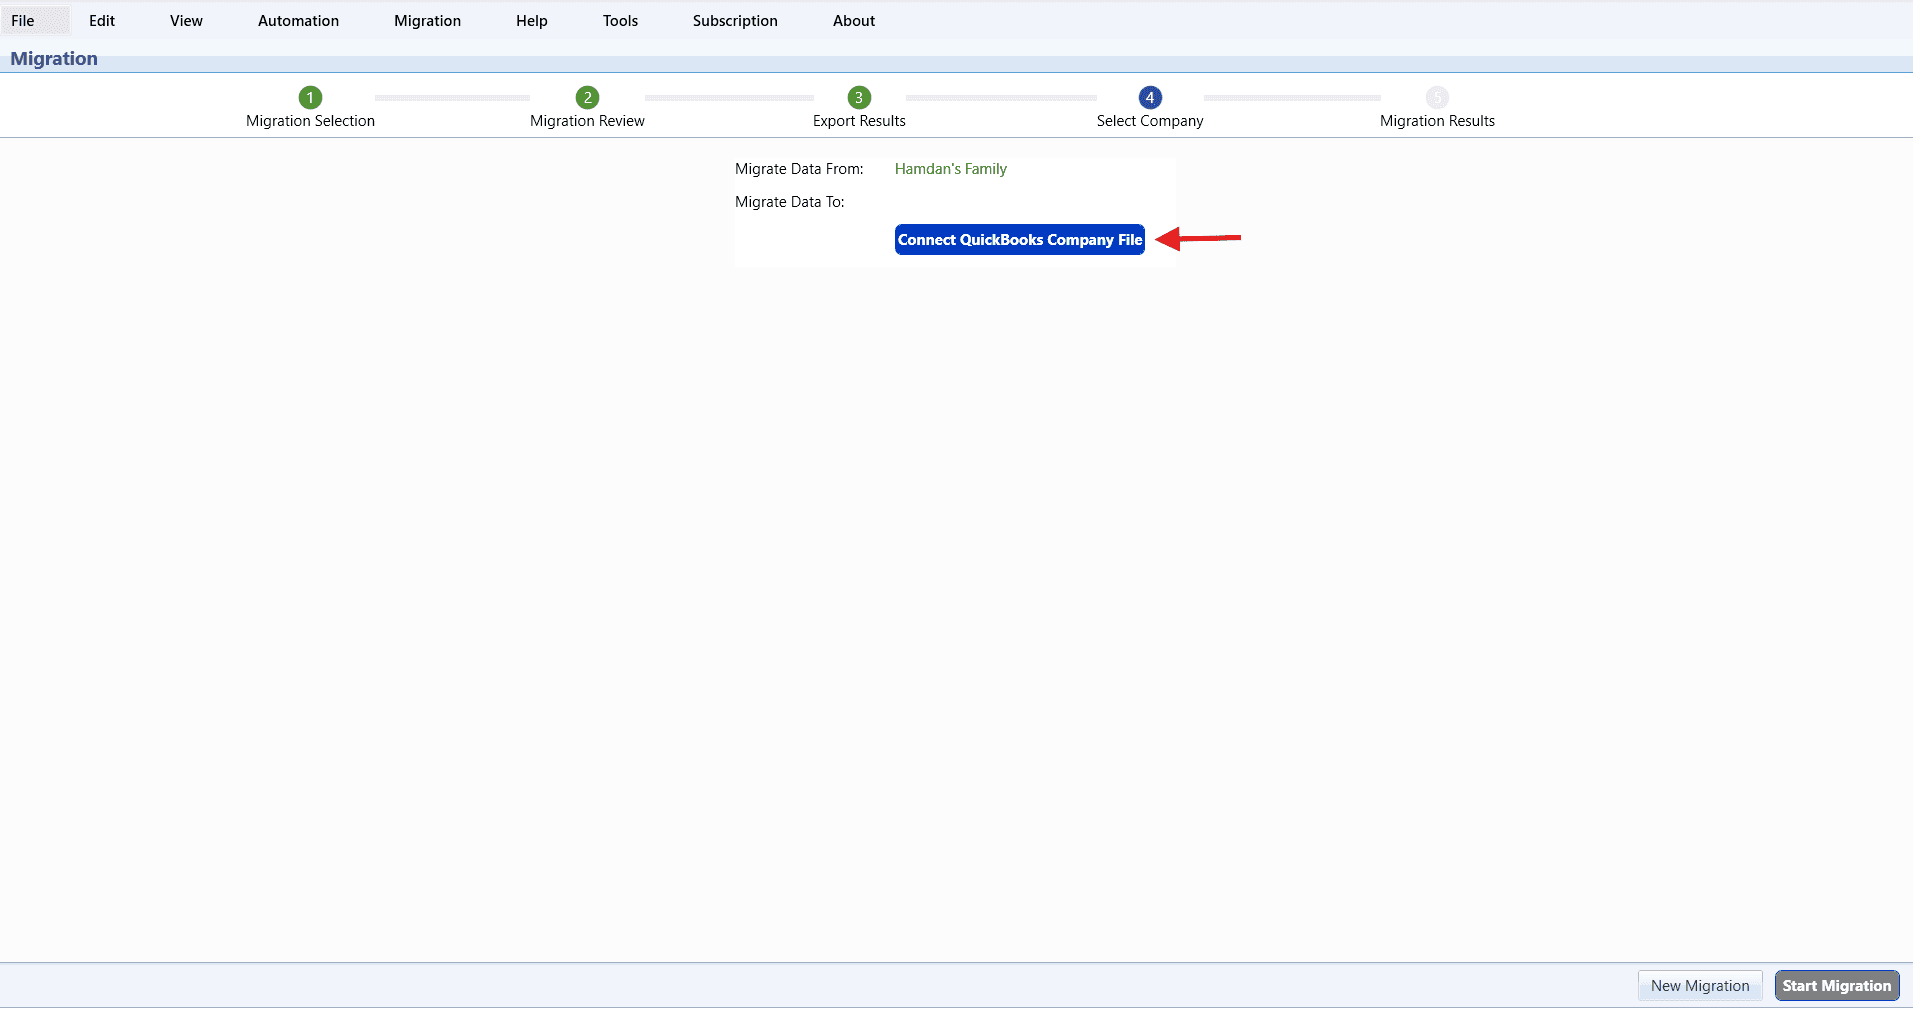
Close the source QuickBooks Desktop company file.
Open the destination QuickBooks Desktop company file.
In SaasAnt Transactions, click Connect QuickBooks Company File.
Connect the destination company file.
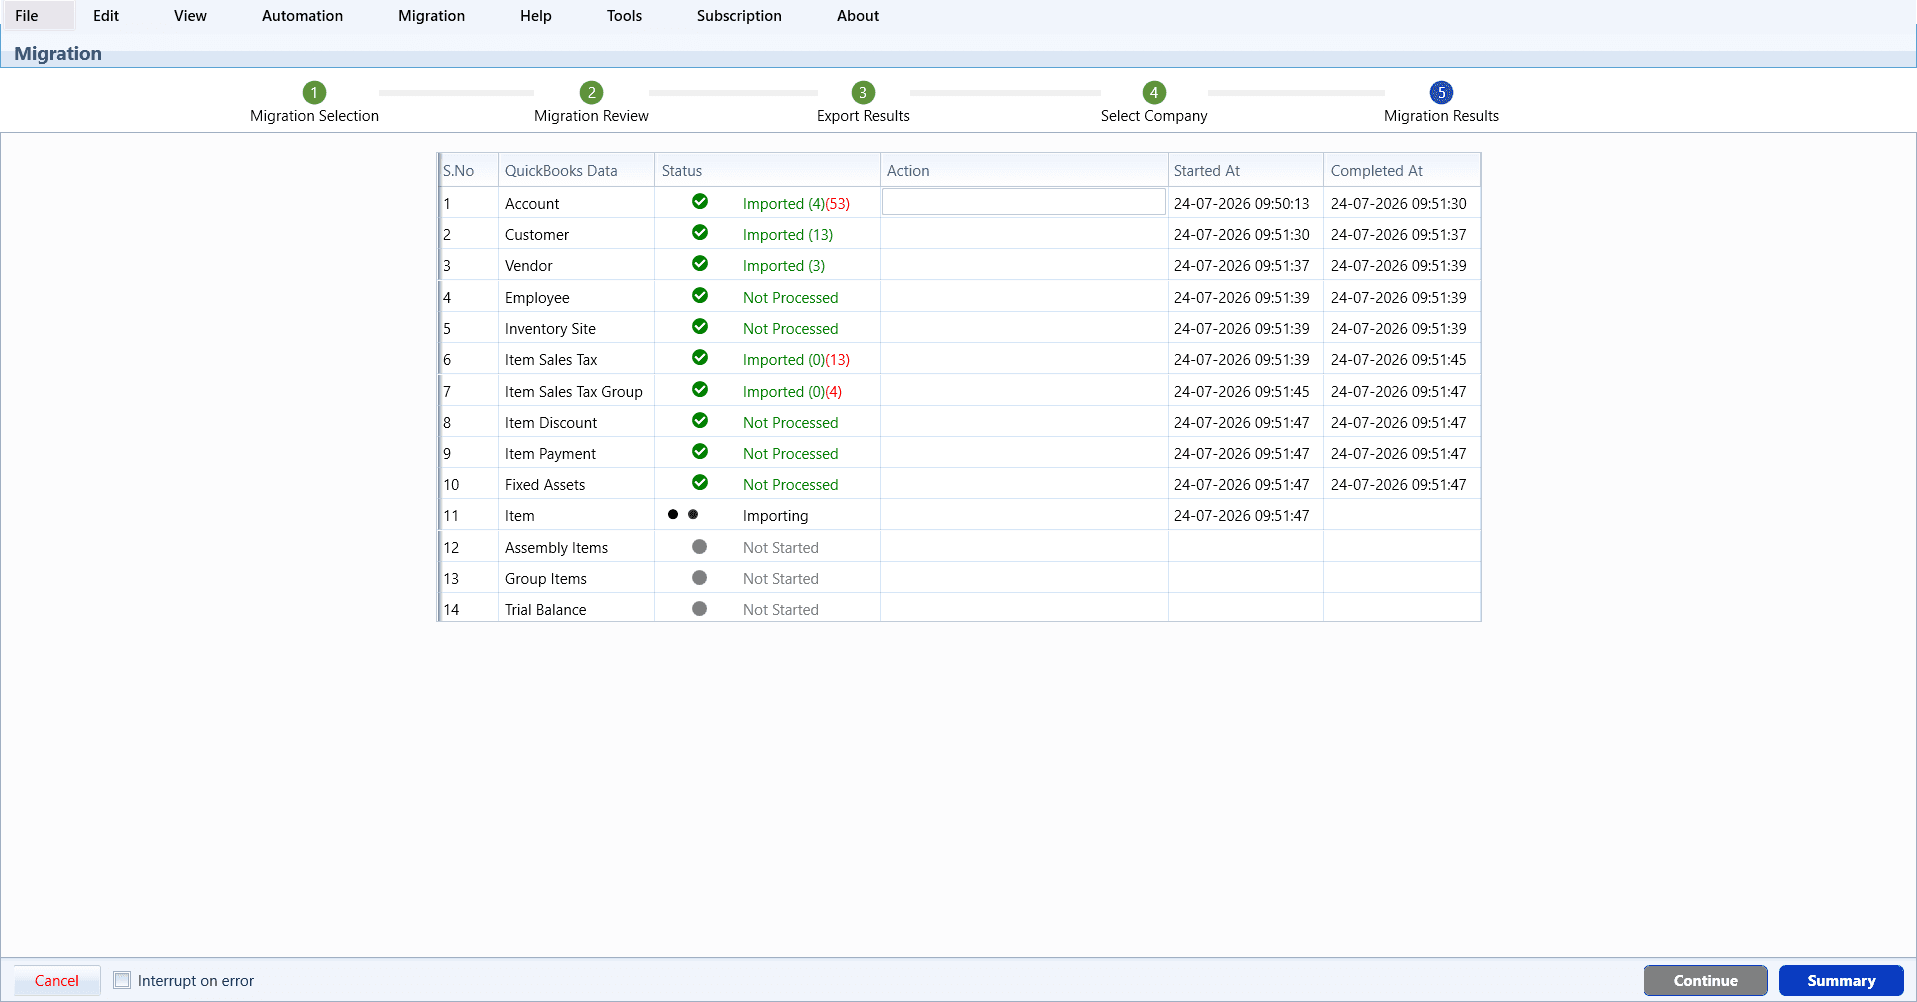
Step 5: Start the Migration – Migration Results
Once the destination company file is connected:
Click Start Migration.
SaasAnt will migrate the selected data directly into the destination QuickBooks Desktop company file.
After the migration completes successfully, review the migration summary for any warnings or errors.
Supported Migration Types
You can migrate one of the following:
Migration Type | Description |
Open Balance | Migrates only opening balances. |
Open Transactions | Migrates only open (outstanding) transactions. |
All Transactions | Migrates all supported transactions within the selected date range. |
Best Practices
Create a backup of both company files before starting the migration.
Ensure both company files are opened in Single-user Mode.
Use an Administrator account when connecting both company files.
Verify the migrated data after completion by comparing reports between the source and destination company files.
Review any migration warnings or errors before continuing with regular business operations.
Troubleshooting
Unable to Connect to QuickBooks Desktop
Cause: The company file is not opened with Administrator privileges or is not in Single-user Mode.
Resolution: Open the company file as the Administrator in Single-user Mode and reconnect.
Migration Cannot Continue
Cause: The source company file is still connected when attempting to connect the destination company file.
Resolution: Complete the export, close the source company file, open the destination company file, and reconnect it before starting the migration.
Migration Errors
If any records fail during migration, review the migration summary to identify the failed records and their corresponding error messages before retrying the migration.
Notes
The migration is performed directly between QuickBooks Desktop company files using the SaasAnt Migration feature.
No intermediate Excel, CSV, or IIF files are generated during the migration.
The source and destination company files can belong to different supported versions of QuickBooks Desktop.
Supported entities and transaction-level limitations may vary. Refer to the latest product documentation or contact SaasAnt Support for the most up-to-date compatibility information.