How to configure general Settings in PayTraqer
November 14, 2025
PayTraQer General Settings
Use General Settings to control how PayTraQer handles automation, reference numbers, duplicate checks, time zone, and date format. These options apply to all connectors in your PayTraQer account, not just one payment processor or store.
If you are looking for settings for a specific connector like Shopify, WooCommerce, PayPal, or Etsy, use the Sync Settings for that connector instead.
How to open General Settings
Sign in to PayTraQer.
Click the Settings icon.
Choose General.
You will see two sections:
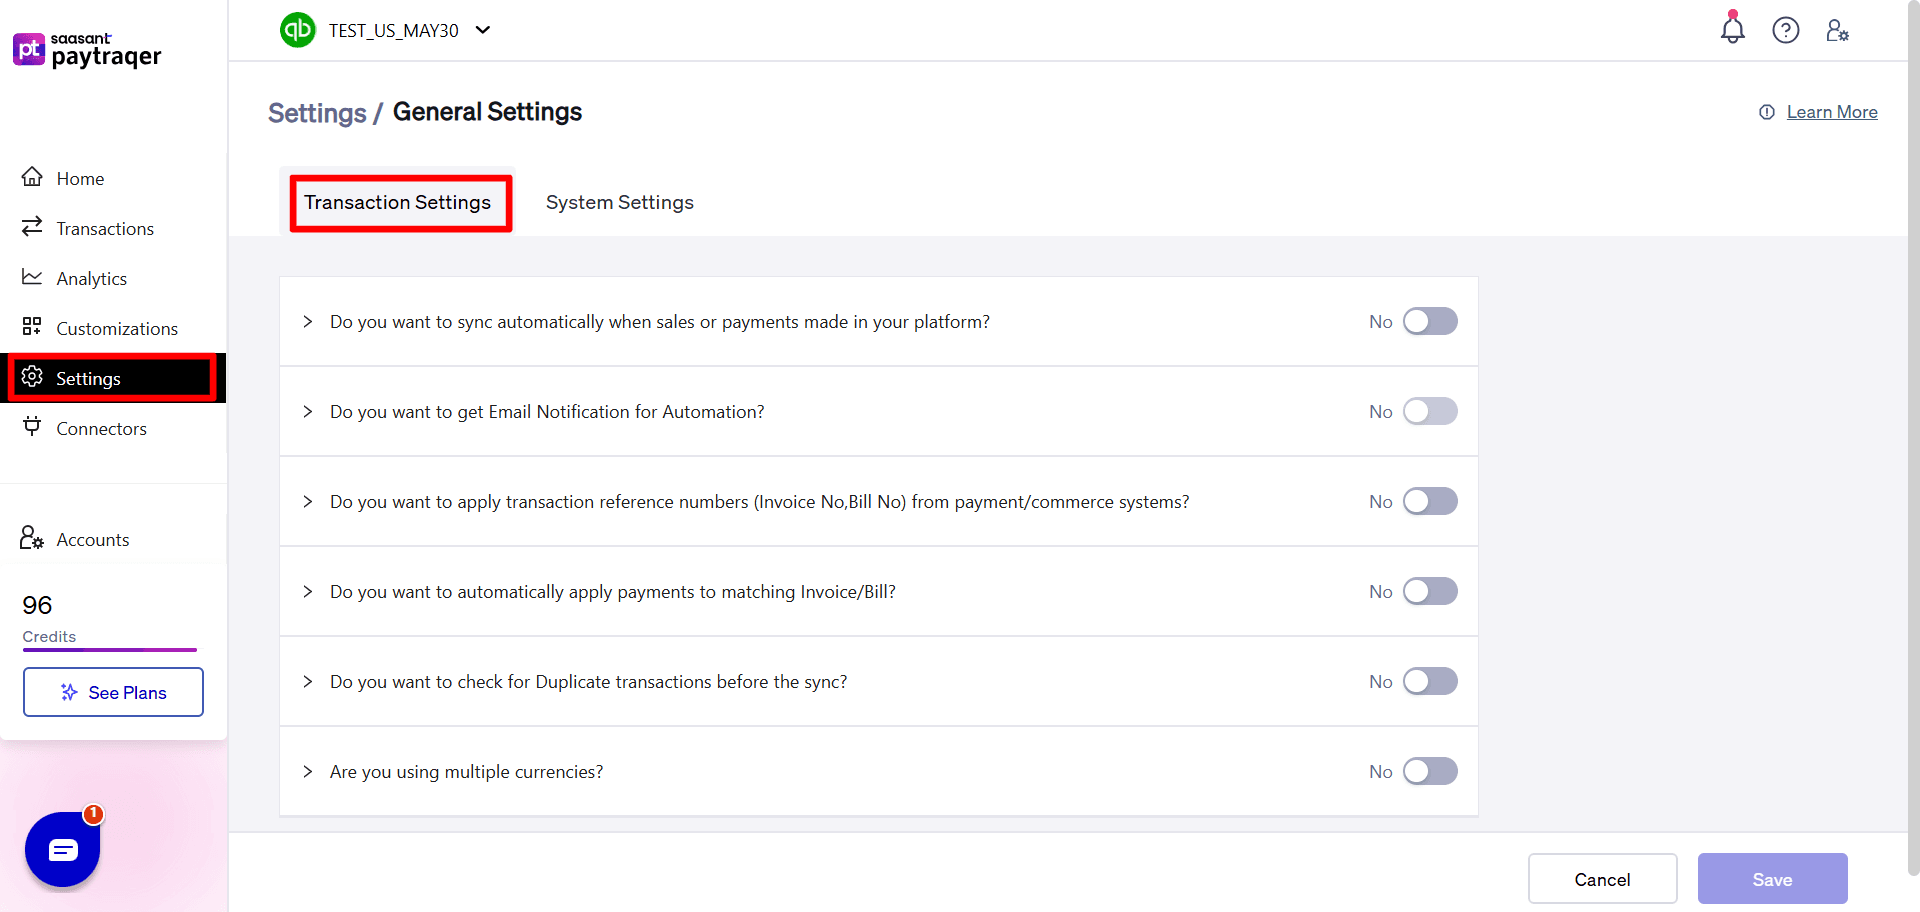
Transaction settings
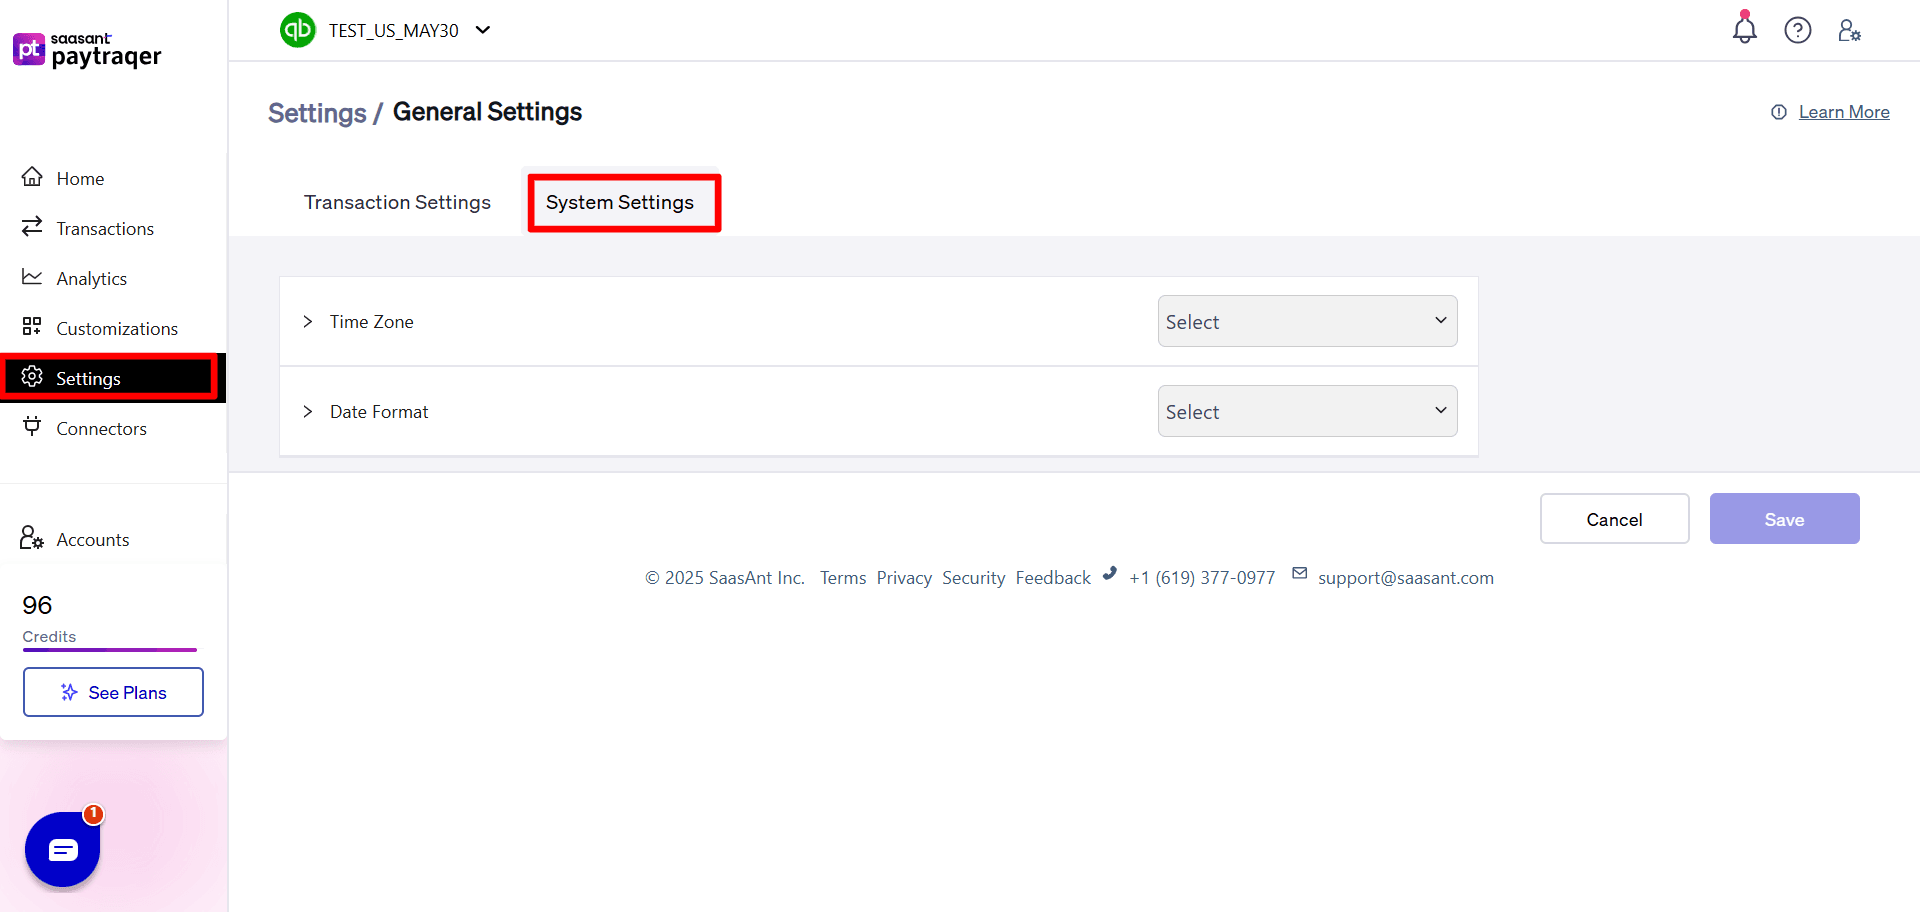
System settings
Transaction settings

These switches control how PayTraQer downloads and posts transactions to QuickBooks.
Auto Sync
Label: Do you want to sync automatically when sales or payments made in your platform
When turned on:
PayTraQer downloads new transactions from your connectors at regular time intervals
Transactions are synced to your accounting system without needing manual action
Use this when:
Your connector level posting rules are already tested
You want PayTraQer to keep books up to date with minimal manual work
Keep this off when you are still testing a new setup and want to review each batch manually.
Email notifications for automation
Label: Do you want to get Email Notification for Automation
When turned on:
PayTraQer sends an email summary for each automated sync run
Use this when:
You manage multiple clients or stores and want an audit trail in your inbox
You want to know if an automated run failed and needs review
Turn this off if you prefer to monitor automation from the dashboard only.
Use reference numbers from source systems
Label: Do you want to apply transaction reference numbers (Invoice No, Bill No) from payment/commerce systems
When turned on:
PayTraQer uses the transaction number or ID from your payment or commerce platform
These values are stored as the reference numbers on Invoices, Sales Receipts, and Payments in QuickBooks
When turned off:
QuickBooks applies its own automatic numbering sequence
PayTraQer does not copy the external transaction ID into the reference fields
Use this when:
You want to see the original order or payment reference directly in your accounting system for easy cross checking
Turn this off when:
You want strict control of your internal invoice and receipt numbering and prefer to keep external references in memo fields or custom fields only.
Automatically apply payments to open invoices or bills
Label: Do you want to automatically apply payments to matching Invoice/Bill
When turned on:
PayTraQer looks for OPEN invoices or bills
Matching is based on Customer or Vendor, Amount, and Transaction Date
Payments are applied automatically to the matching documents
Use this when:
Invoices or bills are created first in QuickBooks
Your payment or commerce system is only collecting payment for those existing invoices
Keep this off when:
You want to decide manually which invoice should receive each payment
You use different matching rules than customer, amount, and date
Duplicate check before sync
Label: Do you want to check for Duplicate transactions before the sync
When turned on:
PayTraQer checks each new transaction against existing transactions
Matching is based on Customer, Amount, and Transaction Date
Possible duplicates are flagged and shown as errors instead of posting again
Use this when:
You re run a date range
You moved from manual CSV workflows to PayTraQer and want to avoid double posting
You have more than one connector that could send the same payment
This setting is strongly recommended in most production accounts.
Multi currency support
Label: Are you using multiple currencies
When turned on:
PayTraQer allows you to sync and track sales and payments in multiple currencies
The app expects that multi currency is already enabled in your accounting system
Use this when:
You accept payments in more than one currency
Your gateways or stores are set to different currencies
Before you enable this setting:
Turn on multi currency in QuickBooks
Set up the necessary bank, clearing, and income accounts per currency
If you only operate in one currency, keep this setting off.
System settings
These options control the time zone and date format used inside PayTraQer.

Time Zone
Label: Time Zone
What it does:
Sets the time zone PayTraQer will use when your payment or commerce platform does not provide complete time zone information
Helps PayTraQer decide which day a transaction belongs to when grouping and reporting
Use this to:
Match the primary time zone of your accounting books
Keep daily summaries and payout dates aligned with your bank and reports
If you serve multiple regions, choose the time zone that matches your base accounting location.
Date Format
Label: Date Format
What it does:
Controls how dates are shown inside PayTraQer reports and screens
Does not change how dates are stored in QuickBooks
Use this to:
Avoid confusion between styles like
MM/DD/YYYYandDD/MM/YYYYMatch the date format your team uses day to day
How General Settings relate to connector settings
General settings apply to all connectors in your PayTraQer company
Sync settings for each connector control how sales, products, tax, fees, expenses, and payouts are posted for that specific payment processor or store
If you want to:
Change automation behavior, duplicate checks, reference numbers, or time zone
Use Settings → General
Change which accounts a connector uses, how tax is mapped, or how payouts are recorded
Use Sync settings for that connector
Review General settings first when setting up a new account and again before you turn Auto Sync on. This keeps your base behavior consistent as you add more connectors over time.
Related PayTraQer Articles:
1) Please refer to this article: How to rollback/undo the Synced transaction in PayTraQer
2) Please refer to this article: Overview of PayTraQer Summary Sync Settings
3) Please refer to this article: How to configure general Settings in PayTraqer
4) Please refer to this article: PayTraQer - Sales Settings Configuration
5) Please refer to this article: Configuration of Tax Settings for Summary Sync in PayTraQer
6) Please refer to this article: Configuration of Fees and Expenses for Summary Sync in PayTraQer
7) Please refer to this article: Configuring Additional Settings for PayTraQer Summary Sync
8) Please refer to this article: Configuration of Payout Settings for Summary Sync in PayTraQer
9) Please refer to this article: Configuration of COGS Matching for PayTraqer Summary Sync
10) Please refer to this article: Configuring COGS Settings for PayTraqer Summary Sync
11) Please refer to this article: Configuring Grouping for PayTraqer Summary Sync
12) Please refer to this article: How to configure general Settings in PayTraqer
13) Please refer to this article: How to Preview and Sync the Transactions into QuickBooks Online
14) Please refer to this article: PayTraQer Consolidated Summary Sync Dashboard Guide
15) Please refer to this article: How to setup PayTraQer for Summary Sync (sales summary
You can reach out to us at support@saasant.com if you are stuck somewhere.