Configuration of Payout Settings for Summary Sync in PayTraQer
November 20, 2025
Introduction:
In PayTraQer, managing payout settings allows you to designate specific accounts for handling various financial scenarios related to your payment system or e-commerce platform. This article provides a detailed guide on how to configure payout settings to effectively manage your sales income, fees, and negative balances.
To access the sales settings in PayTraQer, follow these simple steps:
Click the Gear icon.
Go to Settings.
Select the Payment Processor (Stripe).
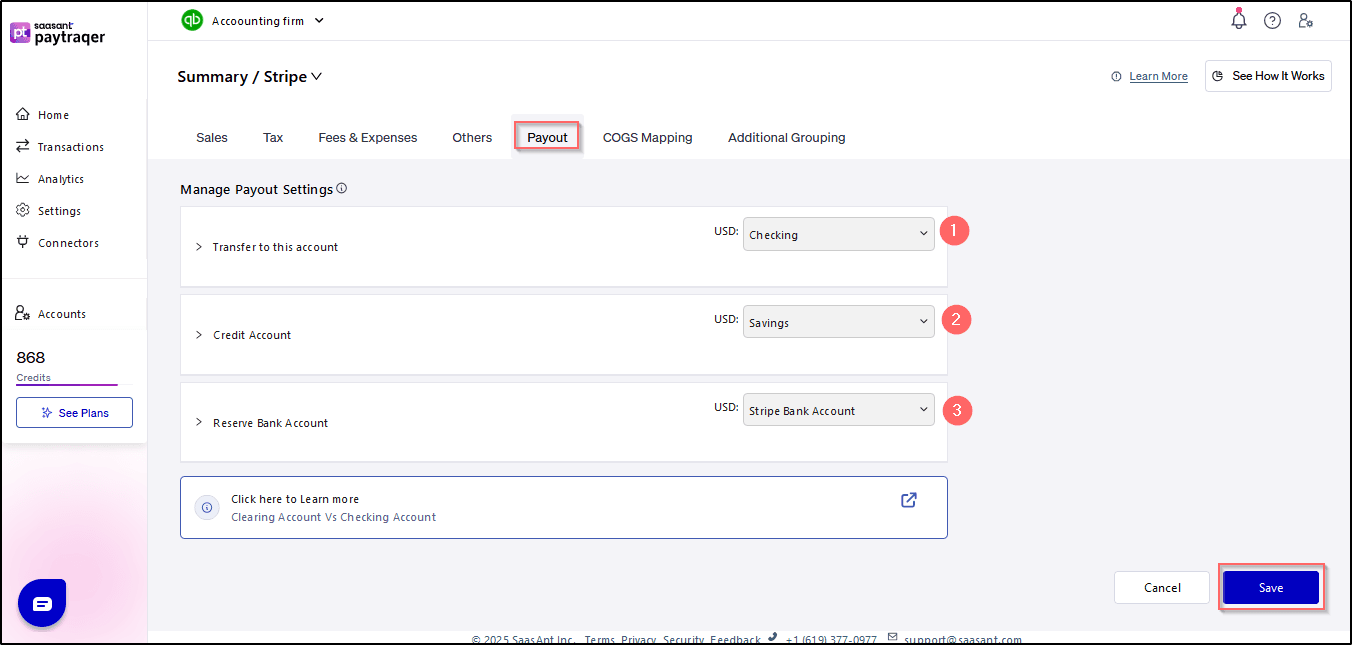
Navigate to Payout.
Manage Payout Settings:
Manage the accounts where your payment system/e-commerce platform deposits sales income and fees. Used if payout balance is negative.
Checking/Settlement Bank Account (Payout Settings)
The checking/Settlement bank account holds the final consolidated payout received from Payment Processors. You need to configure the Checking/Settlement Bank Account in Payout Settings for "Transfer the sales to this account"
PayTraQer will create a transfer transaction to move the balance amount from the given clearing account to the checking/Settlement bank account.
PleasePleas refer this article: Deep Dive: Deep Dive:Clearing Account Vs Checking(Settlement) Account

1. Bank Account:
Your bank account serves as the destination where payment or e-commerce platforms deposit your sales income and fees. Configuring this account ensures seamless tracking and reconciliation of financial transactions. Here's how to set up your bank account in PayTraQer:
Note: Enter the necessary details, including account name, account number, and routing number and save the changes to finalize the bank account setup.
2. Negative Balance Account:
When your payment system or e-commerce platform payout balance falls into the negative, it's essential to designate a specific account to handle such scenarios. This account will be used to manage and reconcile negative balances effectively. Follow these steps to configure the negative balance account:
Enter the details of the designated account, including the account name and account number, and save the changes to confirm the setup of the negative balance account.
3. Reserve Balance Account:
Like the negative balance account, the reserve balance account is utilized when your payment system or e-commerce platform payout balance is negative. This account serves as a safeguard to manage and cover any potential shortfalls effectively. Here's how to configure the reserve balance account in PayTraQer:
Input the relevant details of the reserve balance account, such as account name and account number, and save the changes to complete the setup of the reserve balance account.
Conclusion:
By following the instructions outlined in this article, you can effectively manage your payout settings in PayTraQer, ensuring seamless handling of sales income, fees, and negative balances. If you encounter any issues or require further assistance, feel free to contact our support team for guidance and support.