How to rollback/undo the Synced transaction in PayTraQer
November 19, 2025
Introduction:
Sometimes a sync creates the wrong entry in QuickBooks Online. Maybe a setting was off, a mapping was wrong, or you were testing. PayTraQer lets you undo those synced transactions and remove what it created in QuickBooks, without touching your customers, items, or other list data.
This article explains:
What undo does
How to roll back transactions from the Synced or Error tab
How to undo a single transaction from the Details view
What happens when you undo a synced transaction
When you undo a synced transaction in PayTraQer:
PayTraQer deletes or reverses the QuickBooks Online transactions it created for that sync.
Linked list entities such as Customers, Items, Vendors, Tax codes remain in QuickBooks.
Your QuickBooks file is taken back to the state it was in before that sync ran for those entries.
Use this when:
You synced with the wrong account, class, or tax.
You imported test data and want to clear it.
You want to fix mapping rules and re sync cleanly.
Note: Undo Transactions: Selecting this option will rollback the created transactions in QuickBooks Online, while leaving associated list entities such as Customers, Items, etc., intact.
Undo multiple transactions from the Synced or Error tab
Use this method when you want to roll back a group of transactions at once.
Open the Transactions screen
In PayTraQer, go to Transactions.
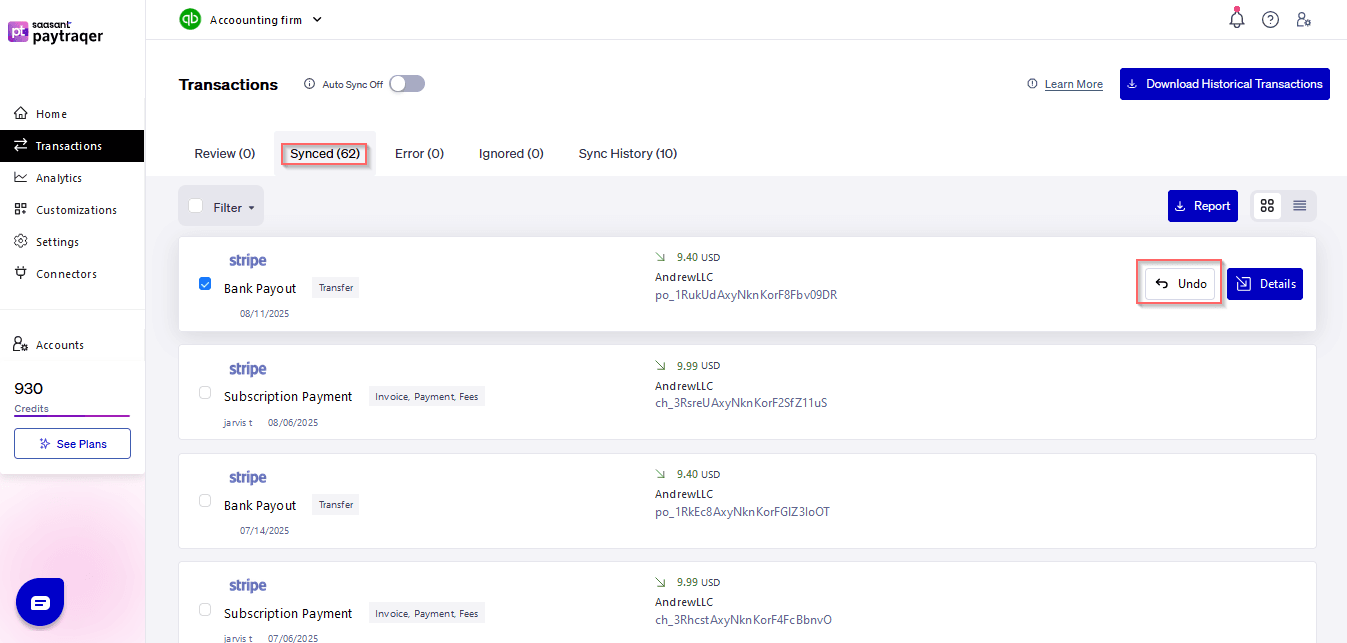
Choose the Synced tab to see successful syncs, or the Error tab for failed or partial syncs.
Filter and select records
Use the date and filter options if needed.
Select the checkboxes next to the transactions you want to roll back.
Click Undo
Click Undo Selected (or the Undo button on the row, depending on your view).
Confirm the rollback
A confirmation dialog appears.
Review the count and type of transactions.
Click Undo Transactions to start the rollback.
PayTraQer then removes the related QuickBooks entries for all selected transactions. The rows move out of the Synced state and can be downloaded and synced again if needed.
Undo a single transaction from the transaction row
You can also undo one transaction directly from the row actions.
Go to Transactions › Synced or Transactions › Error.
Find the specific transaction.
Click the Undo button on that row.
Confirm when the dialog prompts you.
This is useful when only one or two entries were wrong and everything else in that batch is correct.

Undo a transaction from the Details view
When you need to review what was posted before undoing, use the Details view.
Go to Transactions › Synced.
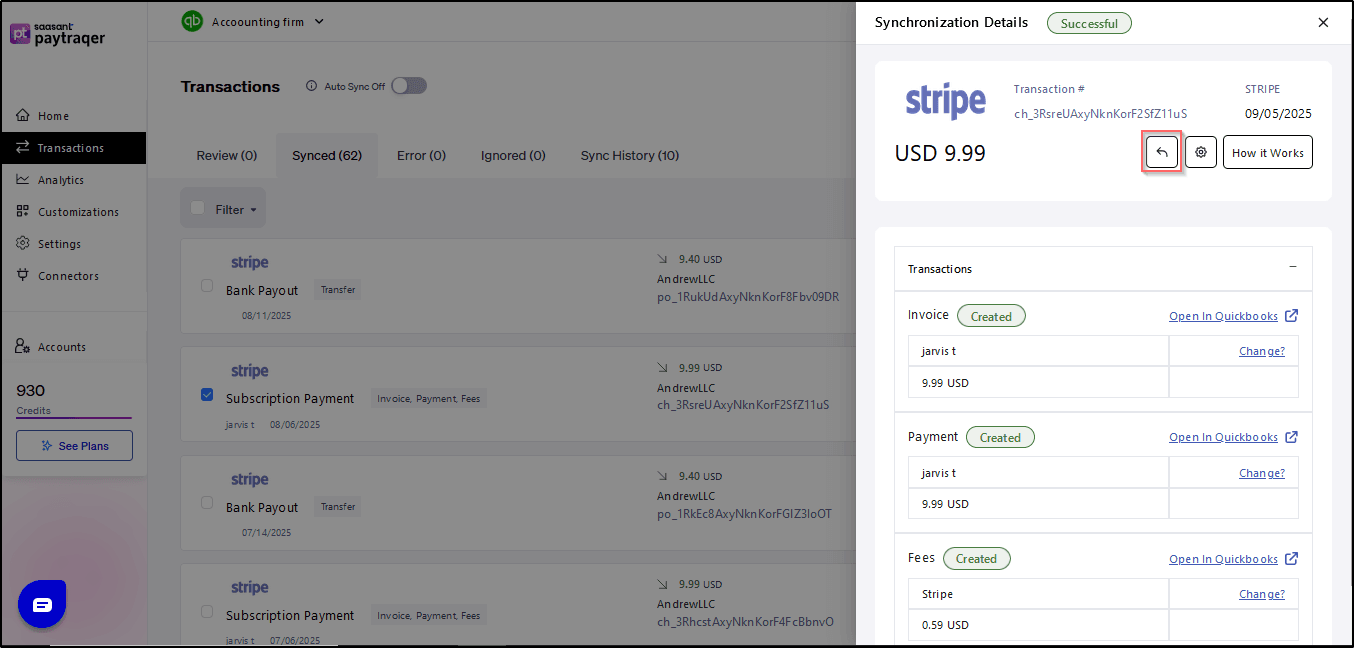
On the transaction you want to roll back, click Details.
In the Synchronization Details panel, review the linked Invoice, Payment, Fees, and other lines created in QuickBooks.
Click the Undo icon or button inside this panel.
Confirm the action when prompted.
PayTraQer removes all the QuickBooks entries listed in the details panel for that transaction.

Things to know before rolling back
Only transactions created by PayTraQer are undone.
Entries you created manually in QuickBooks are not affected by this feature.Manual changes made after sync are also removed.
If you edited a synced transaction directly in QuickBooks, undoing will still remove it.Lists stay intact.
Customers, items, vendors, tax codes, and other list records are not deleted when you undo. Only the posted transactions are rolled back.You can re sync after fixing settings.
After undoing, fix your mappings or settings in PayTraQer, download the transactions again, and sync them back into QuickBooks.
Conclusion
Undo lets you safely clean up mistakes and keep your QuickBooks file accurate. Use it whenever a sync runs with the wrong settings, when you push test data, or when you need to start over with a clean posting.
Related PayTraQer Articles:
1) Please refer to this article: Overview of PayTraQer Settings
2) Please refer to this article: How to Configure General Settings
3) Please refer to this article: PayTraQer - Sales Settings Configuration
4) Please refer to this article: Configuration of Tax Settings for Summary Sync in PayTraQer
5) Please refer to this article: Configuration of Fees and Expenses for Summary Sync in PayTraQer
6) Please refer to this article: Configuring Additional Settings for PayTraQer Summary Sync
7) Please refer to this article: Configuration of Payout Settings for Summary Sync in PayTraQer
8) Please refer to this article: Configuration of COGS Matching for PayTraqer Summary Sync
9) Please refer to this article: Configuring COGS Settings for PayTraqer Summary Sync
You can reach out to us at support@saasant.com if you are stuck somewhere.