How to Migrate Data from QuickBooks Desktop to QuickBooks Online Using SaasAnt Migration Feature
July 22, 2026
Transfer/ Migrate Data From QuickBooks Desktop to QuickBooks Online
The QuickBooks Desktop to QuickBooks Online Migration feature in SaasAnt Transactions helps you move supported company data from QuickBooks Desktop to QuickBooks Online through migration-ready Excel files.
The migration is completed in two stages:
Export your data from QuickBooks Desktop using SaasAnt Transactions Desktop.
Import the exported Excel files into QuickBooks Online using SaasAnt Transactions Online.
Important: This is a file-based migration. SaasAnt does not transfer the data directly from QuickBooks Desktop to QuickBooks Online. The Excel files generated by SaasAnt Transactions Desktop act as the intermediate files for the migration.
Before You Begin
Make sure the following requirements are met before starting the migration:
You have Administrator access to the source QuickBooks Desktop company file.
The QuickBooks Desktop company file is open in Single-user Mode.
The company file uses a QuickBooks Desktop version supported by the latest SaasAnt Transactions Desktop release.
You have installed the latest version of SaasAnt Transactions Desktop.
You have an active QuickBooks Online company.
You have an active SaasAnt Transactions Online subscription.
You have created a backup of your QuickBooks Desktop company file.
Keep the QuickBooks Desktop company file open throughout the data collection process.
Supported QuickBooks Data
During the migration, SaasAnt converts supported QuickBooks Desktop data into the corresponding QuickBooks Online entity.
QuickBooks Desktop data | QuickBooks Online entity |
Account | Account |
Customer | Customer |
Inventory Item | Product/Service |
Item | Product/Service |
Vendor | Vendor |
Invoice | Invoice |
Receive Payment | Receive Payment |
Bill | Bill |
Bill Payment | Bill Payment |
Other supported transactions without a direct equivalent | Journal Entry |
Trial Balance | Trial Balance |
Transactions Converted into Journal Entries
Some QuickBooks Desktop transactions may not have a matching import entity in QuickBooks Online. SaasAnt converts these transactions into Journal Entries to carry their accounting values into the QuickBooks Online company.
Examples may include:
Checks
Deposits
Refunds
Credit notes
Credit card charges
Transfers
Other transactions without a supported direct equivalent
Note: A transaction converted into a Journal Entry will not retain the original QuickBooks Desktop transaction form or workflow in QuickBooks Online. Review the generated Journal Entry file before importing it.
Steps to Migrate QuickBooks Desktop Data
Step 1: Open the Source QuickBooks Desktop Company
Open the QuickBooks Desktop company file that contains the data you want to migrate.
Sign in to the company file as the Administrator.
Make sure the company file is open in Single-user Mode.
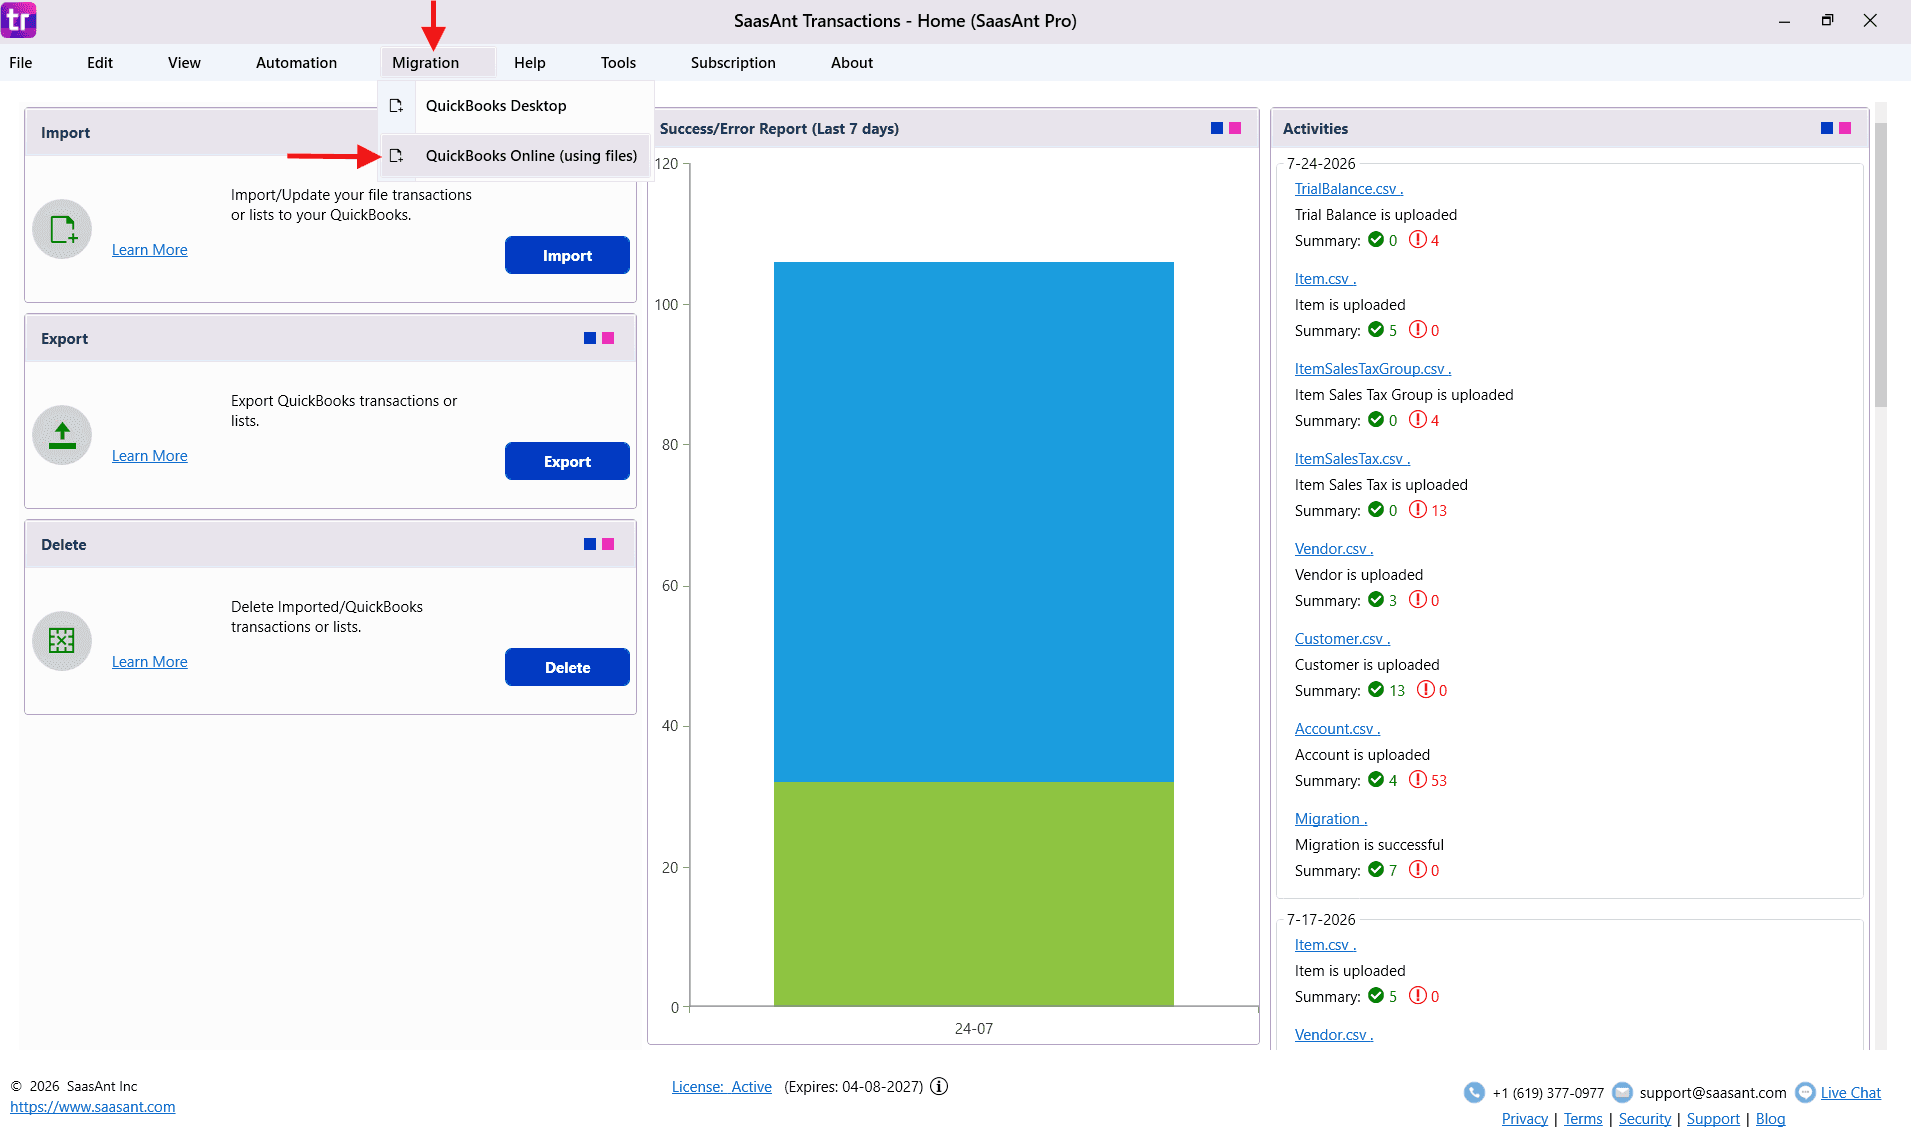
Launch SaasAnt Transactions Desktop.
From the top navigation menu, select Migration.
Select QuickBooks Online (Using Files).
The company file currently open in QuickBooks Desktop will automatically be selected as the source company.
Confirm that the correct company file is displayed before continuing.
Step 2: Start a New Migration
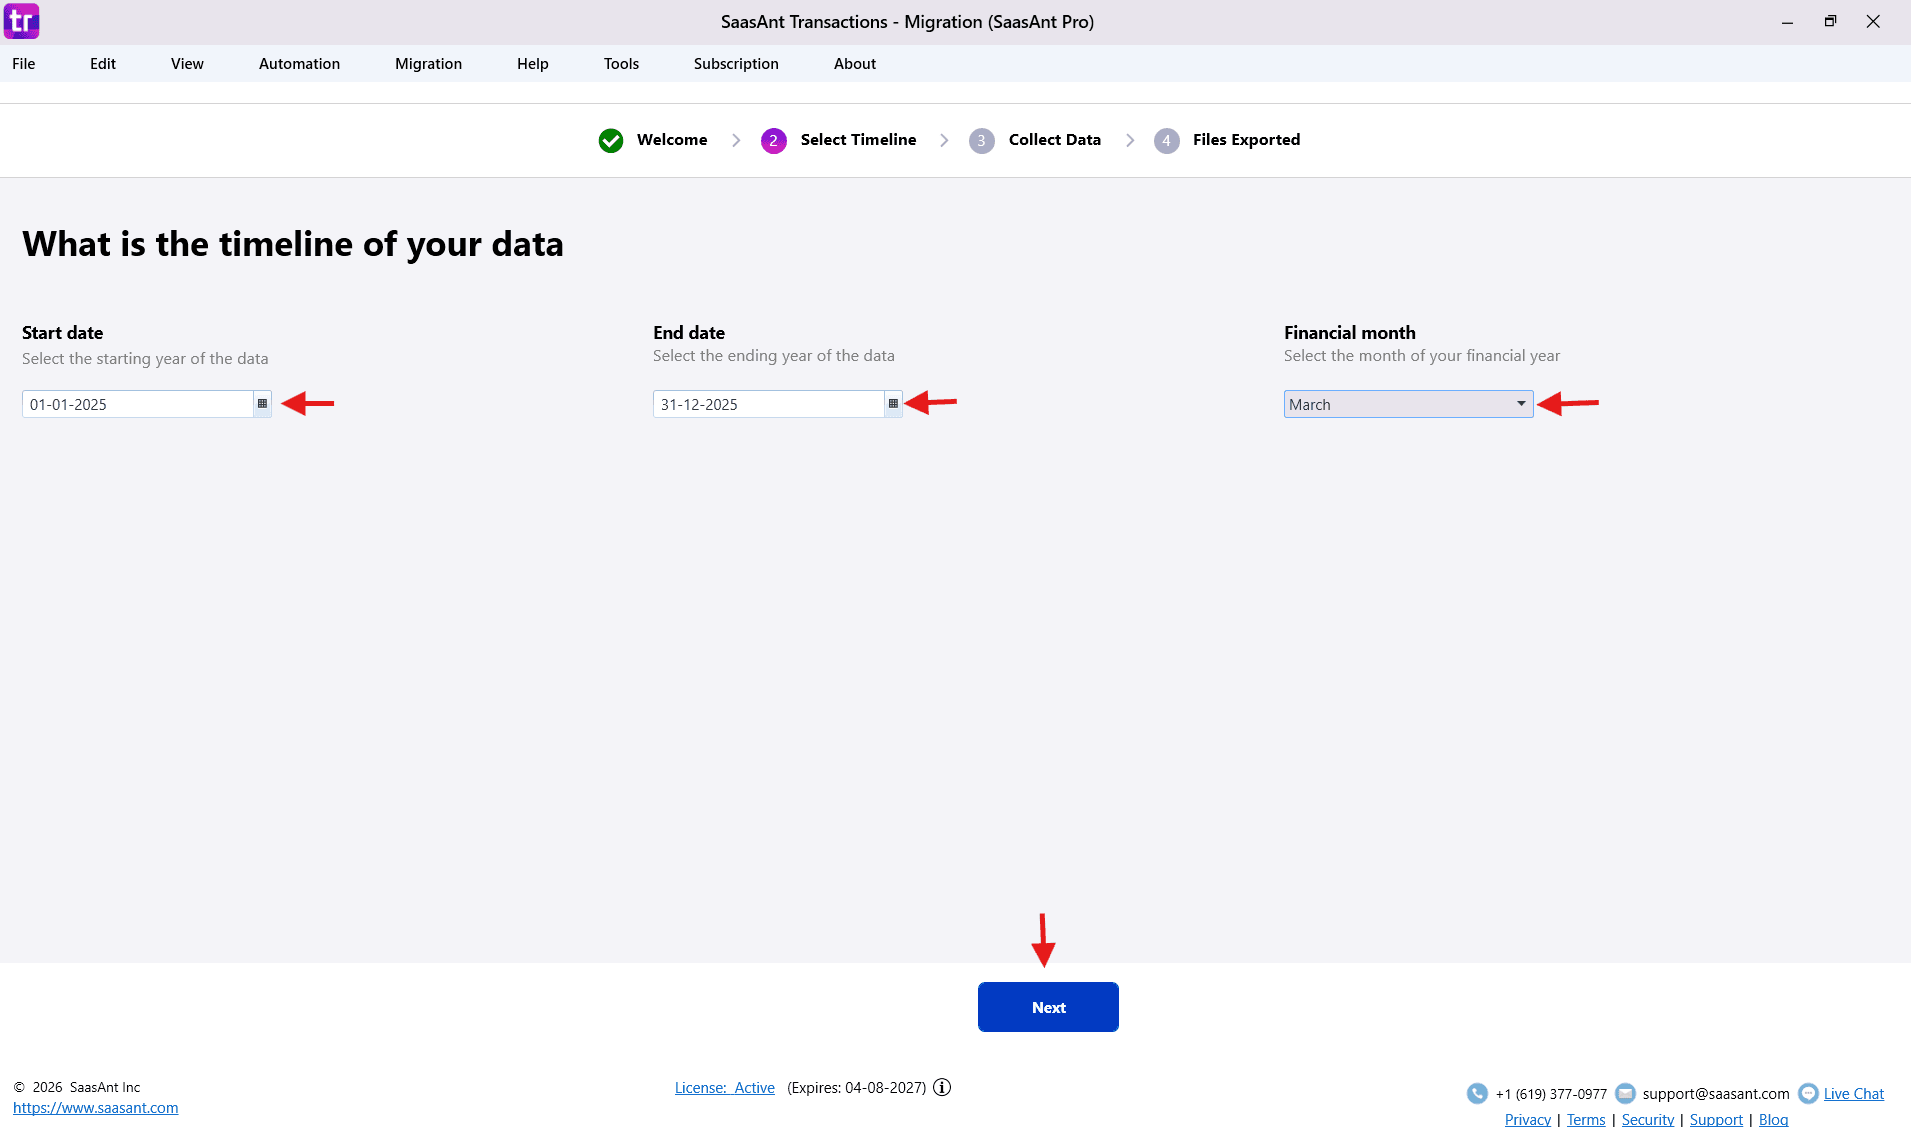
Click Start New Migration.
Enter the required migration information:
Start Date
End Date
Financial Month
Review the selected date range.
Click Next.
The Start Date and End Date determine the transaction period included in the migration. Confirm the dates carefully before proceeding.
Step 3: Review the Data Collection Details
SaasAnt Transactions Desktop will display the types of data that will be collected from the QuickBooks Desktop company file.
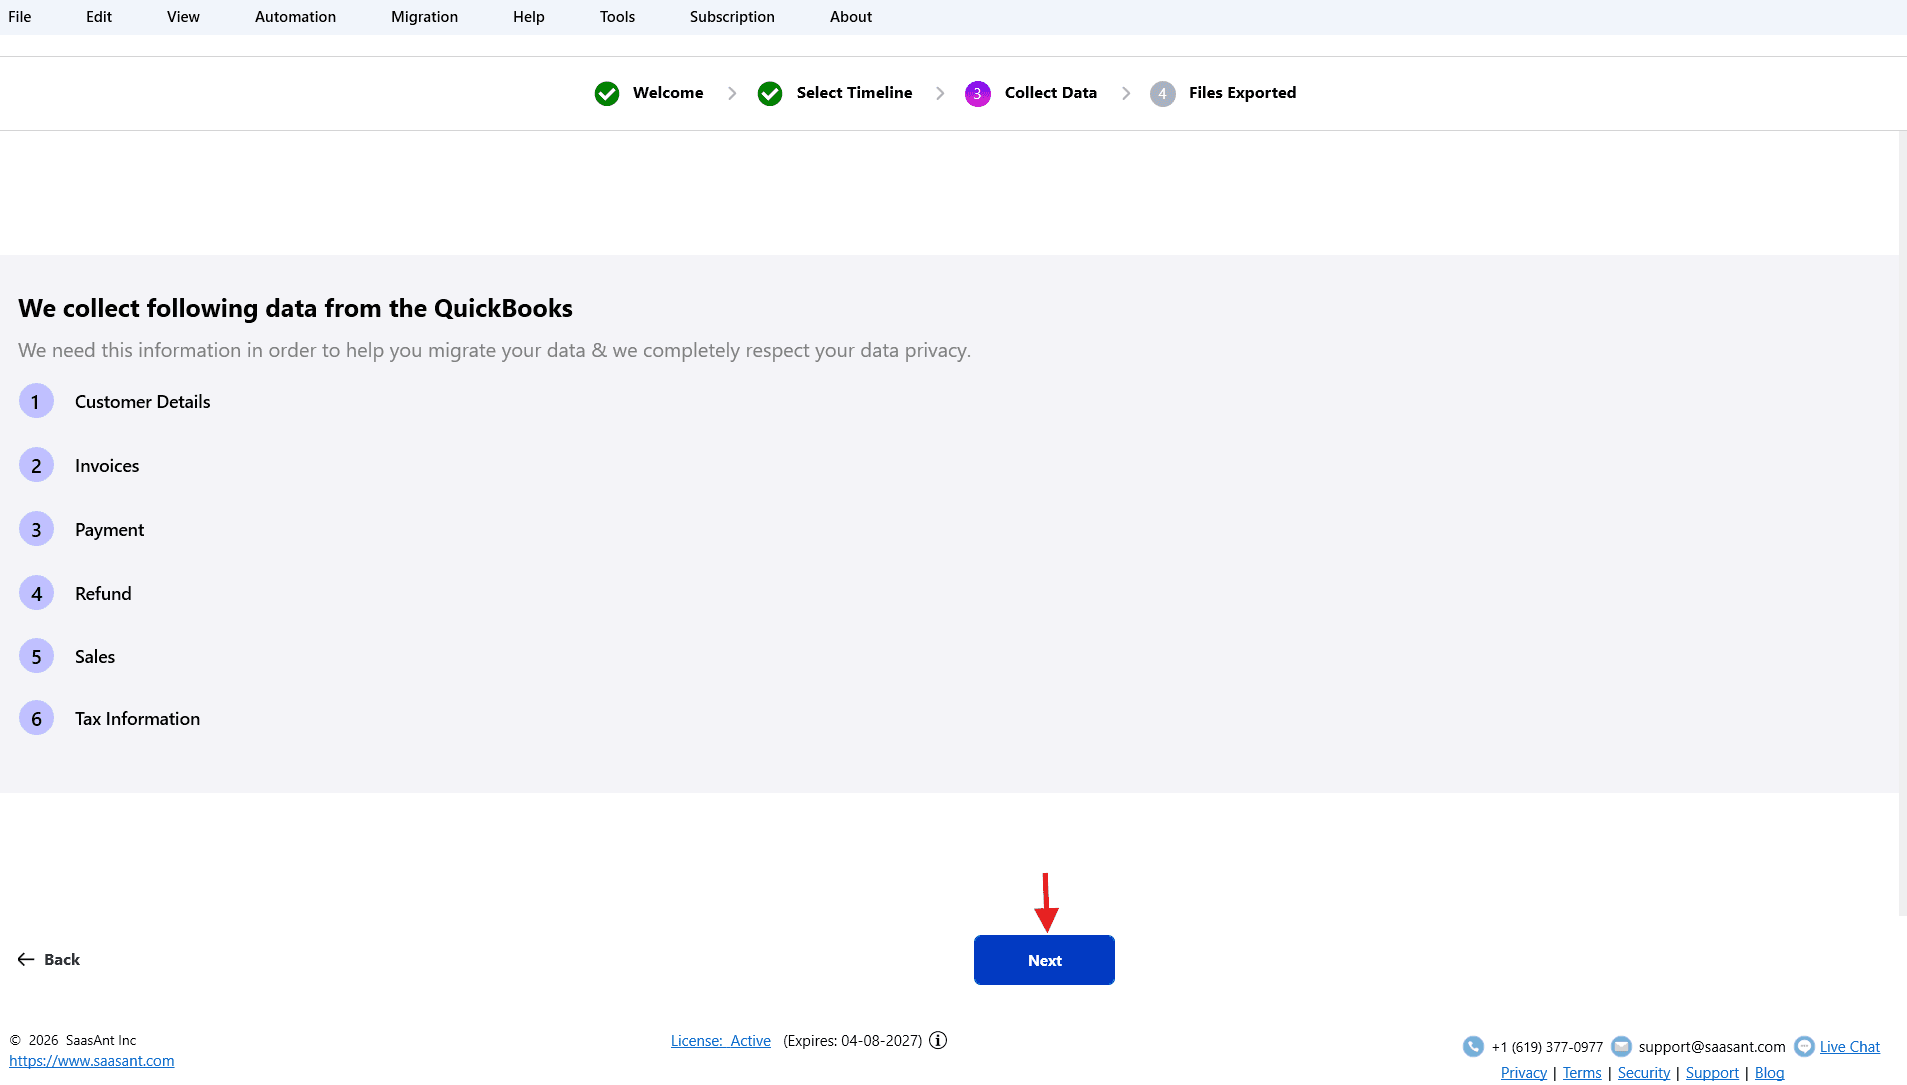
Review the information and click Next to continue.
The application will then display the conversion details showing how supported QuickBooks Desktop entities will be created in QuickBooks Online.
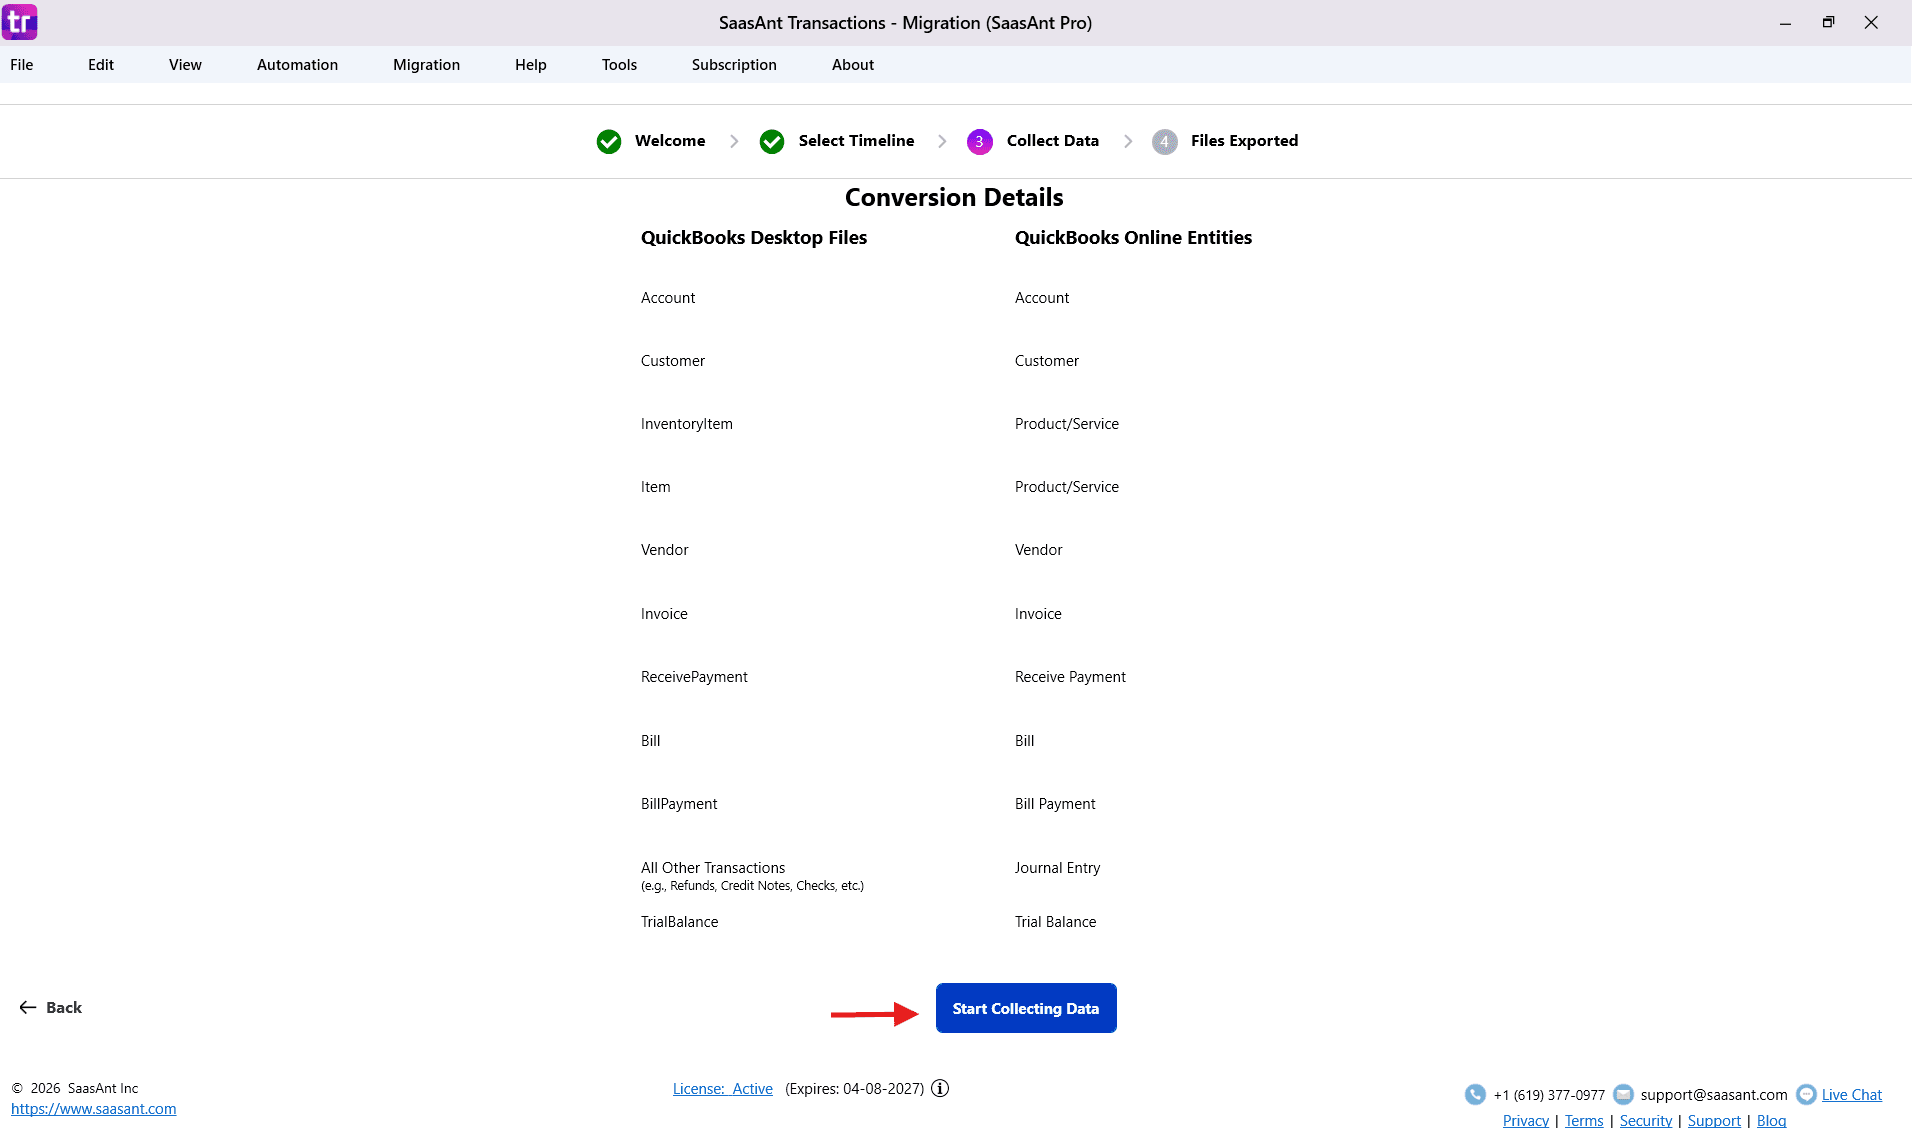
Review the conversion summary, and then click Start Collecting Data.
SaasAnt Transactions Desktop will begin collecting data from the QuickBooks Desktop company file and preparing the migration-ready Excel files.
Important: Keep QuickBooks Desktop, the company file, and SaasAnt Transactions Desktop open until the collection process is complete.
Step 4: Download the Migration Files
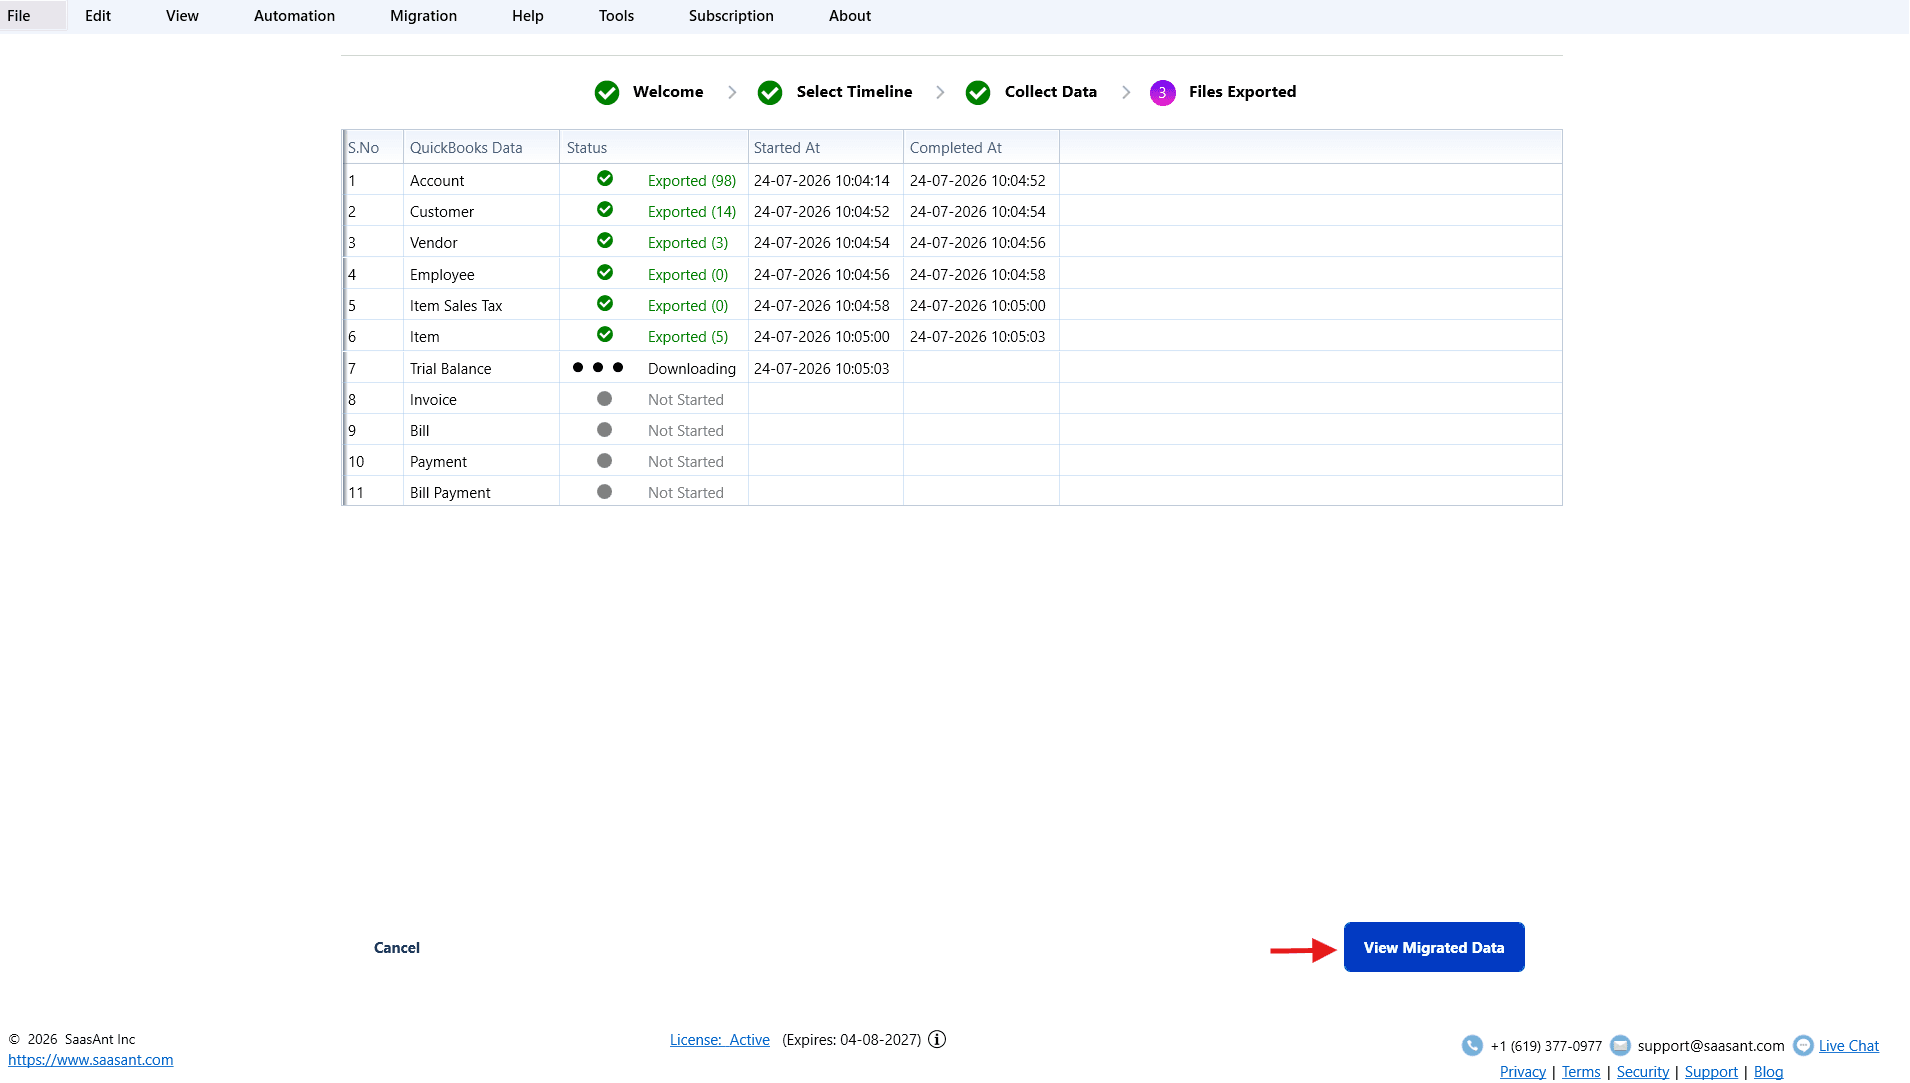
After the data collection process is completed successfully:
Click View Migrated Data.
Review the files generated for each supported entity.
Download or save the Excel files to a secure folder on your computer.
Confirm that all the expected files have been generated.
These files are now ready to be imported into QuickBooks Online using SaasAnt Transactions Online.
Keep an unchanged copy of the original migration files before making any corrections or adjustments.
Import the Migration Files into QuickBooks Online
Step 5: Connect the QuickBooks Online Company
Sign in to SaasAnt Transactions Online.
Connect the QuickBooks Online company into which the data must be imported.
Confirm that the correct QuickBooks Online company is connected.
Open the appropriate import option for the entity you are importing.
Upload the corresponding migration file generated by SaasAnt Transactions Desktop.
Review the field mapping.
Review the transaction data before importing.
Start the import.
Check the import summary after the process is complete.
Resolve failed records before moving to transactions that depend on those records.
Recommended Import Order
Importing the files in the correct order helps prevent missing customer, vendor, account, product, invoice, and bill reference errors.
Order | Entity or transaction | Why it should be imported in this order |
1 | Chart of Accounts | Accounts are required by most transactions and form the accounting structure of the QuickBooks Online company. |
2 | Customers | Customers must exist before importing customer transactions such as Invoices and Receive Payments. |
3 | Vendors | Vendors must exist before importing Bills and Bill Payments. |
4 | Products and Services | Products and services must exist before importing sales or purchase transactions that reference them. |
5 | Invoices | Invoices create the customer Accounts Receivable balances needed for Receive Payments. |
6 | Receive Payments | Receive Payments can be applied only after the related invoices have been imported. |
7 | Bills | Bills create the vendor Accounts Payable balances needed for Bill Payments. |
8 | Bill Payments | Bill Payments can be applied only after the related bills have been imported. |
9 | Journal Entries | Journal Entries include supported transactions converted from QuickBooks Desktop when no direct QuickBooks Online import entity is available. |
10 | Trial Balance | Use the Trial Balance at the end of the process to review and validate the migrated financial balances. |
Important: Review the import summary after every file. Do not continue with a dependent file until errors in the previous import have been resolved.
For example, resolve Customer import errors before importing Invoices, and resolve Invoice import errors before importing Receive Payments.
Best Practices
Create a backup of the QuickBooks Desktop company file before starting.
Use the latest version of SaasAnt Transactions Desktop.
Open the company file as the QuickBooks Administrator.
Keep the company file in Single-user Mode during data collection.
Confirm the source and destination company names before proceeding.
Use a folder dedicated to the migration files.
Keep an unchanged copy of every exported file.
Import lists before importing transactions.
Import Invoices before Receive Payments.
Import Bills before Bill Payments.
Review each import summary before proceeding.
Resolve failed records before importing dependent transactions.
Compare QuickBooks Desktop and QuickBooks Online reports after the migration.
Avoid entering new transactions in both company files during the migration and validation period.
Troubleshooting
Unable to Connect to QuickBooks Desktop
Possible cause:
The company file is not open with Administrator access, or it is not in Single-user Mode.
Resolution:
Close SaasAnt Transactions Desktop.
Open the correct QuickBooks Desktop company file.
Sign in as the Administrator.
Switch the company file to Single-user Mode.
Reopen SaasAnt Transactions Desktop.
Start the migration again.
Incorrect Source Company Is Displayed
Possible cause:
A different company file is currently open in QuickBooks Desktop.
Resolution:
Close the incorrect QuickBooks Desktop company file.
Open the company file you want to migrate.
Confirm the company name in QuickBooks Desktop.
Return to the Migration section in SaasAnt Transactions Desktop.
Data Collection Failed
Possible cause:
The collection process was interrupted, QuickBooks Desktop was closed, or the company file became unavailable.
Resolution:
Confirm that the QuickBooks Desktop company file is still open.
Make sure it remains in Single-user Mode.
Confirm that you are signed in as the Administrator.
Keep QuickBooks Desktop and SaasAnt Transactions Desktop open.
Restart the migration process.
Some Migration Files Were Not Generated
Possible cause:
There may be no supported records for that entity within the selected migration period, or the data collection process may not have completed successfully.
Resolution:
Confirm the migration Start Date and End Date.
Check whether records exist for that entity in the selected period.
Review the data collection result.
Restart the migration if the collection was interrupted.
Unable to Import Files into QuickBooks Online
Possible cause:
The QuickBooks Online company is not connected, the wrong company is connected, or the SaasAnt Transactions Online subscription is inactive.
Resolution:
Sign in to SaasAnt Transactions Online.
Verify the connected QuickBooks Online company.
Confirm that the SaasAnt Transactions Online subscription is active.
Reopen the appropriate import screen.
Upload the correct migration file and retry the import.
Missing Customer, Vendor, Account, or Product Errors
Possible cause:
A transaction file was imported before the list records referenced by that transaction.
Resolution:
Import the required list file first:
Import Customers before Invoices.
Import Vendors before Bills.
Import the Chart of Accounts before transactions.
Import Products and Services before sales and purchase transactions.
Import Invoices before Received Payments.
Import Bills before Bill Payments.
After importing the missing records, retry the failed transaction import.
Import Errors
When records fail during an import:
Open the import summary in SaasAnt Transactions Online.
Review the failed records.
Read the error message shown for each record.
Correct the affected data or missing reference.
Re-upload only the corrected records where appropriate.
Confirm that the corrected records were imported successfully before continuing.
Avoid importing the complete file again without checking whether the successful records have already been added to QuickBooks Online.
Migrated Balances Do Not Match
Possible causes:
Some records failed during import.
A migration file was skipped.
The files were imported in the wrong order.
A file was imported more than once.
Reports use different dates or accounting methods.
Some Desktop transactions were converted into Journal Entries.
Opening balances or Trial Balance values were entered more than once.
Resolution:
Compare the import summaries with the source record counts.
Check for failed or skipped records.
Confirm that no file was imported twice.
Run reports using the same date range.
Use the same Cash or Accrual accounting method in both companies.
Review converted Journal Entries.
Compare Accounts Receivable, Accounts Payable, bank balances, and the Trial Balance separately.
Important Notes
SaasAnt uses Excel files as the intermediate format for this migration.
The migration is not a direct company-to-company transfer.
The exported files must be imported using SaasAnt Transactions Online.
QuickBooks Desktop Inventory Items and Items are created as Products/Services in QuickBooks Online.
Some transactions without a matching QuickBooks Online import entity are converted into Journal Entries.
Converted Journal Entries preserve the accounting values but not the original transaction form or workflow.
Review every migration file and import summary carefully.
Supported entities and conversion behaviour may change with product updates.
Contact SaasAnt Support when an exported entity, converted transaction, or financial balance requires additional review.