Import the transactions into QuickBooks Online using SaasAnt Transactions Online
August 19, 2025
Learn how to import your transactions using our app SaasAnt Transactions for Quickbooks Online into your Quickbooks.
SaasAnt Transaction Online lets you import your bulk data into your QuickBooks Online. This article will help you to see how our app is performing in importing data. Here are the steps on how you do it.
Video tutorial for Import CSV into QuickBooks Online using SaasAnt Transactions Online:
Video tutorial for Import Excel into QuickBooks Online using SaasAnt Transactions Online:
Steps to Import Transactions into QuickBooks Online Using SaasAnt Transactions Online
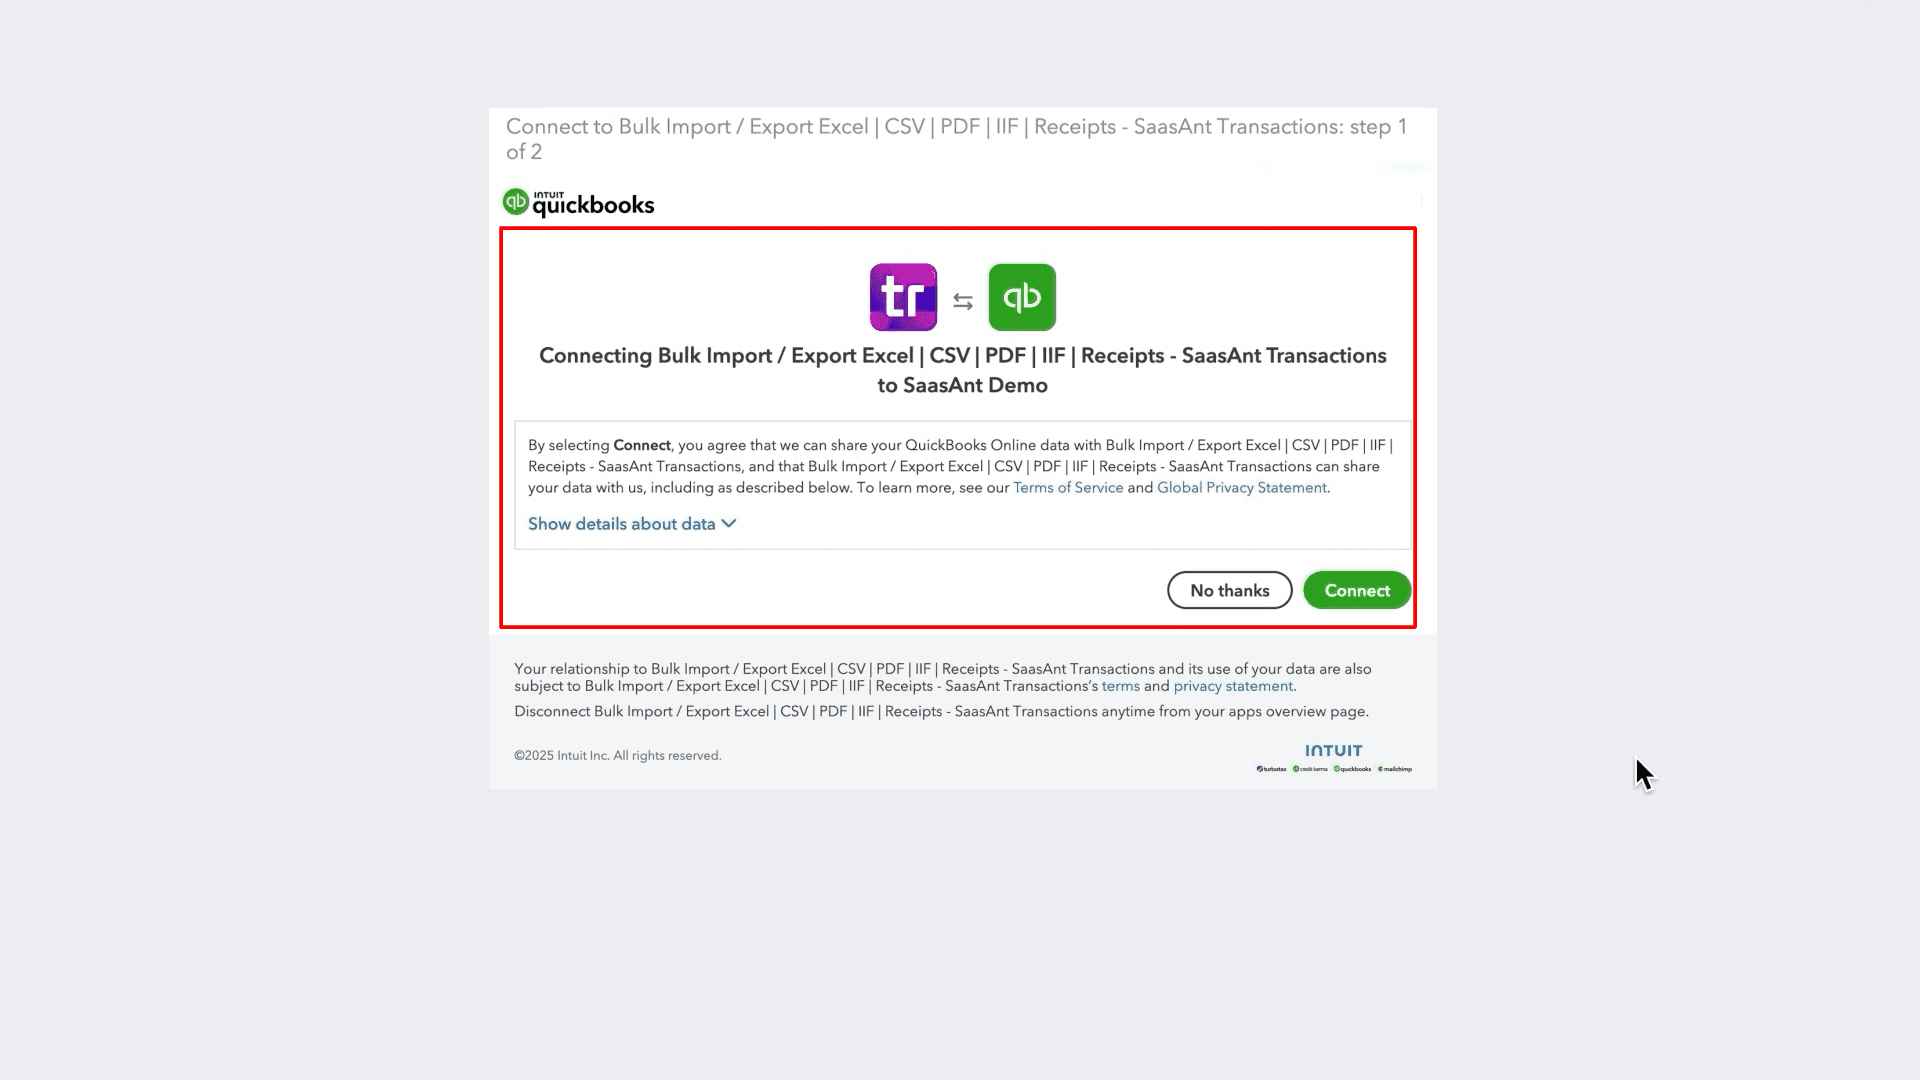
Step 1: Connect SaasAnt Transactions with your QuickBooks Online
Step 2: Select the Bulk Upload and choose the transactions you want to import.
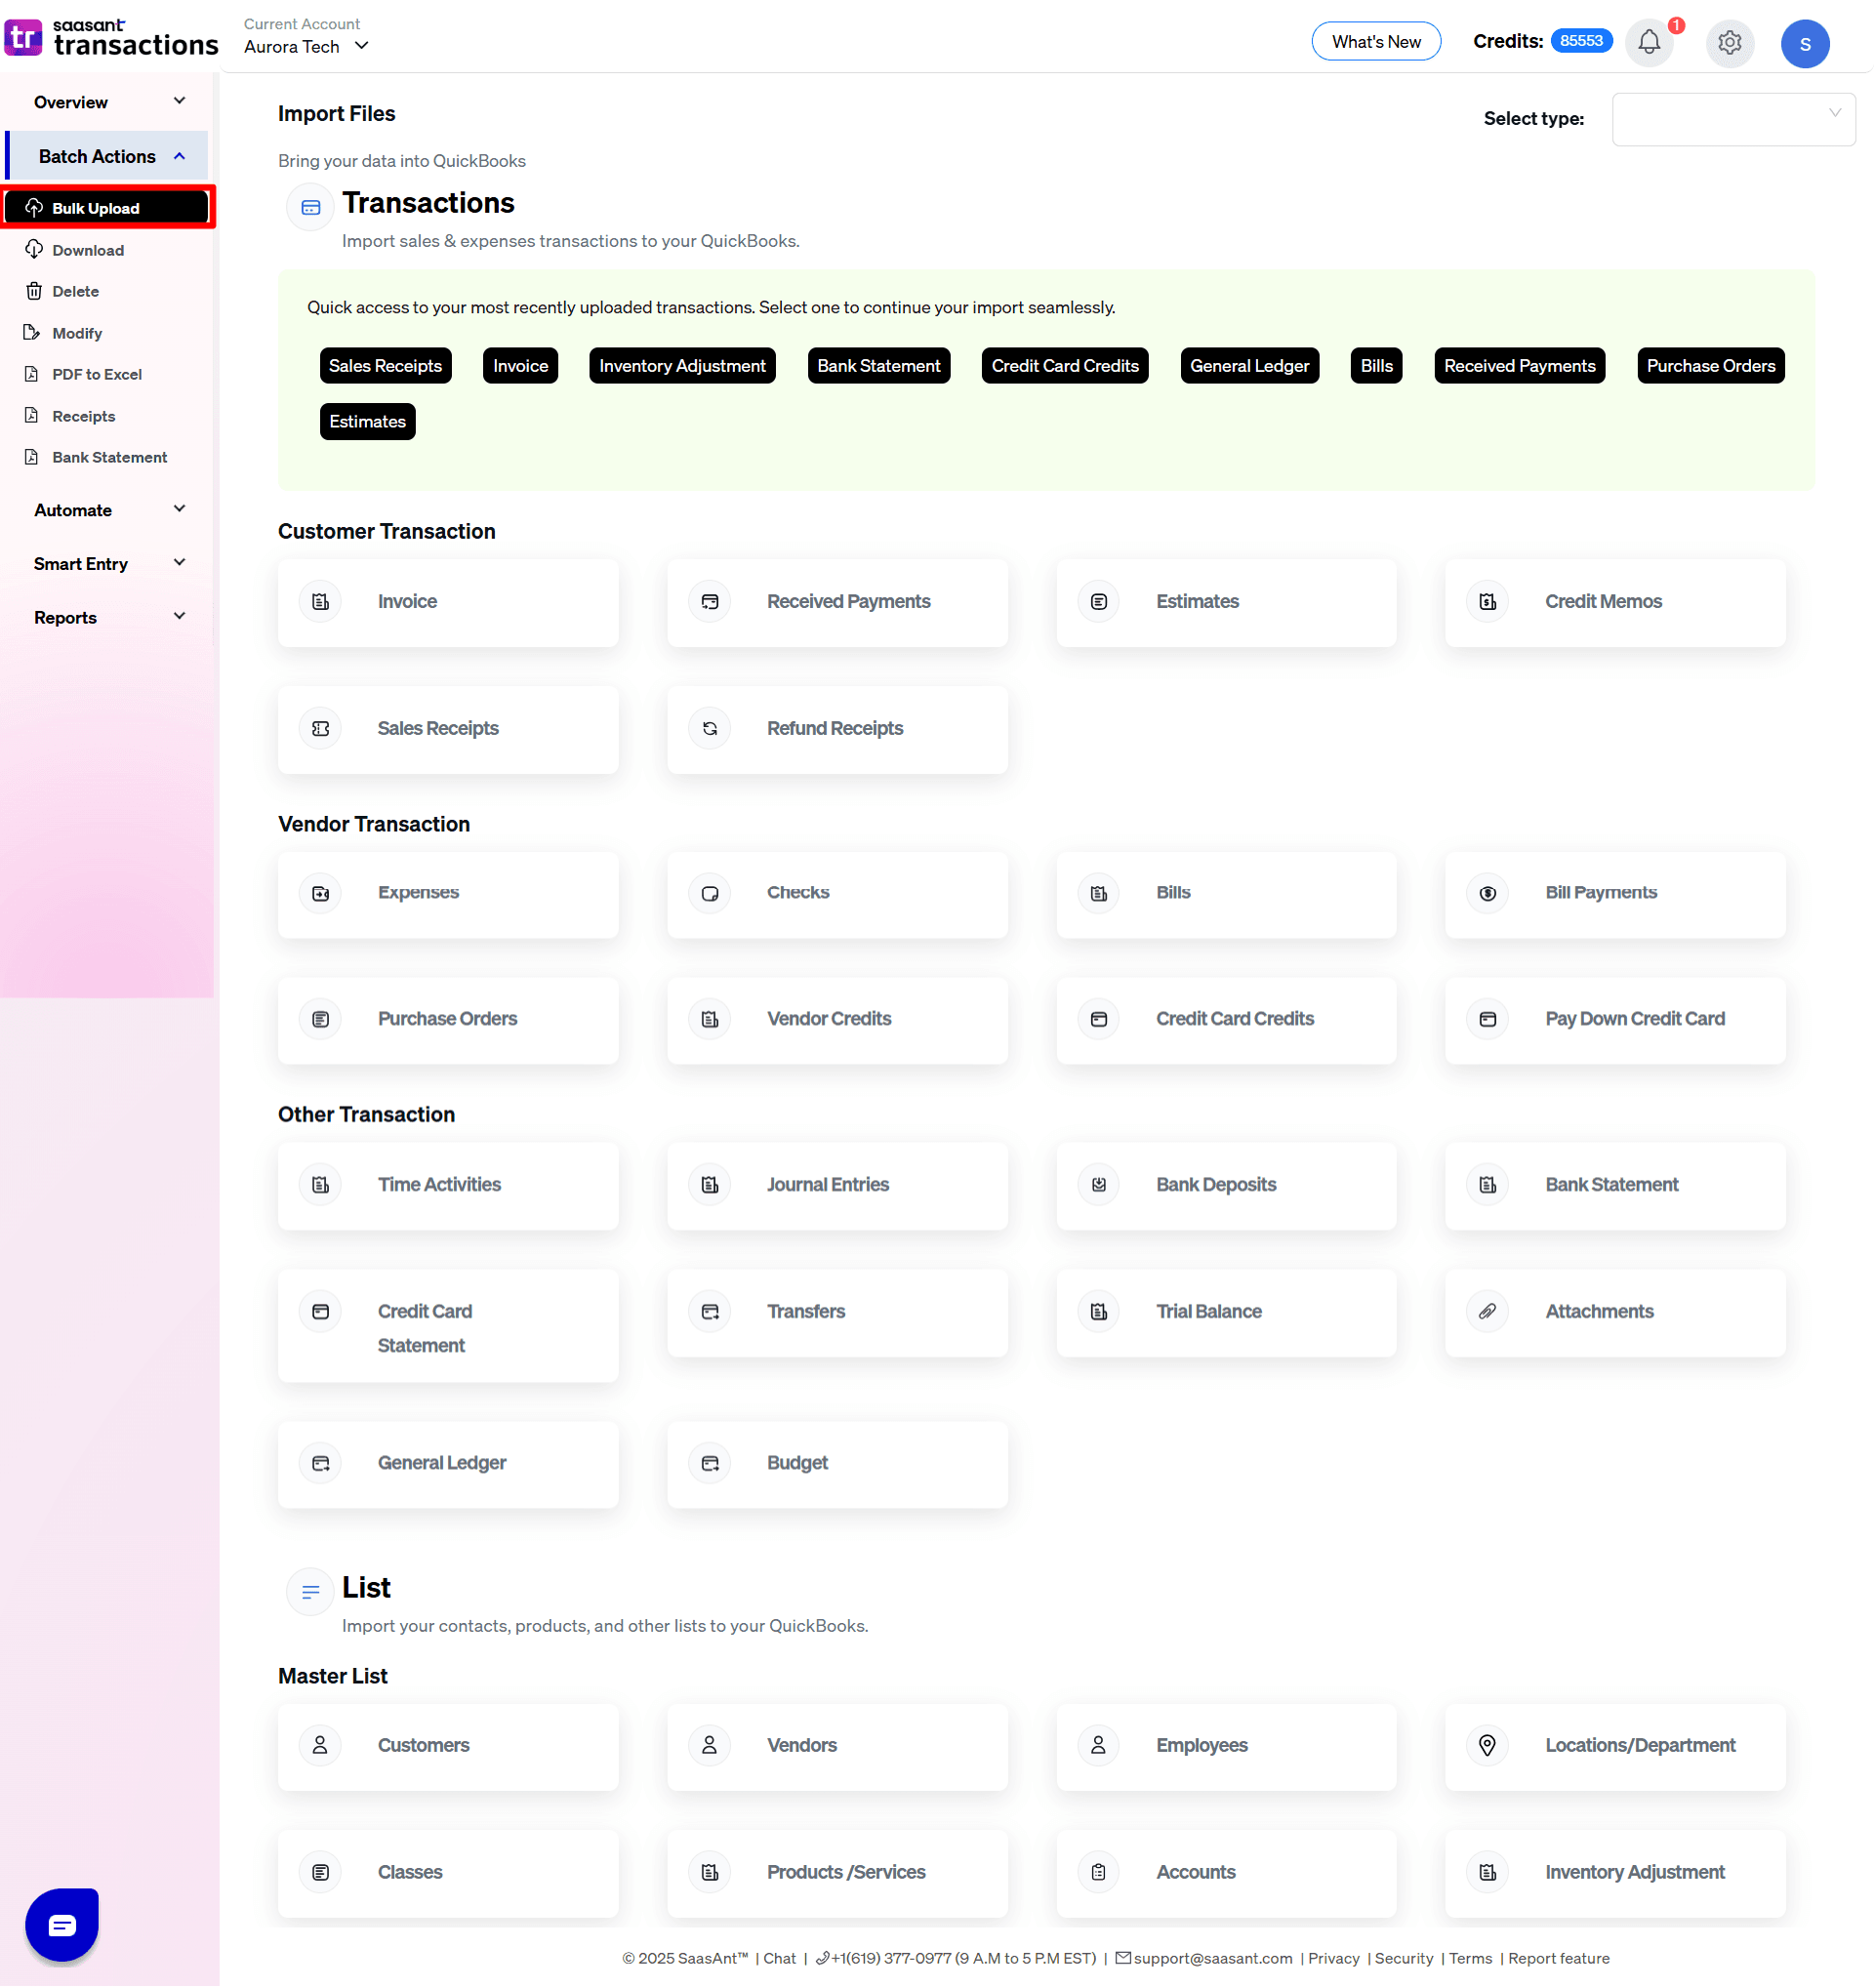
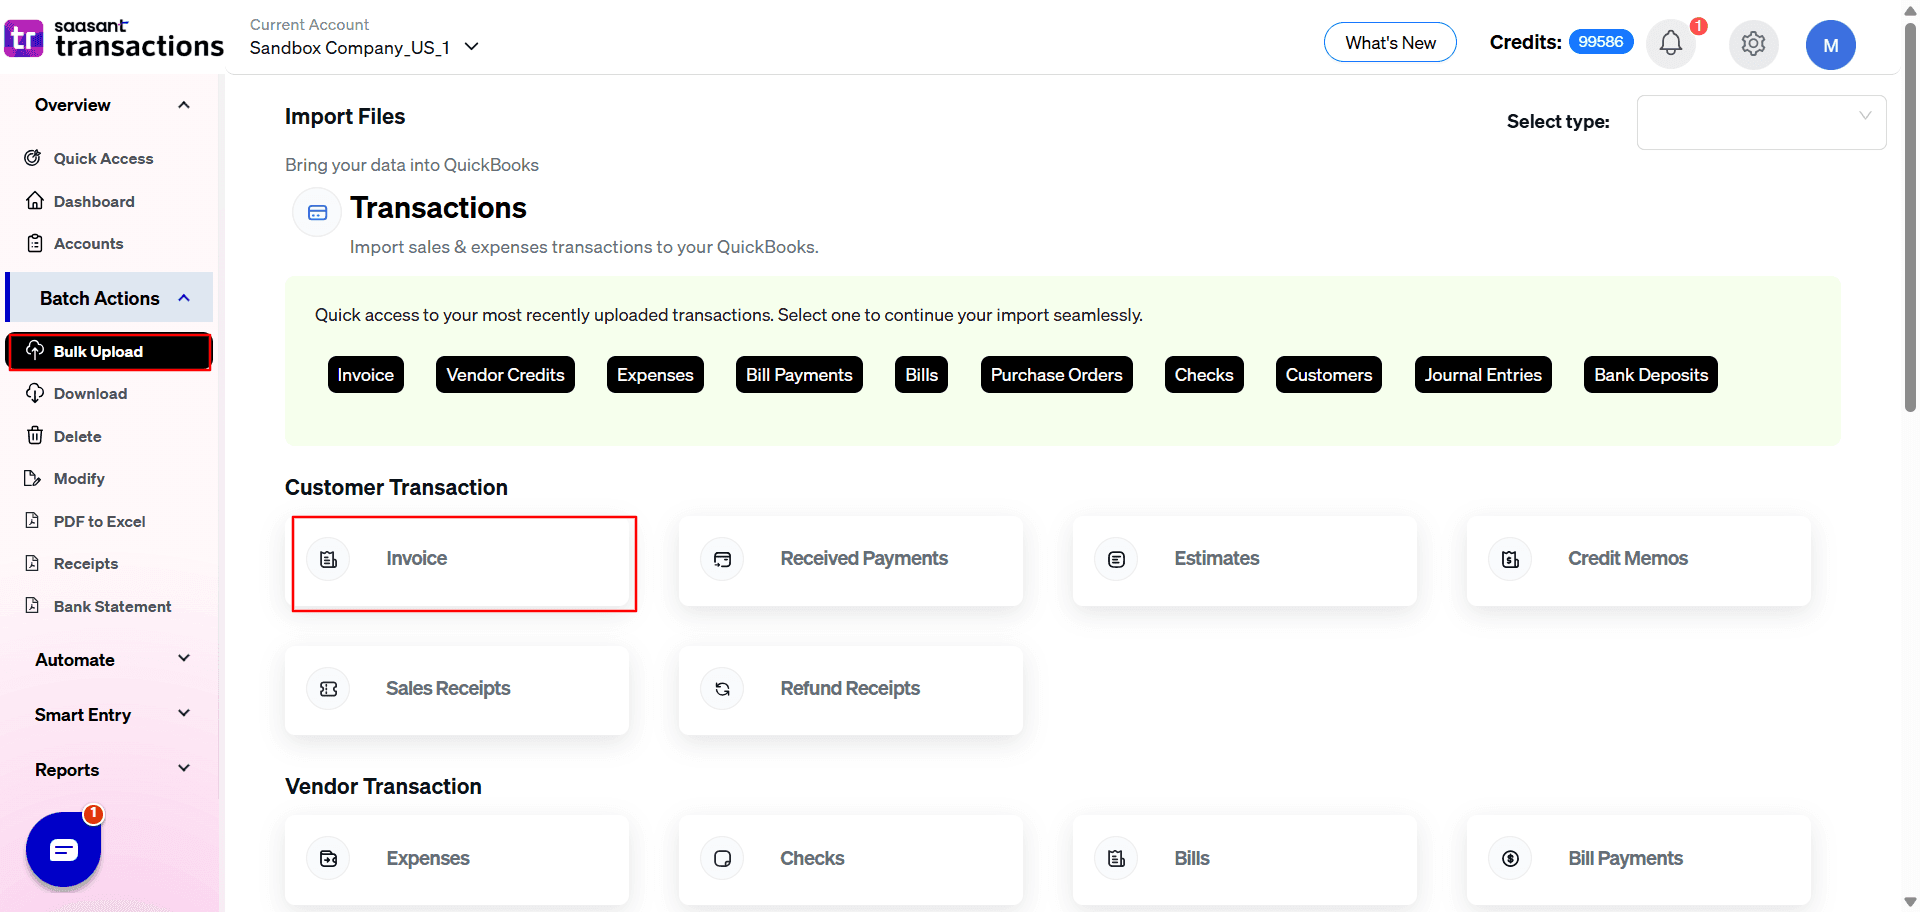
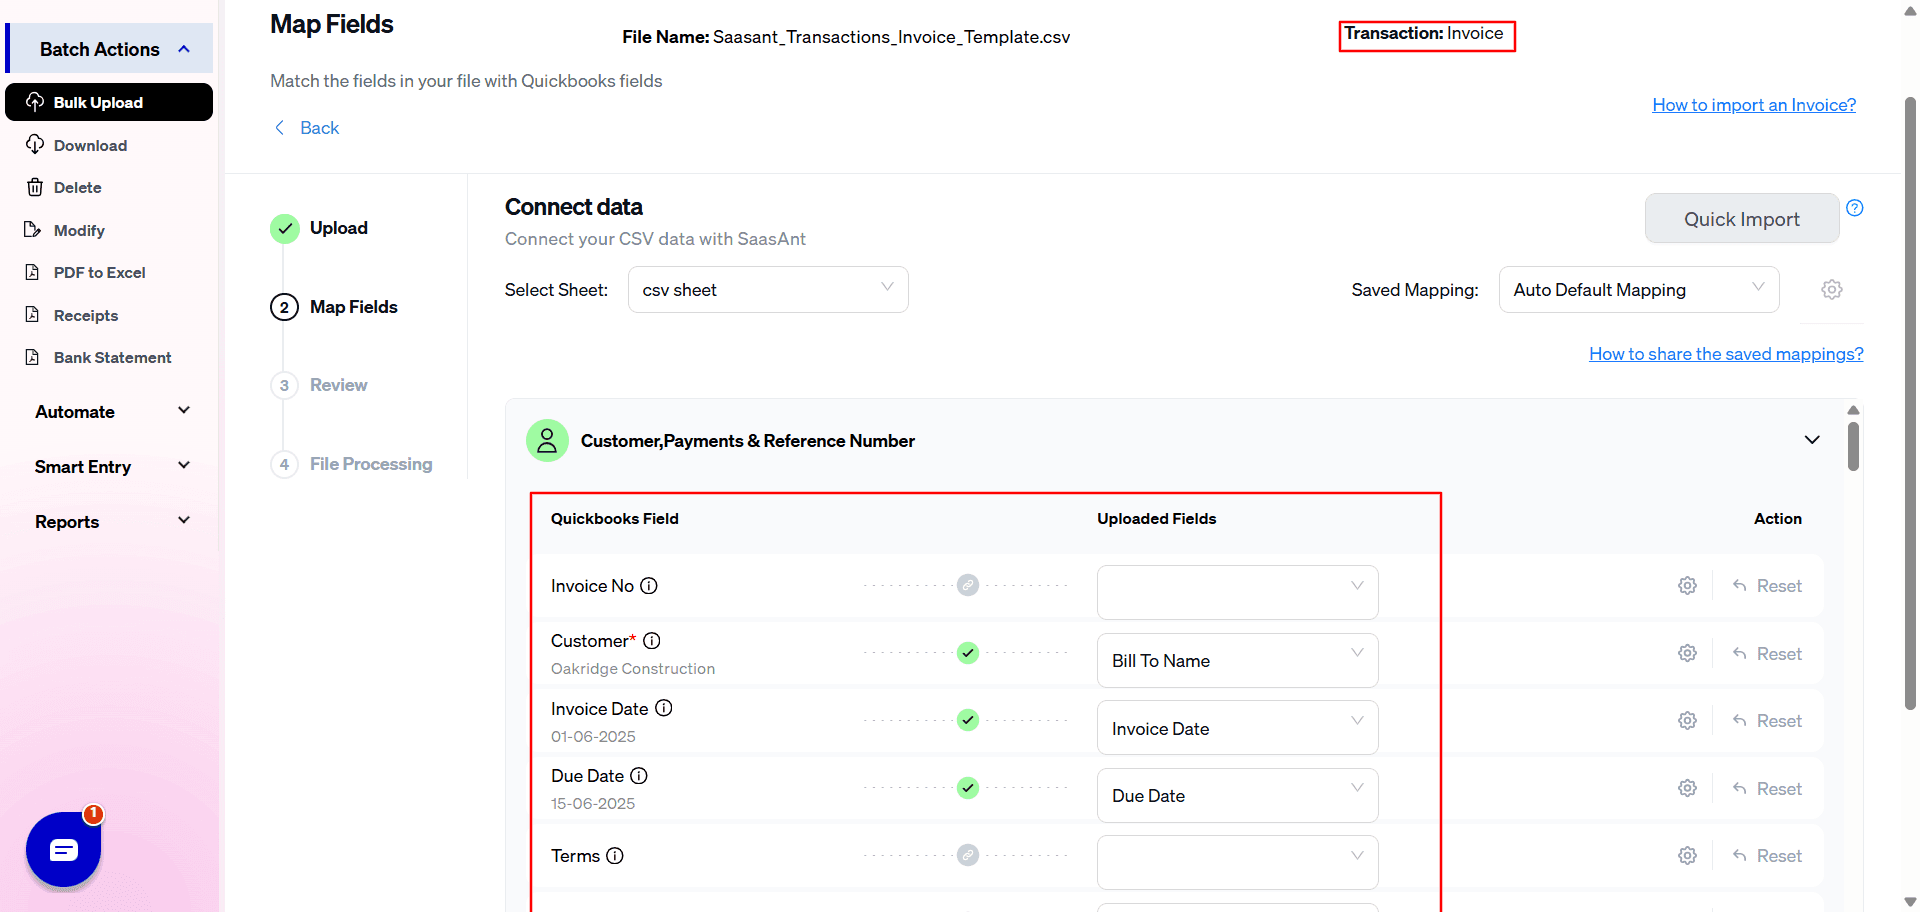
The example chosen here is "Invoices."
SaasAnt Transactions (Online) supports the following Lists & Transaction Types in QuickBooks Online.
Customer Transactions:
Invoice
Receive Payment
Estimate
Credit Memo
Sales Receipt
Refund Receipt
Vendor Transactions:
Expense
Check
Bill
Bill Payment
Purchase Order
Vendor Credit
Credit Card Credit
Pay Down Credit Card
Lists:
Customer
Vendor
Employee
Location
Product / Service
Chart of Accounts
Other Transactions
Time Activity
Credit Card Statements
Bank Statements
General Ledger
Trial Balance
Budget
Inventory Adjusstments
Journal Entry
Deposit
Transfer
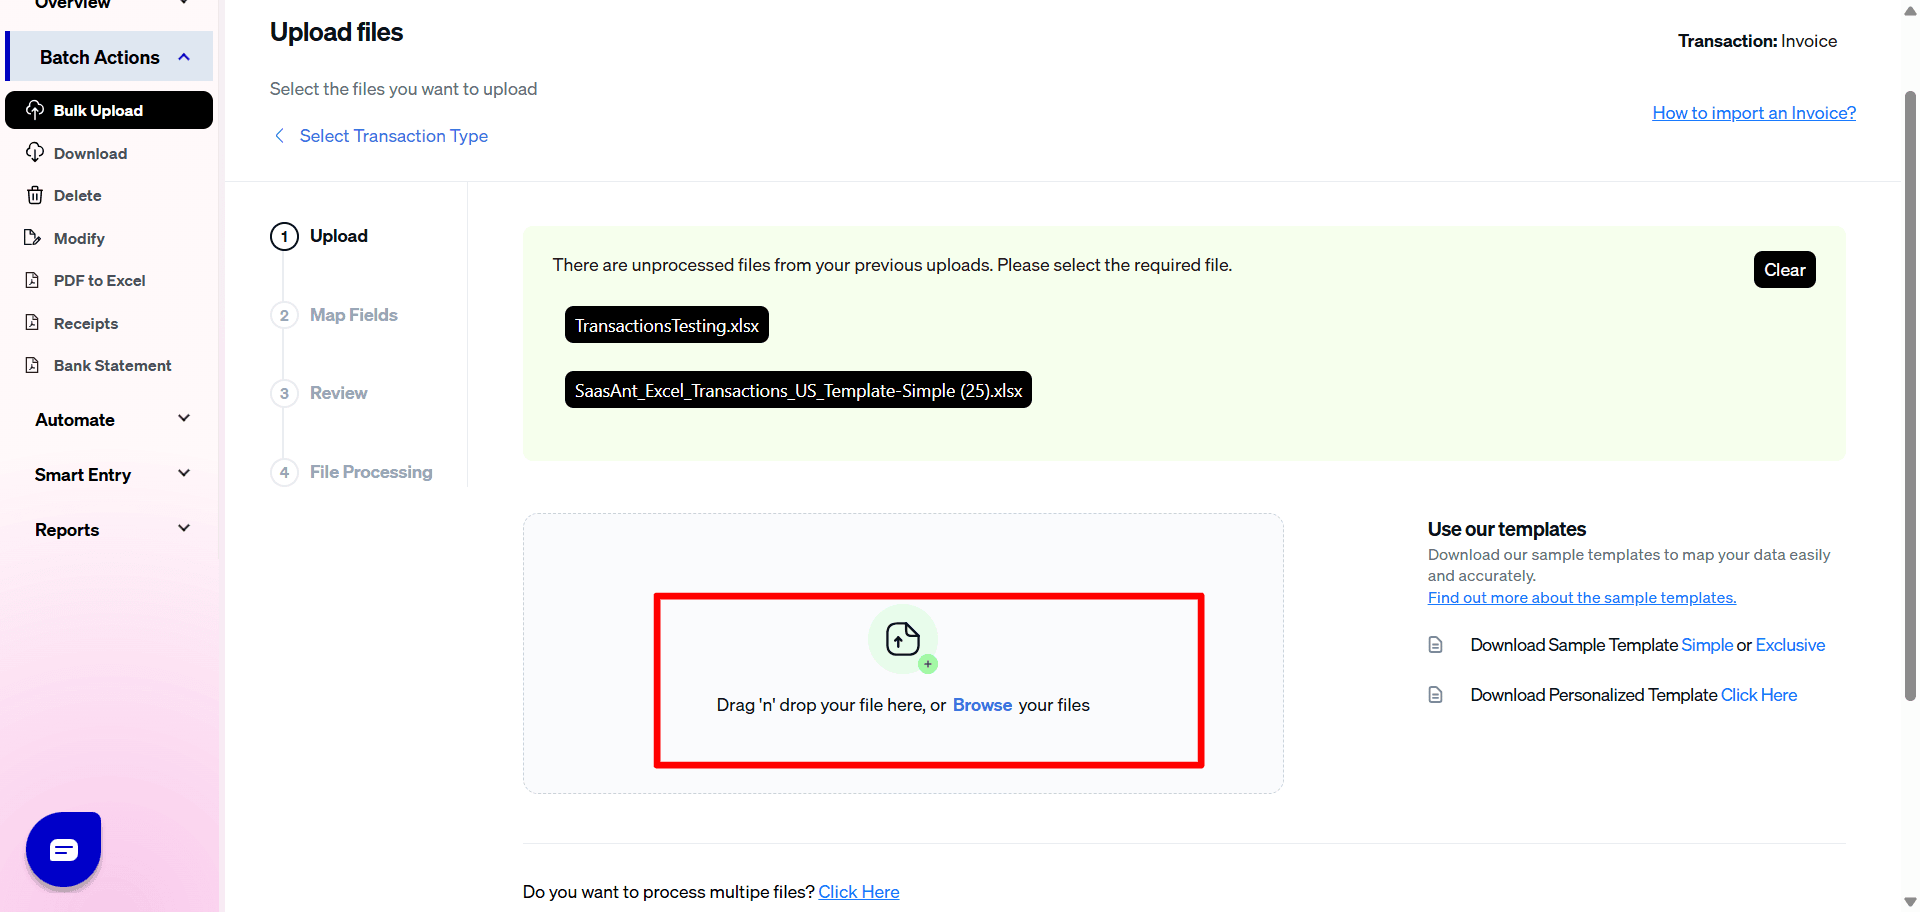
Step 3: Select the file to upload
Step 4: Map the fields with your QuickBooks fields.
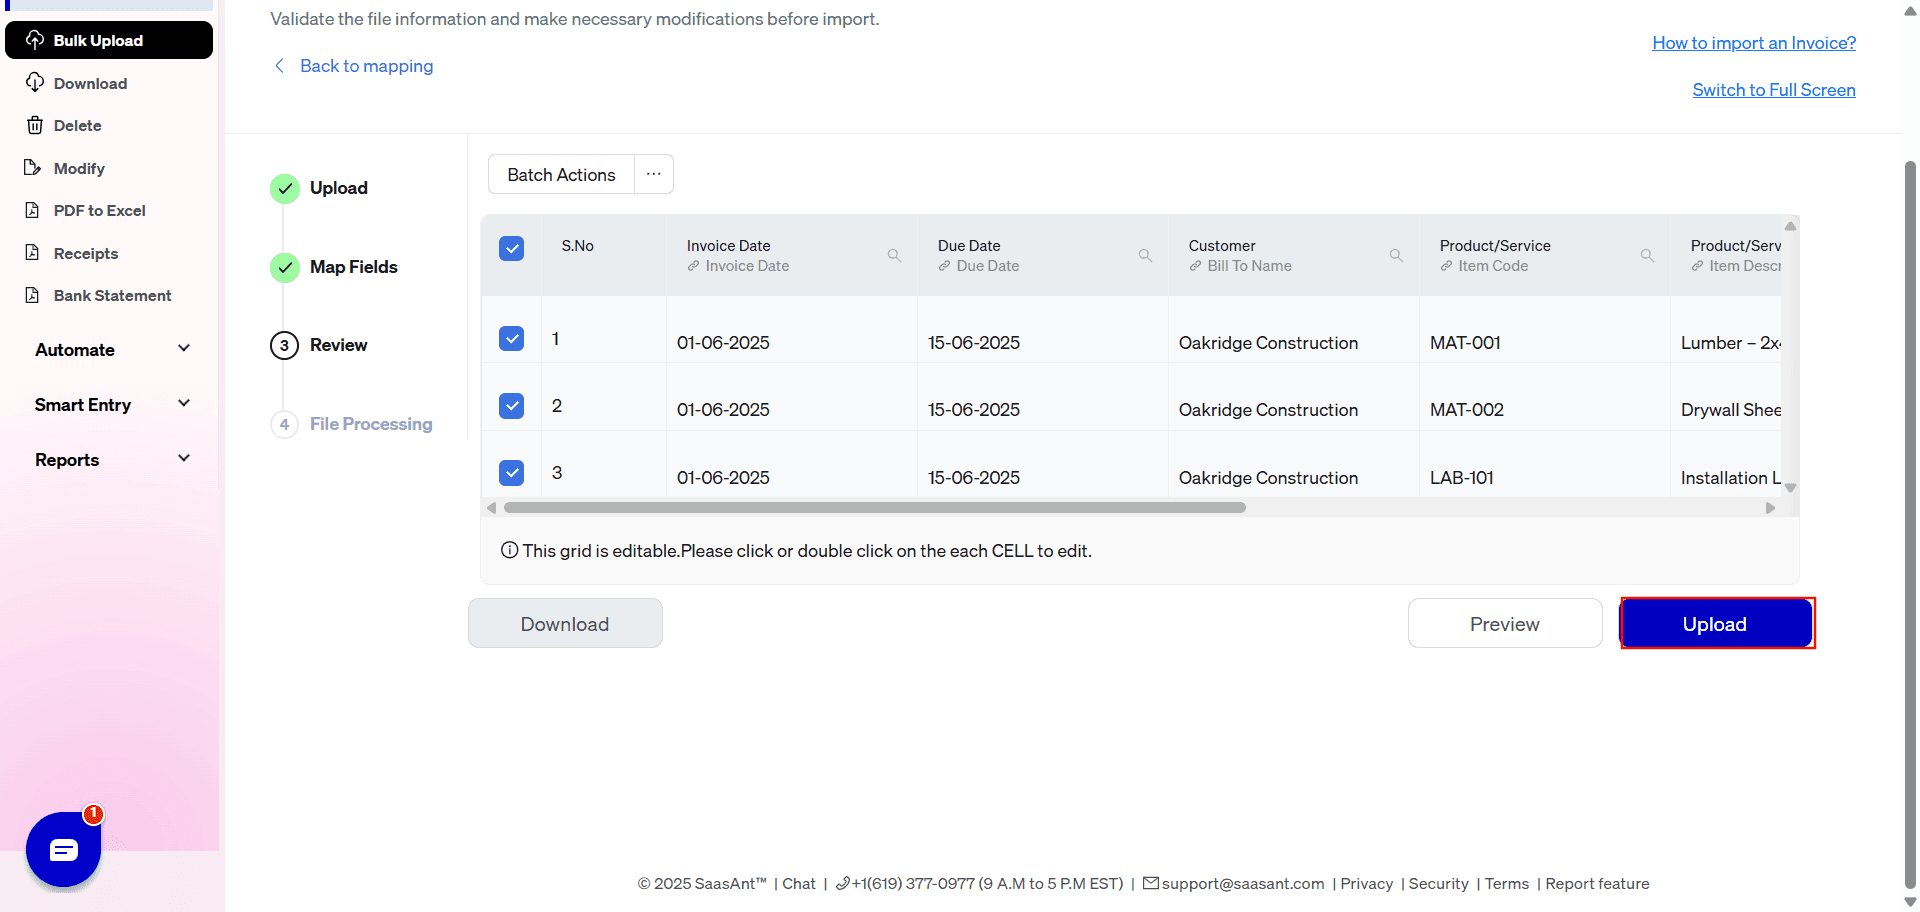
Step 5: Review data before import
Step 6: Upload the data
Step 7: Successful Upload Notification Displayed.
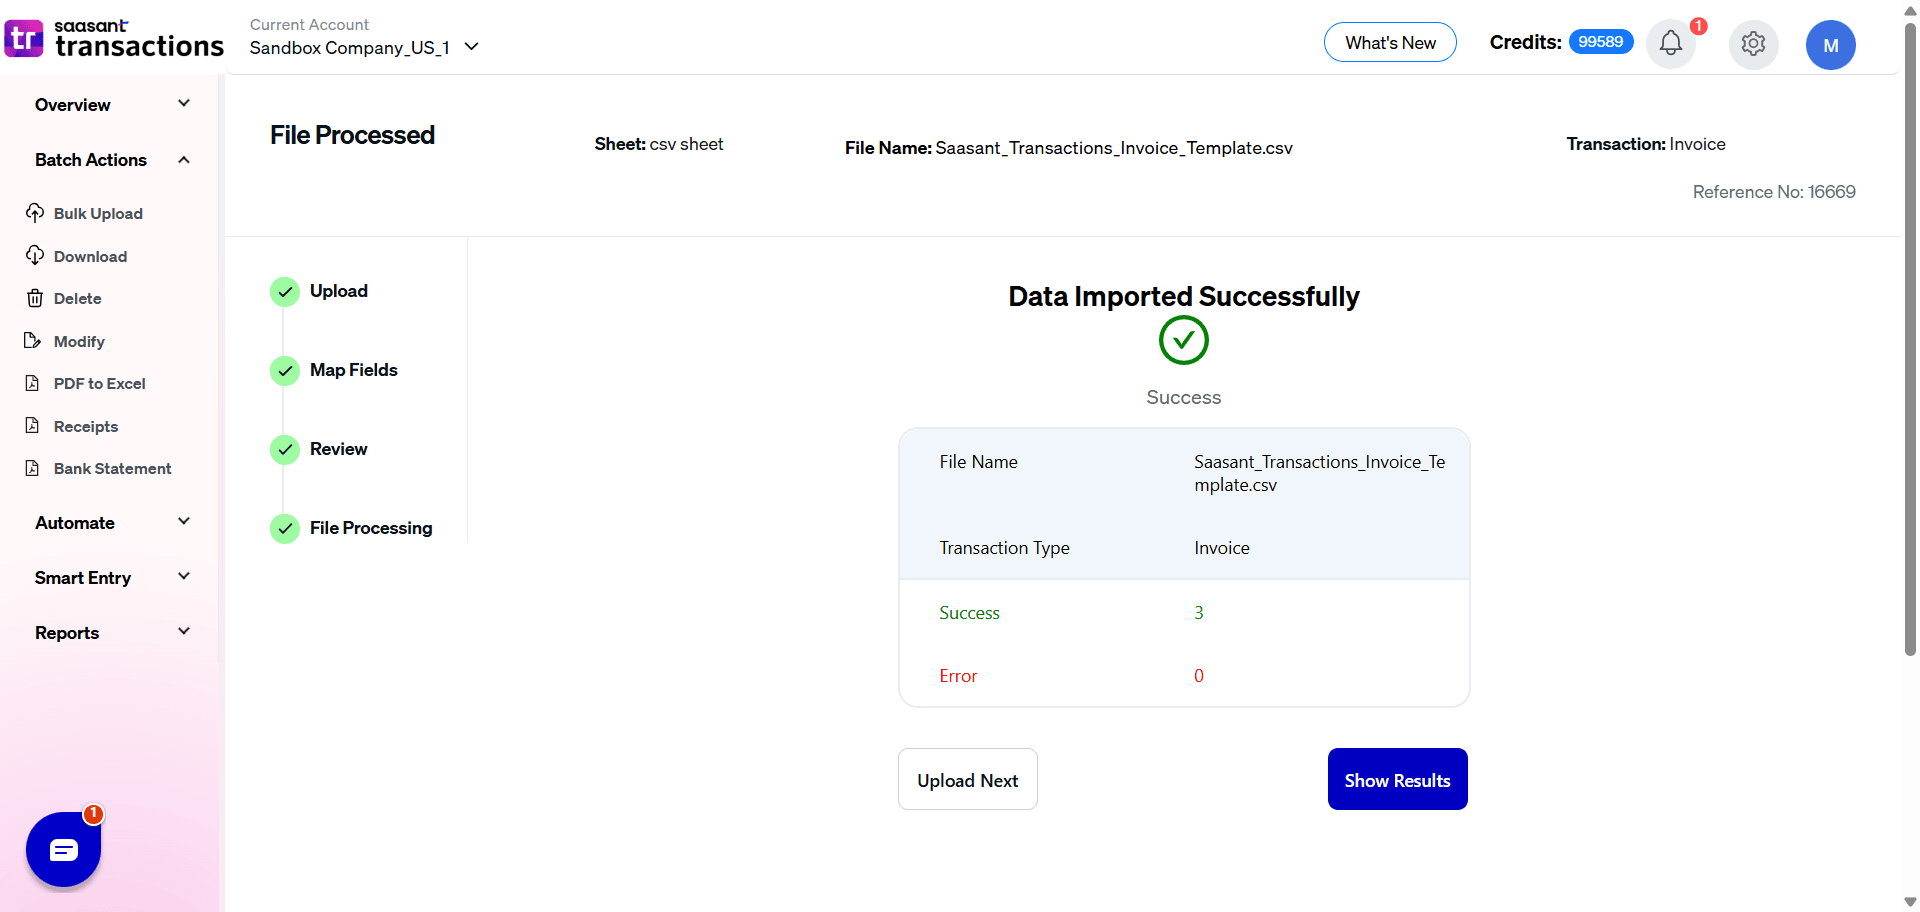
You will receive a notification to confirm the successful upload of your transactions that can be checked in your connected QuickBooks Online Account.
General Settings Reference Guide
The General Settings panel controls the master automation behavior, global date structures, and email notification rules across all data types before any transaction-specific rules are applied.
Master Automation Rules
Do you want to apply suggestions automatically?
What it does: Imports data using default fallback values and displays a warning if minor data mismatches occur. This setting will also automatically generate missing customers or products.
Do you want to create Customers, Vendors, Locations, Classes, and Accounts automatically?
What it does: Automatically creates missing entity profiles (Accounts, Vendors, Customers, Products/Services, Classes, and Locations) in your QuickBooks account on the fly to prevent validation failures.
Do you want to skip the mapping screen?
What it does: Bypasses Step 2 completely during the import process. This is useful when you have predefined mappings and want to streamline your workflow.
Formatting & System Notifications
Date Format
What it does: Selects the date format (supporting - or / separators) that exactly matches your upload file to prevent processing confusion (e.g., choose MM/DD/YYYY if your file reads 12/31/2023).
Do you want to receive alerts/notifications about your manual imports?
What it does: Sends an email summary of your manual imports showing how many transactions succeeded, how many failed, and why—helping you quickly verify data and fix errors.
Do you want to receive alerts/notifications about your automation imports?
What it does: Sends an email summary of your background, automated imports outlining successful and failed counts alongside specific error explanations for quick troubleshooting.
Transactions Settings Reference Guide
The Transactions settings panel controls how SaasAnt manages transaction numbers, multi-line grouping, duplicates, and text data constraints before sending them to QuickBooks.
Reference Numbers & Grouping Rules
Do you want to use the Transaction Reference Numbers from the uploaded file?
What it does: Forces QuickBooks to use the exact document numbers (like Invoice No, Bill No, or PO No) from your spreadsheet instead of its own auto-generated sequence.
Do you want to auto generate Transaction Numbers If Missing in File?
What it does: Automatically creates and assigns sequential numbers if your file lacks necessary transaction numbers. (QuickBooks strictly requires a transaction number for all records).
Do you want to process the transactions with Duplicate Reference Numbers?
What it does: Allows you to import transactions even if they share the same reference number as an entry already inside QuickBooks.
Take note: This can slow down import speeds; use this option only when duplicate numbers are essential for your accounting workflow.
Do you want to Import each Line as a Separate Transaction?
What it does: Treats every single row in your spreadsheet as an entirely unique, standalone transaction in QuickBooks rather than grouping identical document numbers together.
Data Handling & Text Correction
Convert Negative Amounts to Positive
What it does: Automatically flips negative numerical amounts to positive values.
Take note: QuickBooks generally requires positive amounts. For Expenses and Checks, SaasAnt will convert them safely, but it is always recommended to ensure your raw file values are positive before uploading.
Truncate Text If It Exceeds QuickBooks Limits
What it does: Automatically shortens lengthy text fields that surpass QuickBooks' strict character limits (applies to Addresses, Notes, Memos, Sales Descriptions, and Expenses) to prevent character-limit rejection errors.
Do you want to disable the optimisation for the batch import?
What it does: Disables high-speed parallel bundling, forcing a slower line-by-line verification process. This is ideal when importing and verifying complex data like inventory items in bulk.
Validation Settings Reference Guide
The Validation settings panel provides safety controls to catch financial discrepancies and filter out unnecessary line entries before your file uploads to QuickBooks.
Data Validation & Error Handling
Do you want to stop the import if the payment due amount mismatches?
What it does: Triggers an error message and stops the import if the monetary value in a Received Payment or a Bill Payment fails to match the original total in its corresponding Invoice or Bill.
Take note: This commonly catches issues caused by entering an incorrect amount or attempting to map an uneven partial payment. You can clear the error by adjusting your file to match the exact invoice or bill balance.
Do you want to skip the transaction lines with zero amount?
What it does: Automatically ignores and filters out individual spreadsheet rows that have a value of zero during processing, ensuring your QuickBooks registers aren't cluttered with empty line items.
Customers Settings Reference Guide
The Customers settings panel configures how SaasAnt handles customer matching logic, address updates, and automated customer communications during your imports.
Customer Identification & Matching
Find Customer by Tax Resale No / Exemption details.
What it does: Instructs SaasAnt to use the "Tax Resale No." value saved inside your QuickBooks account to locate and match the correct customer from your uploaded file.
Would you like to match the names exactly as they appear in your file for customers, vendors, and items?
What it does: Forces a strict text match. SaasAnt will identify your customers using the exact names found in your file, completely ignoring variations like extra spaces, case sensitivity, trailing numbers, or special characters.
Updates & Communications
Do you want to Update the address (Customer & Vendor) in QuickBooks from the file?
What it does: Overwrites the existing billing or shipping addresses currently saved in your QuickBooks customer profiles with the new address data provided in your upload file.
Do you want to send invoice emails to your customers after the invoice import automatically?
What it does: Triggers QuickBooks' native email system to immediately blast out the newly created or updated invoices to their respective customer email addresses right after the import finishes.
Take note: Leave this option turned off if you prefer to review your invoices first and email them manually at a later time.
Vendors Settings Reference Guide
The Vendors settings panel configures how SaasAnt maps and identifies supplier profiles during your purchase, expense, or bill imports.
Vendor Identification & Matching
Do you want to identify the vendor based on their Account Number?
What it does: Allows SaasAnt Transactions to use the specific vendor account number saved inside your QuickBooks account to correctly identify and match the vendors listed in your uploaded file.
Take note: This is highly useful if your import file repeats the same vendor multiple times across different rows or transactions and you need to ensure they route to the exact profile.
Products / Services Settings Reference Guide
The Products / Services settings panel controls how inventory, non-inventory, and service items are identified, how missing descriptions are handled, and how new item profiles are built on the fly.
Product Identification & Data Mapping
Do you want to identify product details from SKU information?
What it does: Instructs SaasAnt to match and identify the line items in your upload file using the SKU field inside QuickBooks rather than matching by Item Name.
Do you want to apply sales and expense descriptions derived from products/services settings in QuickBooks?
What it does: If enabled, SaasAnt Transactions will automatically pull and apply the default sales and purchase descriptions saved inside your QuickBooks item profiles whenever those descriptions are left blank in your uploaded file.
Would you like to match the names exactly as they appear in your file for customers, vendors, and items?
What it does: Enforces a strict character-by-character match against item names, completely ignoring formatting variations like extra spaces, case sensitivity, numbers, or special characters.
Automated Product/Service Creation Rules
If your global settings allow the background creation of missing entities, these fallback rules define exactly how QuickBooks builds those brand-new item profiles on the fly:
Select the product type to be created automatically if it does not exist
What it does: Determines the default classification tier (Non-Inventory, Service, or Inventory) for any newly generated items.
Select the Income Account for the newly created Products/Services
What it does: Links the new item profile to a mandatory QuickBooks revenue/income ledger account (e.g., 'Sales').
Select the Expense Account for the newly created Products/Services
What it does: Links the new item profile to a mandatory QuickBooks expense account (typically a 'Cost of Goods Sold' account type).
For Inventory Items Only:
Select the Inventory Account for the newly created Inventory Item
What it does: Maps physical inventory stock tracking to your preferred 'Inventory Asset' ledger account in QuickBooks.
Select the Inventory Start Date for the newly created Inventory Item
What it does: Establishes the official tracking start date (MM/DD/YYYY) for the item's stock history.
Select the default Inventory Quantity for the newly created Inventory Item
What it does: Automatically inputs an initial opening stock quantity balance (must be 1 or greater).
Accounts Settings Reference Guide
The Accounts settings panel controls the tracking and lookup behavior for your Chart of Accounts when mapping financial data lines.
Account Lookup Rules
Find GL Account by Account Number
What it does: Instructs SaasAnt to identify and match your General Ledger accounts using their numerical codes (e.g., 1000, 5000) inside QuickBooks rather than relying on matching the account's full text name.
Journal Entry Settings Reference Guide
The Journal Entry settings panel allows you to define how SaasAnt handles the generation of new entity profiles specifically when they are referenced inside a journal entry import.
Name & Contact Creation Rules
Type of the contact created automatically for Journal Entry
What it does: Determines how SaasAnt classifies brand-new names found in your Journal Entry file if they do not yet exist in your QuickBooks account.
Configuration Options: You can set this dropdown to automatically classify new contacts as Customers, Vendors, or select Do Not Create to prevent any automatic profile generation during the import.
Bank Deposits Settings Reference Guide
The Bank Deposits settings panel allows you to define how SaasAnt handles the generation of new entity profiles when they are referenced within a deposit import file.
Name & Contact Creation Rules
Type of the contact created automatically for Deposits
What it does: Determines how SaasAnt classifies brand-new names found in your Bank Deposit file if they do not already exist in your QuickBooks account.
Configuration Options: You can set this dropdown to automatically classify new contacts as Customer, Vendor, or Employee. Alternatively, select Do Not Create to prevent any automatic profile generation during the deposit import.
Time Activities Settings Reference Guide
The Time Activities settings panel dictates how SaasAnt handles contact matching and profile generation specifically for tracking labor hours, timesheets, and billable work lines.
Name & Contact Creation Rules
Type of the contact created automatically for Time Activity
What it does: Determines how SaasAnt handles and classifies brand-new names found in your Time Activity spreadsheet if they are not already registered in your QuickBooks account.
Configuration Options: You can set this dropdown to automatically classify new tracking names as either a Vendor or an Employee. Alternatively, select Do Not Create to prevent any automatic profile creation during the timesheet import.