Overview of PayTraQer Settings
November 14, 2025
PayTraQer settings overview
This article explains the common settings in PayTraQer that apply across all connectors. Use it when you want to control automation, time zone, notifications, billing, and sync mode.
There are three main areas:
General settings → Transaction and system settings
Account settings → Billing, connectors, and users
Sync settings → Per-connector rules and sync mode
1. General settings
Path: Settings → General
General settings are split into two parts:
Transaction settings
System settings (time zone and date format)
1.1 Transaction settings
These options define how PayTraQer downloads, checks, and posts transactions.
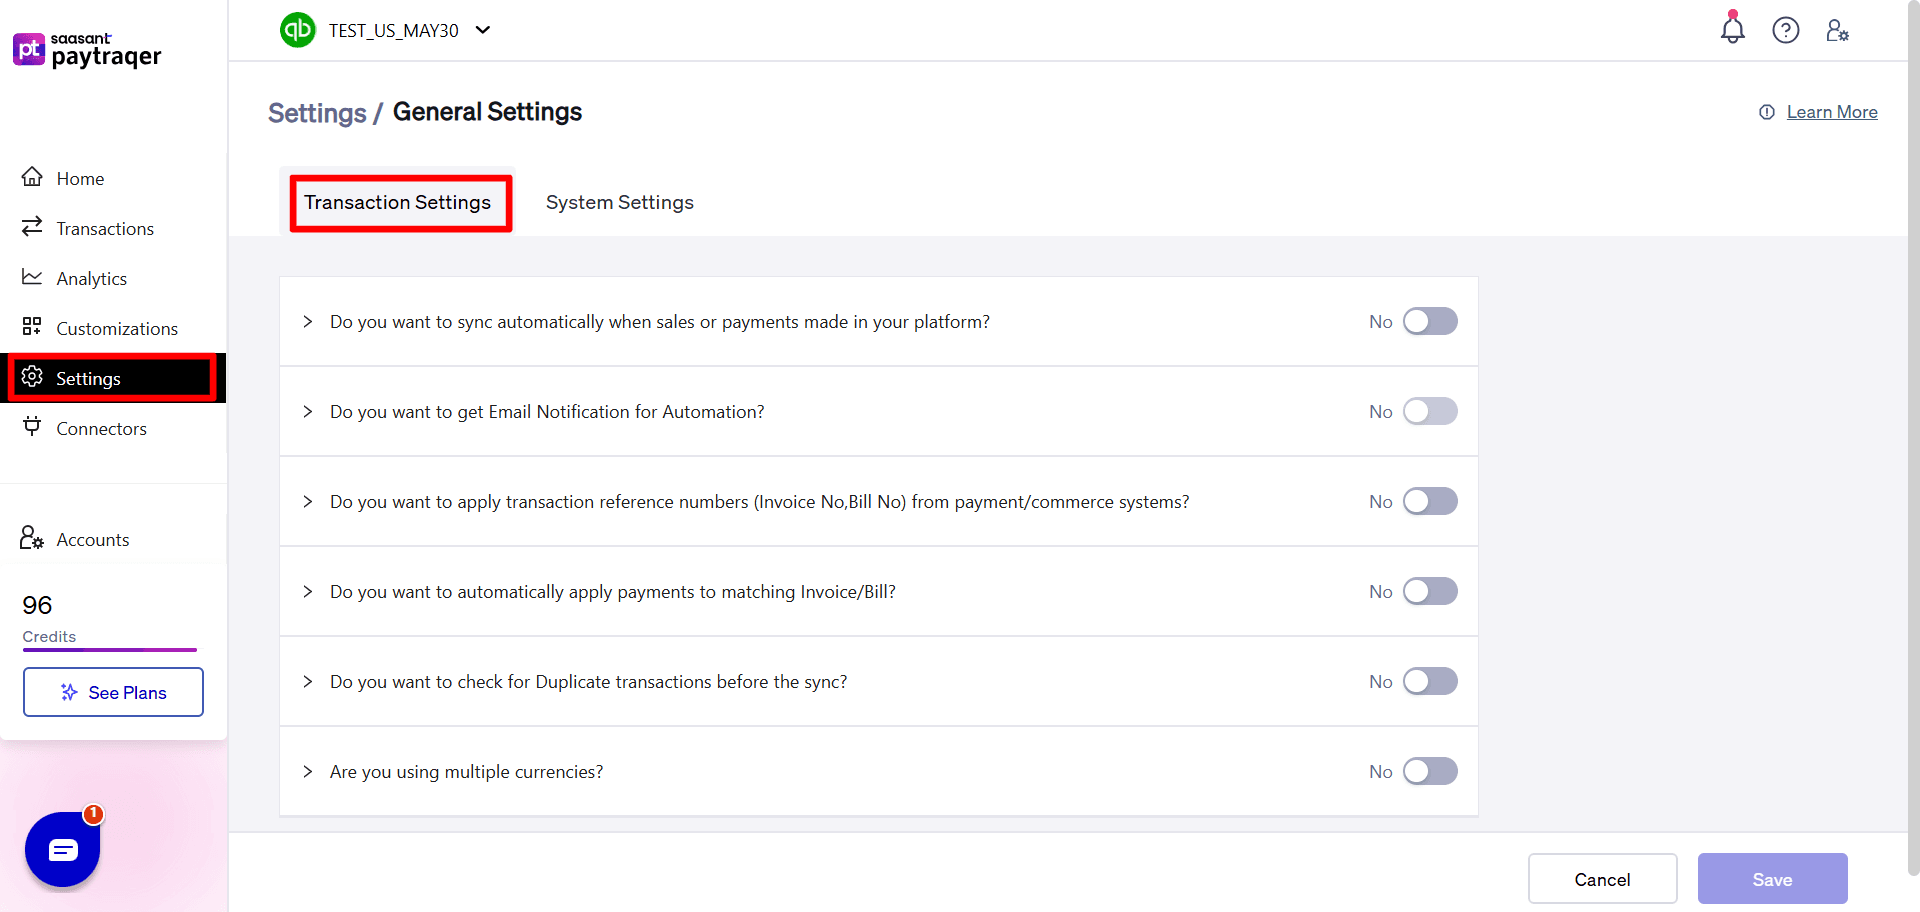
Auto Sync
Do you want to sync automatically when sales or payments are made in your platform
When turned on, PayTraQer will download new transactions from your connectors on a schedule and sync them to QuickBooks/Xero without manual action.
Use this when your posting rules are stable and you do not need to manually approve each batch.
If you are testing new settings, keep this off until you are happy with a small manual run.
Email notifications
Do you want to get Email Notification for Automation
When turned on, PayTraQer emails a summary of each automated sync run.
Helpful if you manage multiple clients or want a record of what ran overnight.
If your inbox is already busy, you can leave this off and rely on the dashboard instead.
Use source reference numbers
Do you want to apply transaction reference numbers (Invoice No, Bill No) from payment/commerce systems
When turned on, PayTraQer uses the transaction number or ID from your payment or e-commerce platform as the reference number on Invoices, Sales Receipts, and Payments in QuickBooks/Xero.
When turned off, your accounting system’s own automatic numbering is used instead.
Turn this on if you prefer to see the original order or payment reference on each entry for easier cross-checking. Turn it off if you want to keep your accounting reference sequence clean.
Auto apply payments to existing invoices/bills
Do you want to automatically apply payments to matching Invoice/Bill
When turned on, PayTraQer looks for OPEN invoices or bills by Customer/Vendor, Amount, and Transaction Date and applies the payment to those documents.
Use this when invoices are created in QuickBooks/Xero or another app and PayTraQer is only bringing in the payments.
If you want to review all applications manually, keep this off and apply payments yourself.
Duplicate check before sync
Do you want to check for Duplicate transactions before the sync
When turned on, PayTraQer compares new transactions against existing ones by Customer, Amount, and Transaction Date before posting.
If a duplicate is detected, the transaction shows as an error instead of creating a second copy.
This is strongly recommended when you are re-syncing a date range or switching between manual and automatic sync.
Multi-currency handling
Are you using multiple currencies
When turned on, PayTraQer will track transactions in multiple currencies as long as multi-currency is also enabled in your accounting system.
Use this if you accept payments in more than one currency or run multi-region stores.
Follow the Enable Multi Currency Support in QuickBooks guide linked in the app before turning this on.
1.2 System settings
These options control how PayTraQer interprets and displays basic data.
Time zone
Time Zone
Choose the time zone that should be used when a payment or e-commerce platform does not provide full time zone information.
This affects how PayTraQer groups transactions by day and how they appear in reports.
Set this to the primary time zone you use for your accounting and reporting.
Date format
Date Format
Choose how dates should be shown inside PayTraQer reports and screens.
This does not change how dates are stored in QuickBooks/Xero but helps avoid confusion between formats like MM/DD/YYYY and DD/MM/YYYY.
2. Account settings
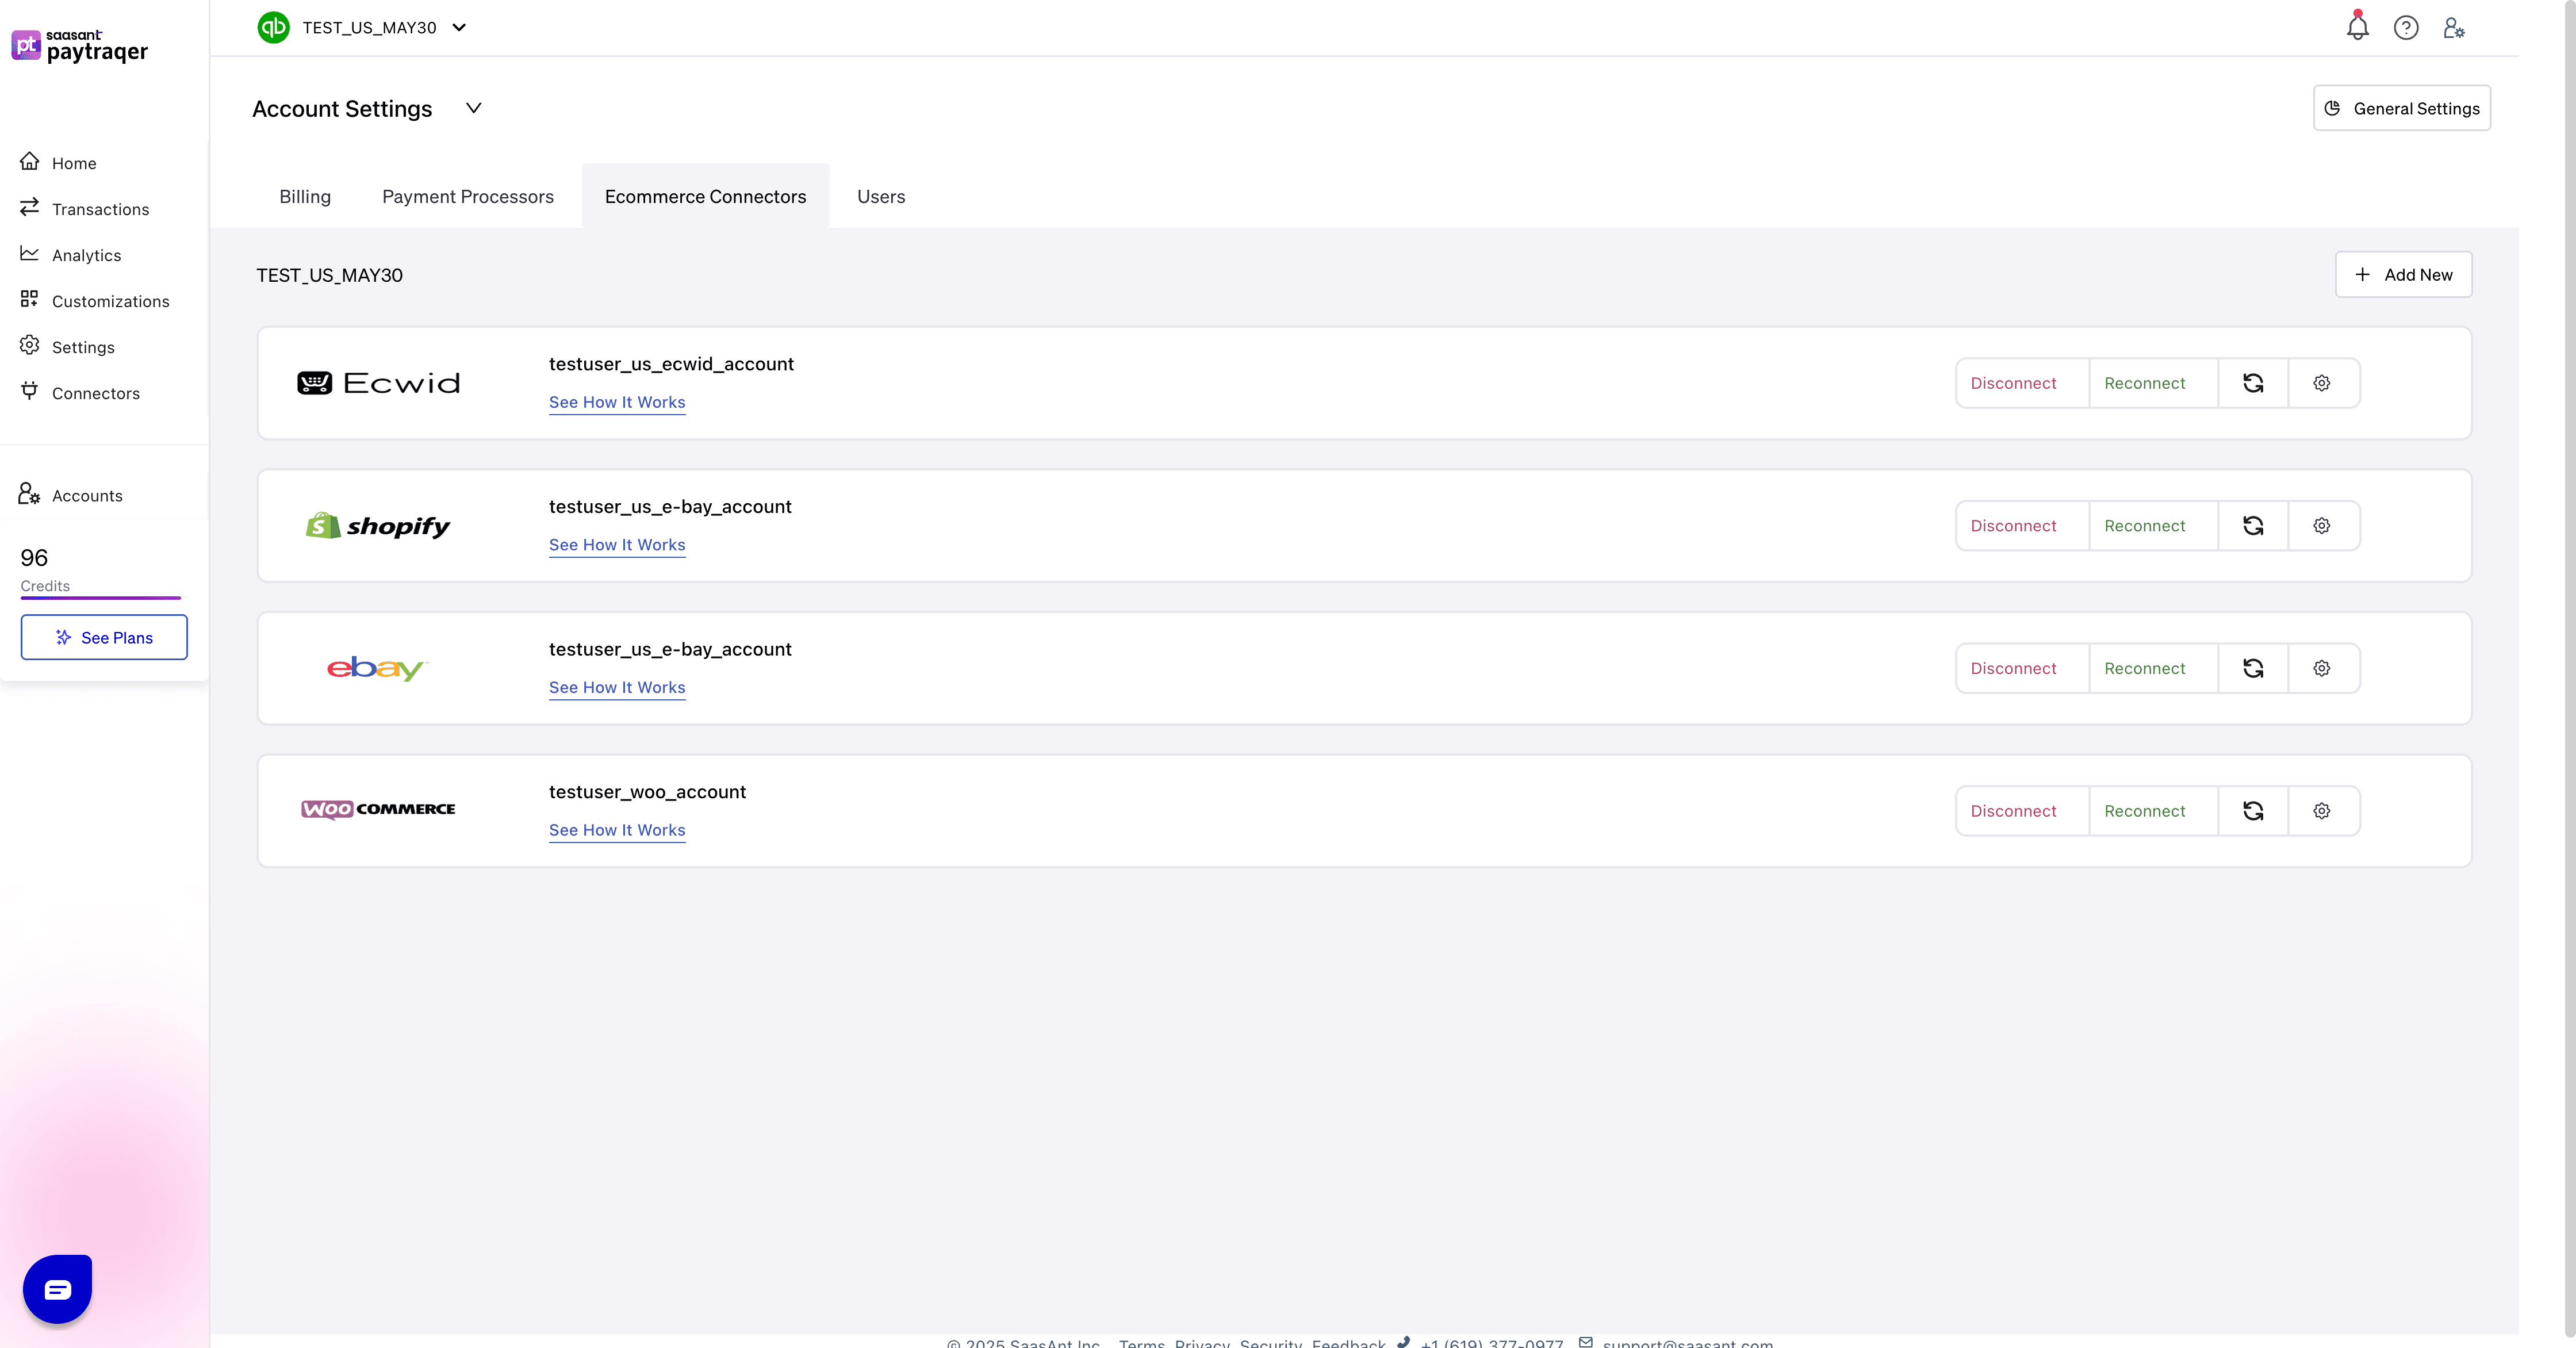
Path: Settings → Account
Account settings control your PayTraQer subscription, connectors, and user access.
2.1 Billing
View your current plan and usage
Upgrade, downgrade, or cancel your subscription
Update payment method and billing contact details
This is where you manage how you are charged for PayTraQer.
2.2 Payment processors
See which payment gateways (Stripe, PayPal, Square, etc.) are connected
Connect new processors or disconnect ones you no longer use
Some advanced GL routing options rely on these connectors being set up here
2.3 E-commerce connectors
See which stores (Shopify, WooCommerce, Etsy, Ecwid, Amazon, eBay, etc.) are connected
Connect new stores or disconnect retired ones
Each connected store will also appear in the Sync settings area with its own posting rules
2.4 Users
Add additional users to your PayTraQer account
Control who can view or change settings and run syncs
Use this when you want your team members or clients to access PayTraQer directly.
2.5 My profile
You can change your personal details by clicking My Profile:
Name and email
Password
(Where available) personal time zone and notification preferences
This affects only your login, not the global company settings.
3. Sync settings and connector-level rules
Path: Settings → Sync settings or via the gear icon on each connector
In Sync settings you will see all connected payment processors and e-commerce platforms. Each connector has its own configuration blocks, for example:
The layout and options are the same across connectors, but some names and defaults vary by payment system or platform. For detailed field-by-field guidance, use the connector-specific articles (Shopify, WooCommerce, Etsy, PayPal, Stripe, etc.) that follow the same structure.
4. Sync mode (Individual vs Summary)
At the top of the Sync settings screen you will see the current sync mode for your PayTraQer account:
Current Sync Mode: "Individual"
To switch to Summary Sync or back, you must disconnect all connectors.
Important points:
Sync mode is common for all connectors in that PayTraQer company.
You cannot mix Summary Sync for one connector and Individual for another in the same profile.
To change the mode, you must disconnect every connected processor and store.
4.1 How to change sync mode safely
Pause automation
Turn Auto Sync off in General settings so no new data posts while you change the mode.
Document current settings
Take screenshots or notes of key Sales, Product, Tax, Fee, and Payout settings for each connector.
This makes it easy to rebuild the same rules after reconnecting.
Disconnect all connectors
Go to Account → Payment processors and Account → E-commerce connectors.
Disconnect each connected processor and store.
Change sync mode
Go to Sync settings.
Use the sync mode control to switch between Individual and Summary.
Save the change.
Reconnect connectors and re-apply settings
Reconnect each payment processor and store.
Re-enter your Sales, Product, Tax, Fee, Expense, and Payout settings using your notes.
Test with a short date range
Use Download historical transactions for a small window and verify the results in QuickBooks/Xero before you turn Auto Sync back on.
5. When to use each area
General settings
Use when you want to control automation, reference numbers, duplicate checks, multi-currency, or how time and dates are interpreted.Account settings
Use when you are managing billing, adding or removing connectors, or inviting new users.Sync settings
Use when you are changing how a specific connector posts sales, fees, taxes, payouts, or when you plan to switch between Individual and Summary sync.
Keeping these roles clear makes it easier to maintain PayTraQer and reduces the risk of unexpected posting in your accounting system.