How to Sync Stripe Transactions into QuickBooks Online using PayTraQer
October 17, 2025
To download and sync Stripe transactions into QuickBooks Online, you must link your Stripe account with PayTraQer. This article explains how to integrate your Stripe account with PayTraQer and sync Stripe payments, fees, and refunds into QuickBooks Online.
Video Tutorial for How to Connect and Sync Stripe Transactions with QuickBooks Online using SaasAnt PayTraQer:
Step 1: Open the Stripe connector in PayTraQer
Log in to PayTraQer with the QuickBooks Online company you want to sync with Stripe.
From the left menu, select Connectors.
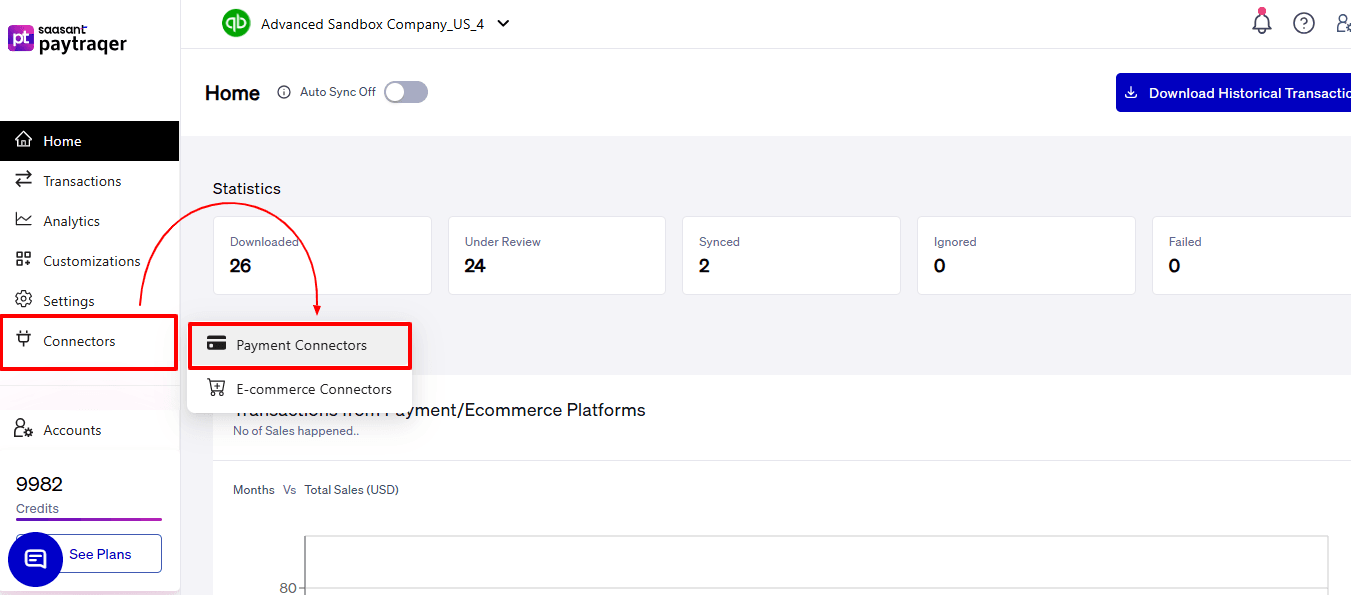
Choose Payment Connectors to view the payment platforms connected to your PayTraQer account.
Find your Stripe connection from the list.
Step 2: Review how Stripe transactions will be recorded in QuickBooks
In the Stripe connector row, click See How It Works.
A User Guide window will open.
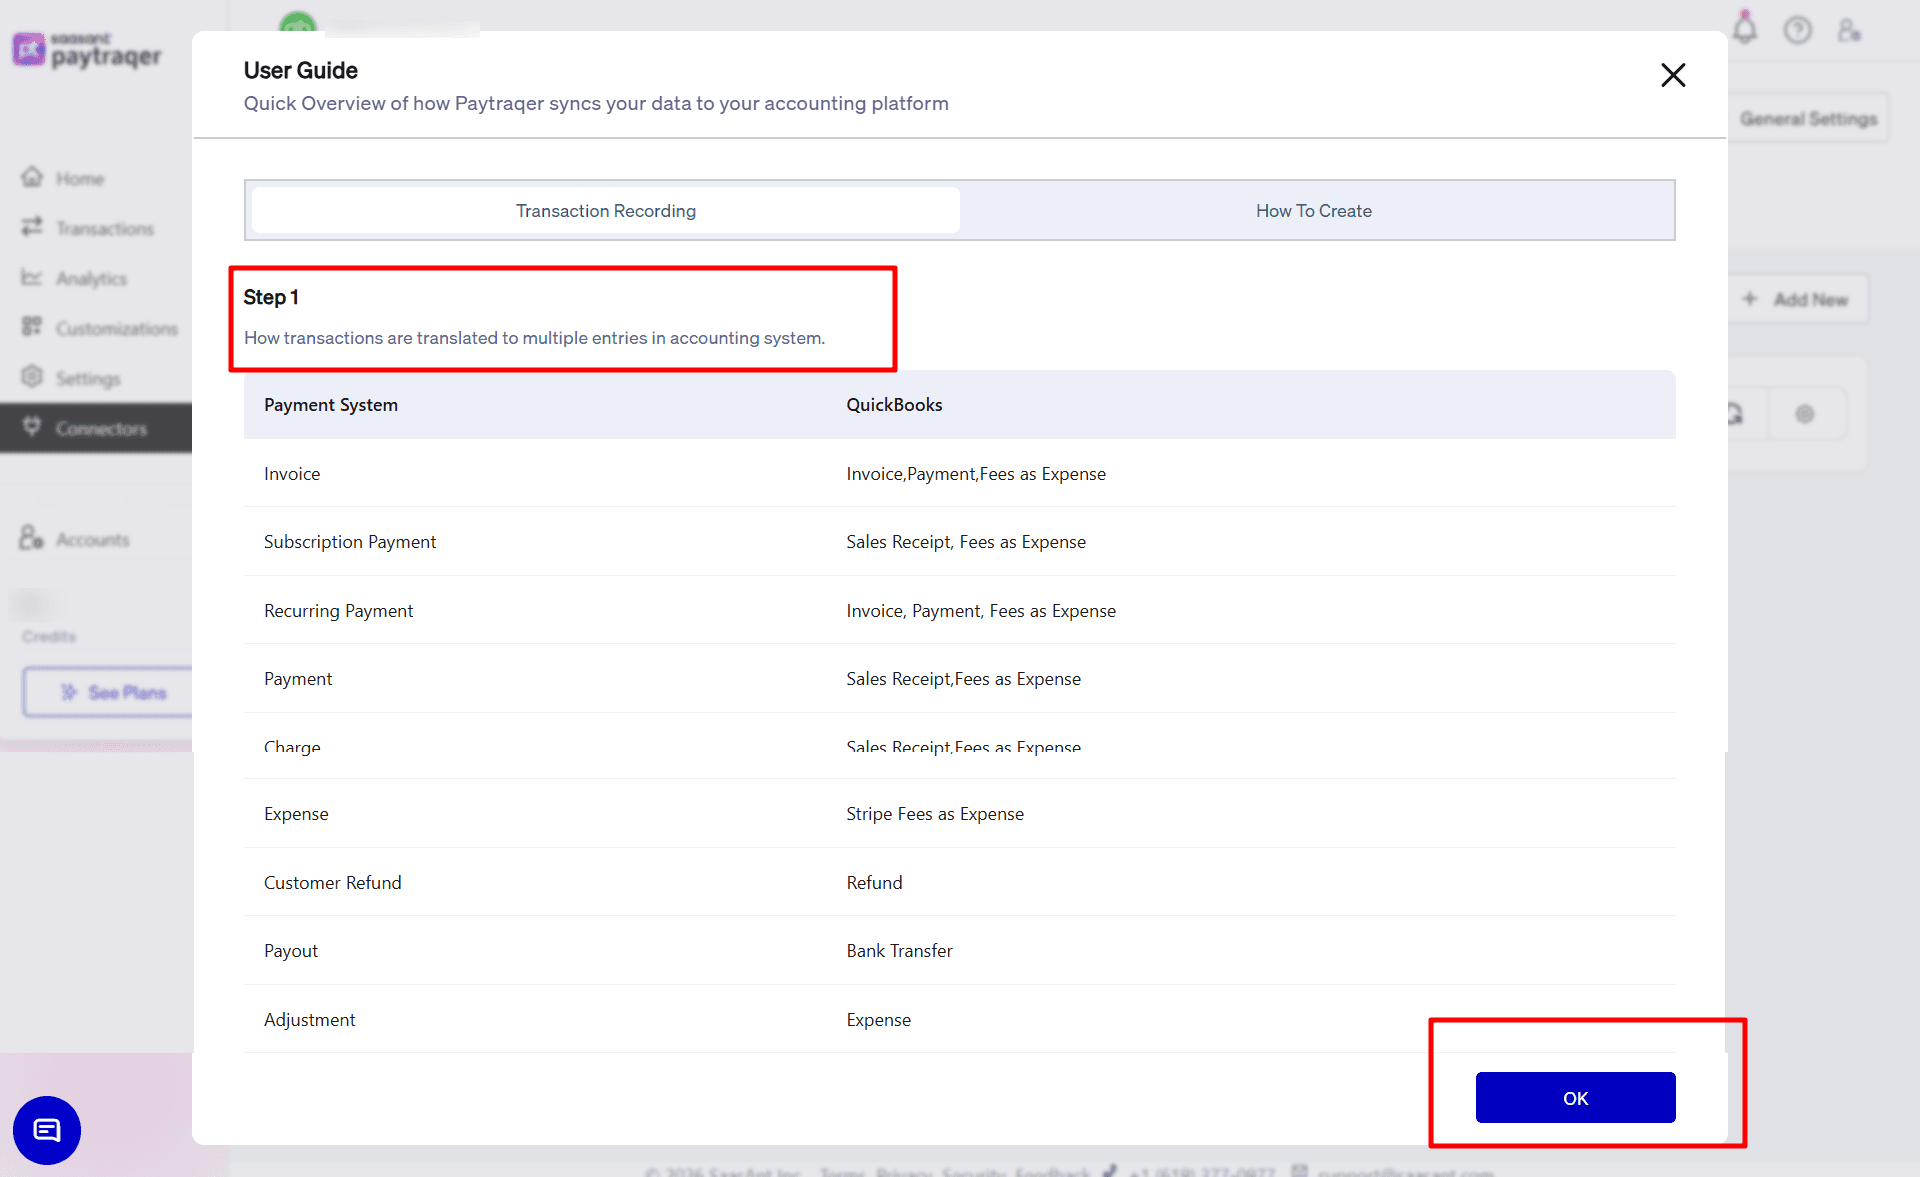
Stay on the Transaction Recording tab.
Review how PayTraQer converts each Stripe transaction type into QuickBooks Online entries. Check that Stripe payments, charges, fees, refunds, payouts, and adjustments are mapped correctly.
Make sure fees are recorded as expenses in QuickBooks Online.
Click OK once you have reviewed the transaction recording flow.
Step 3: Open the Transactions page in PayTraQer
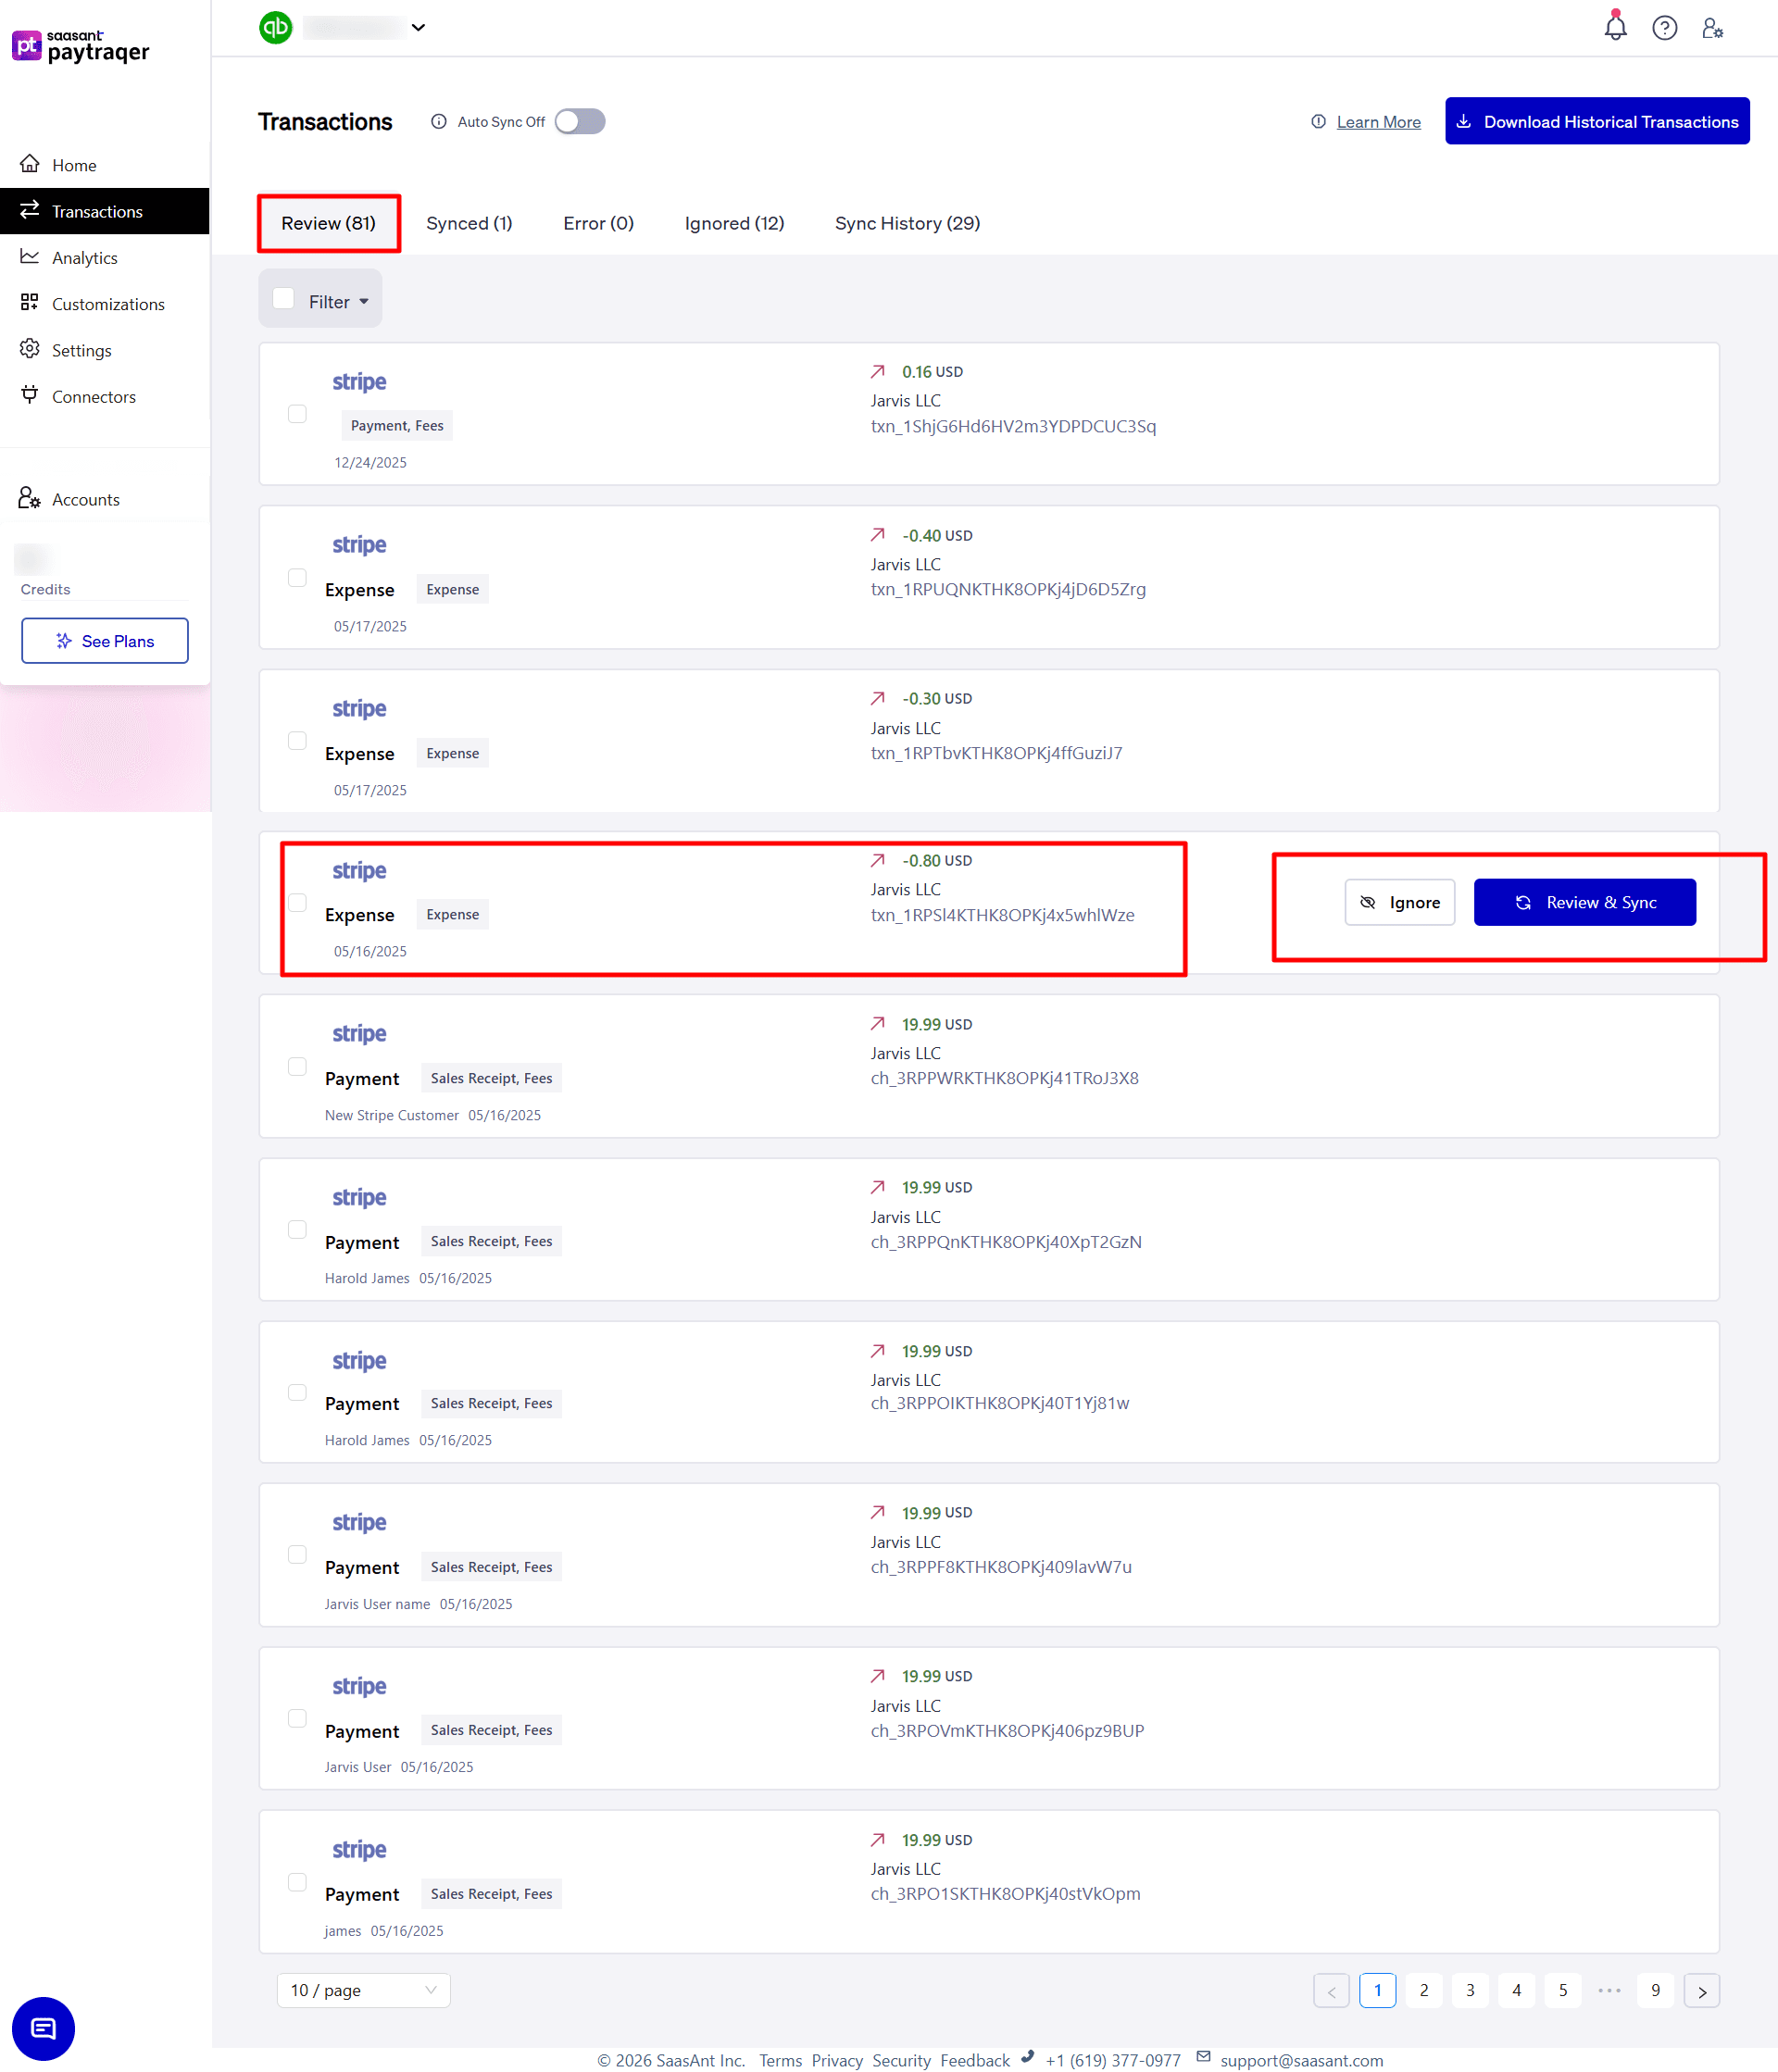
On the left menu, select Transactions.
The Transactions dashboard has various organizational views that assist in managing and checking your data flow:
Section | Purpose |
Review | Lists transactions that are ready for syncing. |
Synced | Includes transactions that have already been sent to QuickBooks. |
Error | List transactions that failed and require correction. |
Ignore | Keeps track of transactions you deliberately avoided. |
Sync History | Provides a full timeline log of previous syncs. |
Stay in the Review tab to view Stripe transactions that are prepared to sync with QuickBooks Online.
In the Review tab, click on Filter.
You can use options such as Date, Amount, Payment System, Transaction Type, Transaction Id, and Contact to filter the records.
Select Current Page if you want to choose all transactions that are currently displayed.
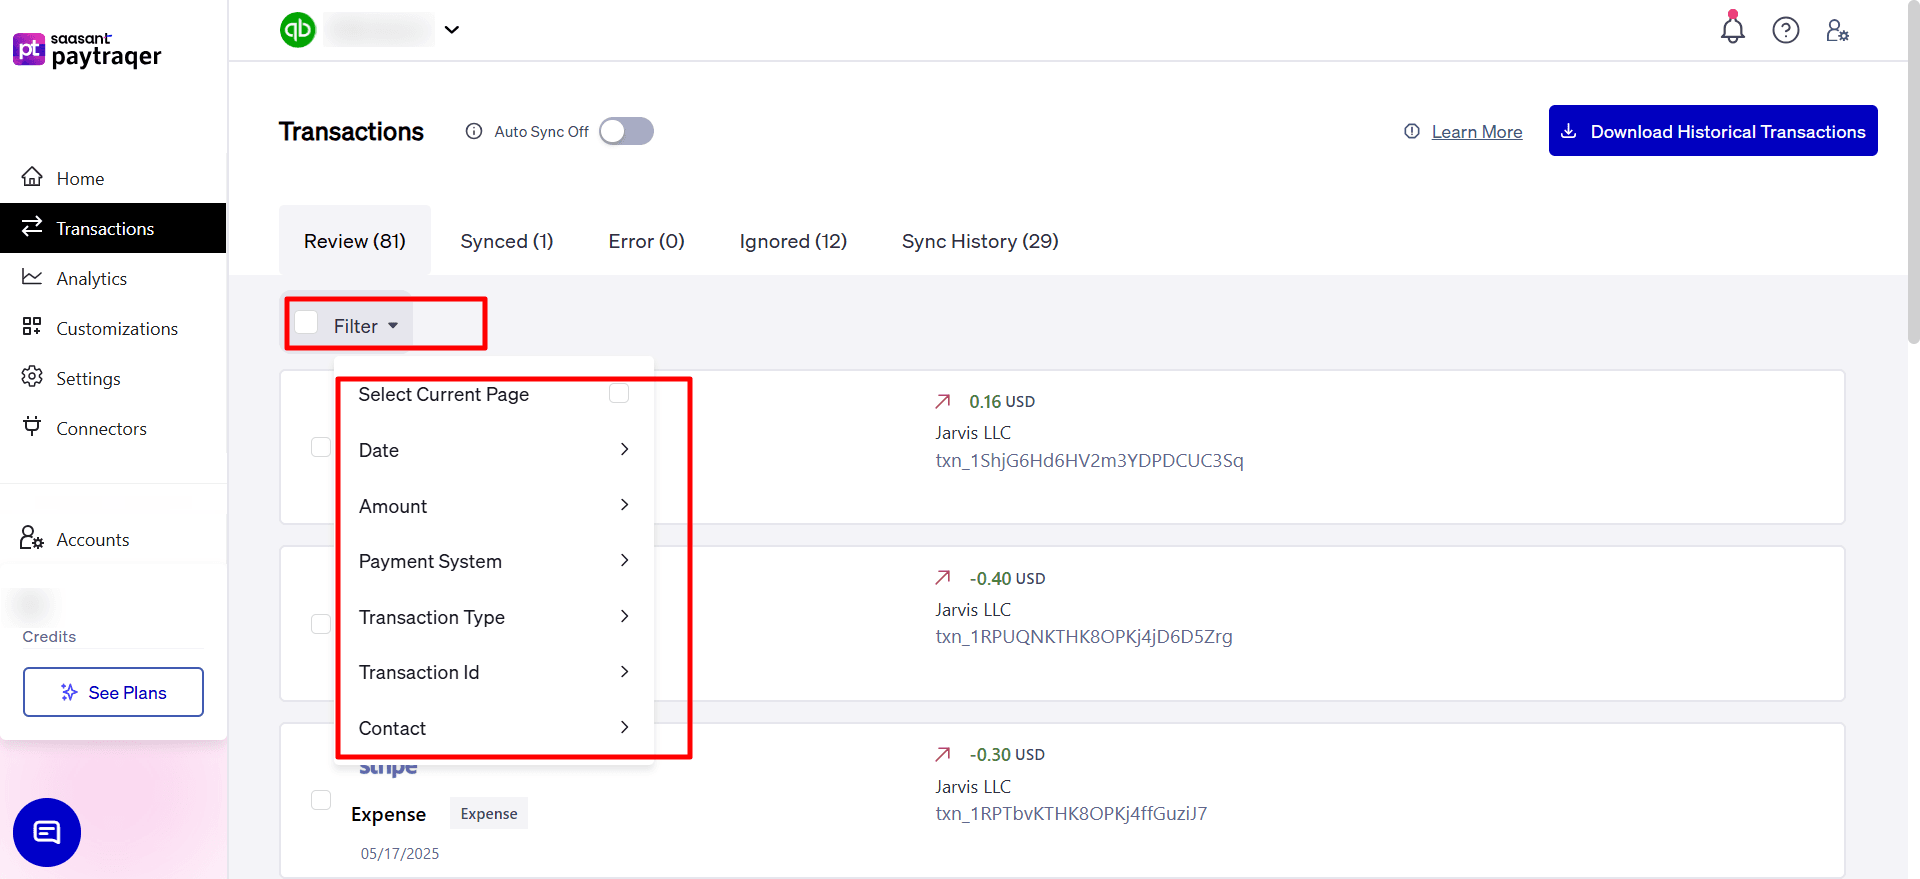
By applying the required filters, you can quickly find the Stripe transactions you need to review or sync.
This makes it easier to work with only the relevant transactions instead of going through each record manually.
Once you have applied the necessary filters, choose the Stripe transactions you want to process.
The selected records will be highlighted, and the total number of selected transactions will be visible at the bottom
Use Sync to upload all selected Stripe transactions to QuickBooks Online at once.
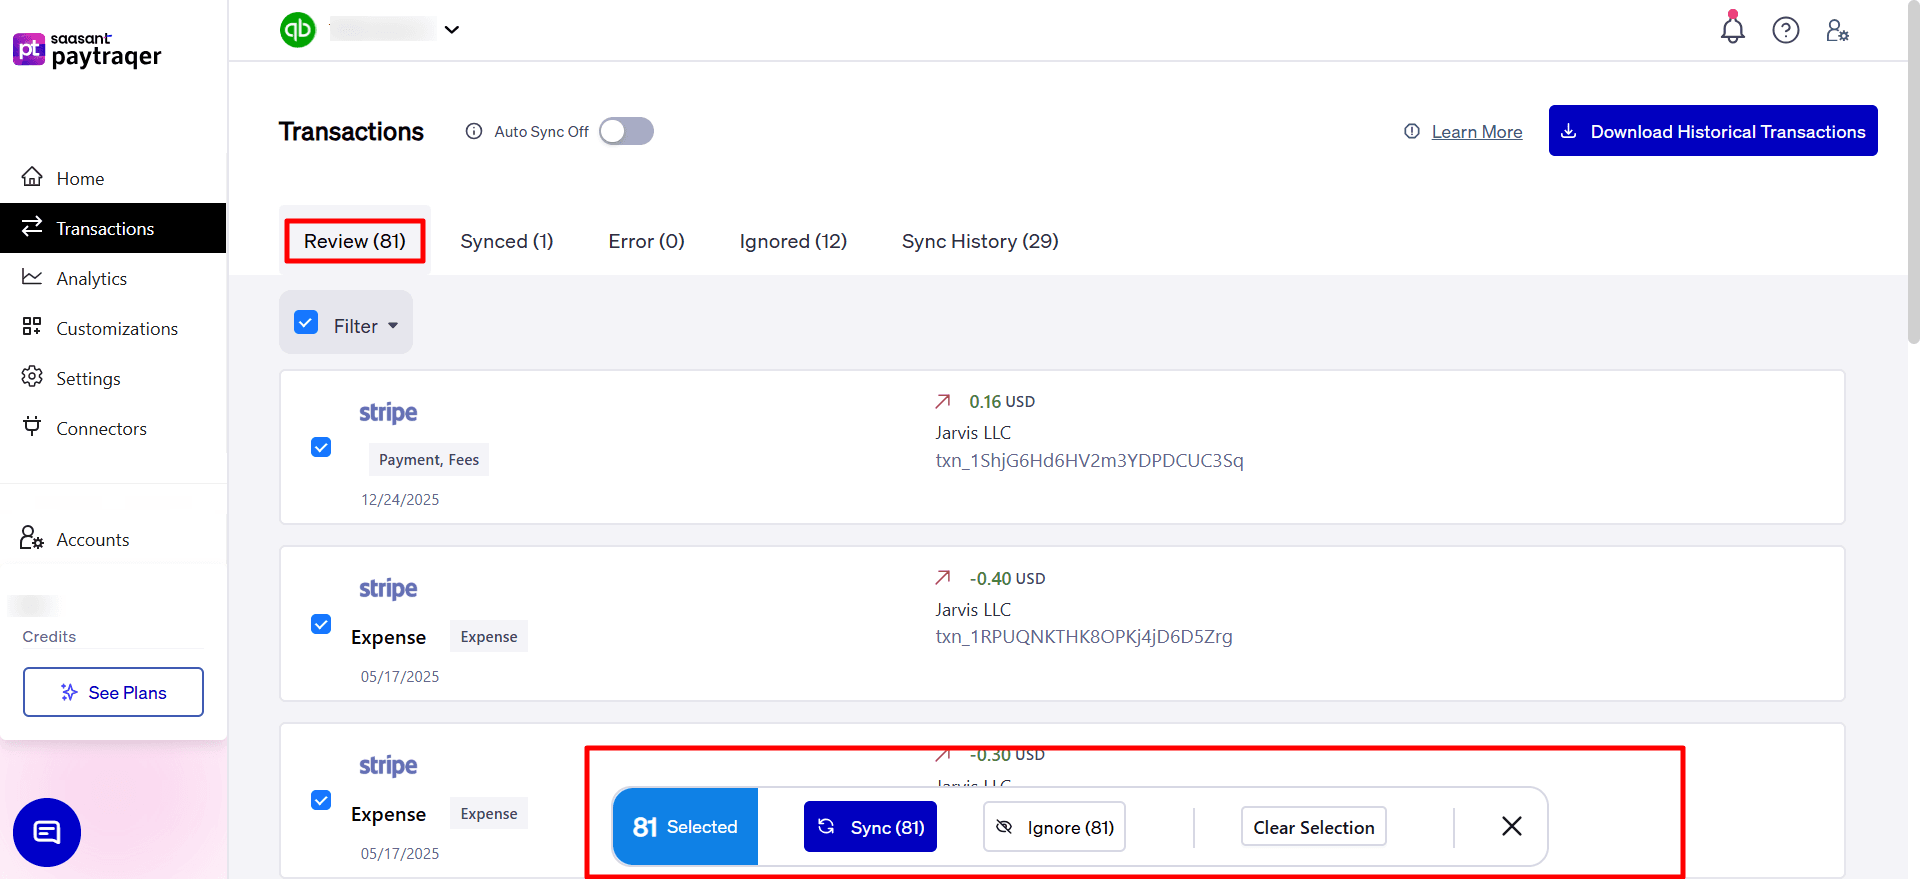
Choose Ignore if you do not wish to sync the selected transactions.
Click Clear Selection to discard the selected records and restart if necessary.
This option enables you to manage multiple Stripe transactions in one go instead of syncing them one at a time.
Step 4: Start the sync review for a Stripe transaction
Go to the Review tab on the Transactions page.
Find the Stripe transaction you want to sync.
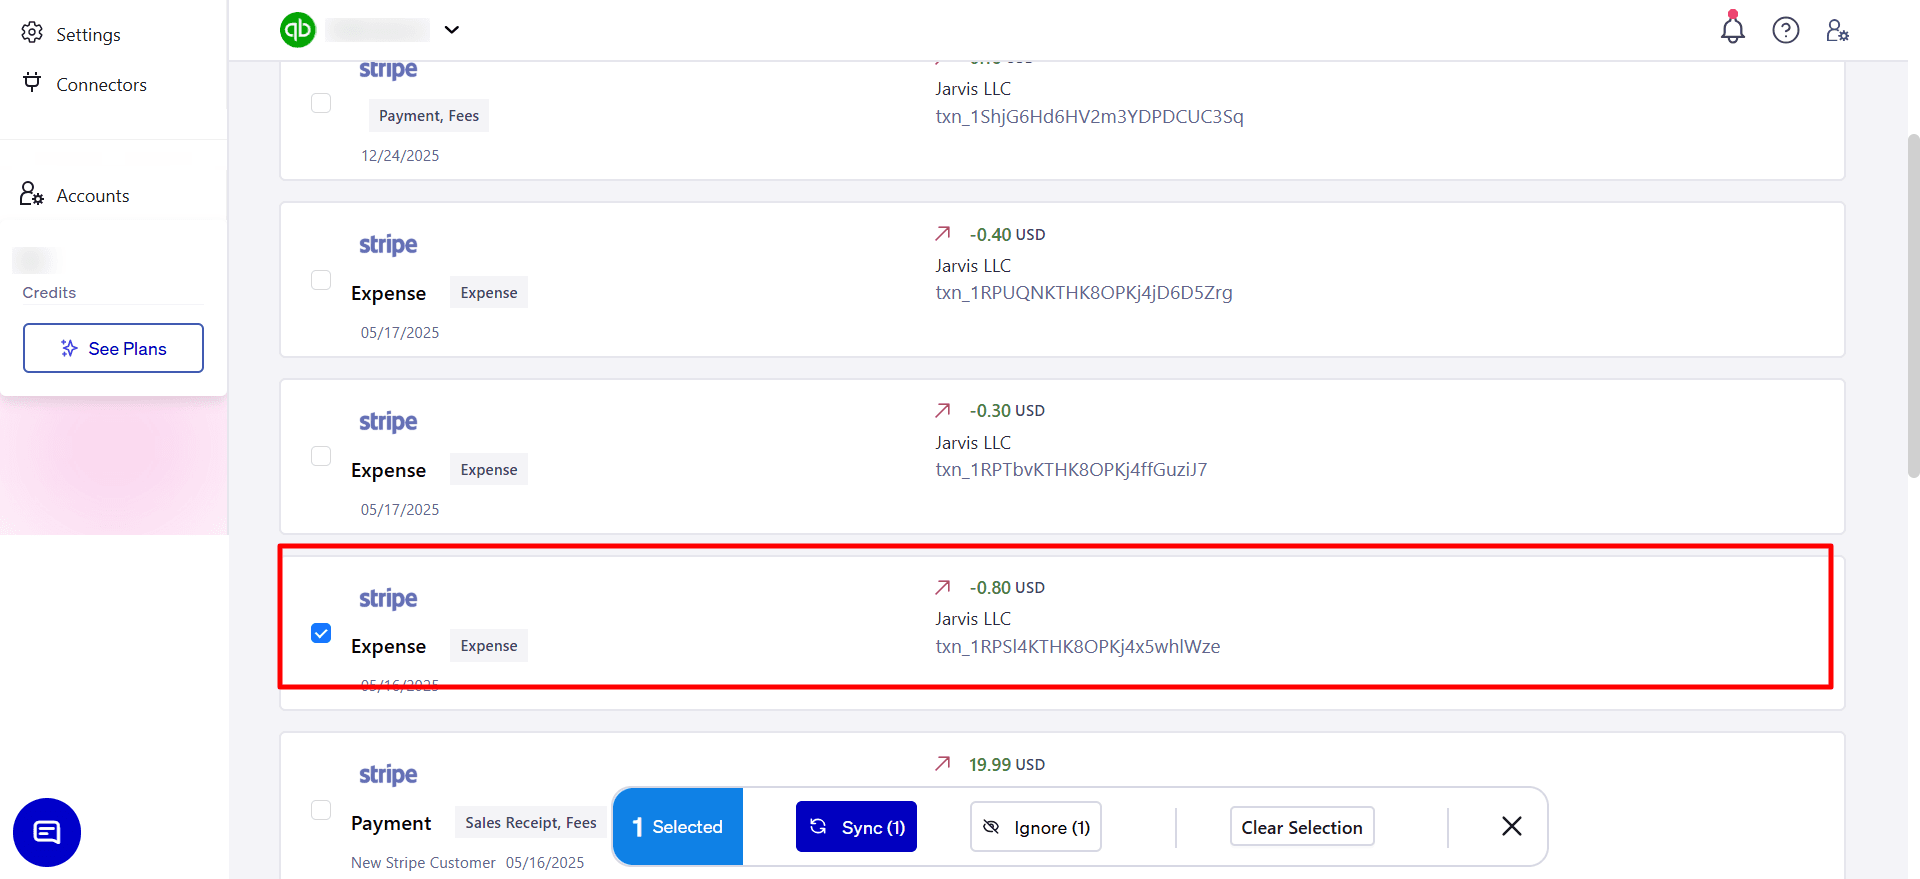
Check the transaction type shown on the record, such as Expense or Payment.
Review the transaction date, amount, customer or vendor name, and transaction number before syncing.
Click Review & Sync for the selected Stripe transaction.
PayTraQer will open the transaction details on the right side of the screen.
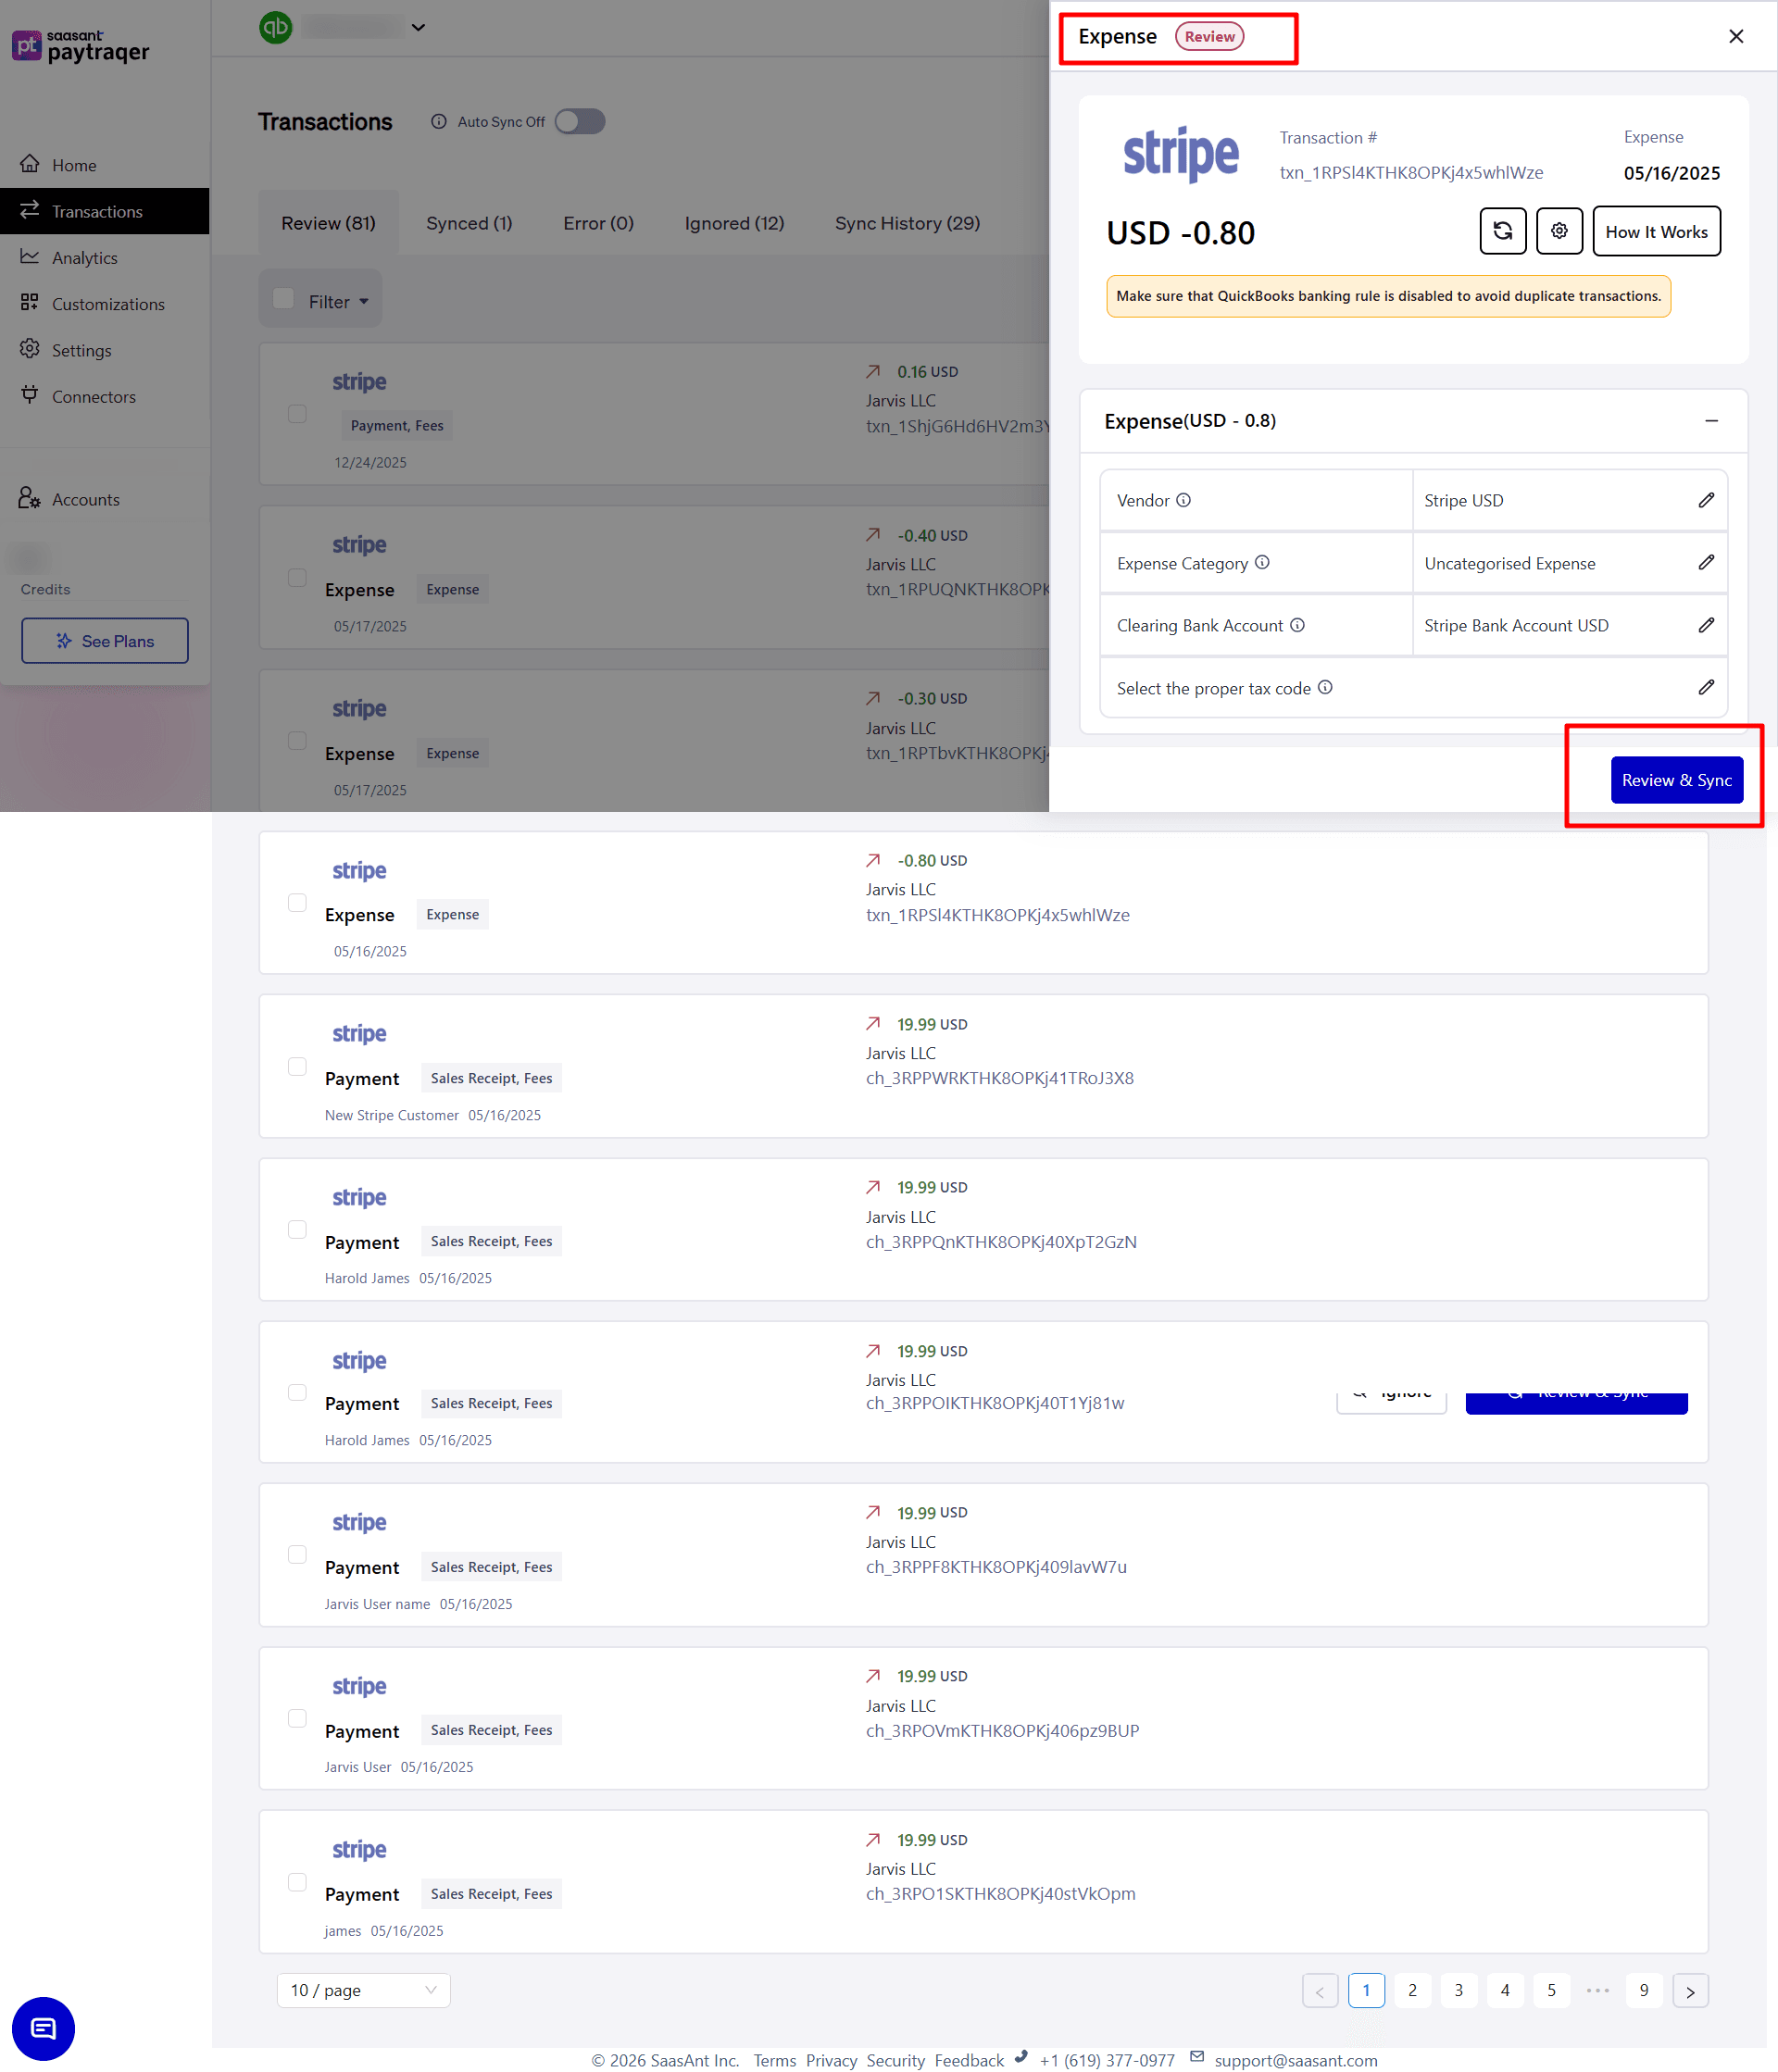
In the transaction panel, confirm the Stripe transaction type, transaction number, date, and amount.
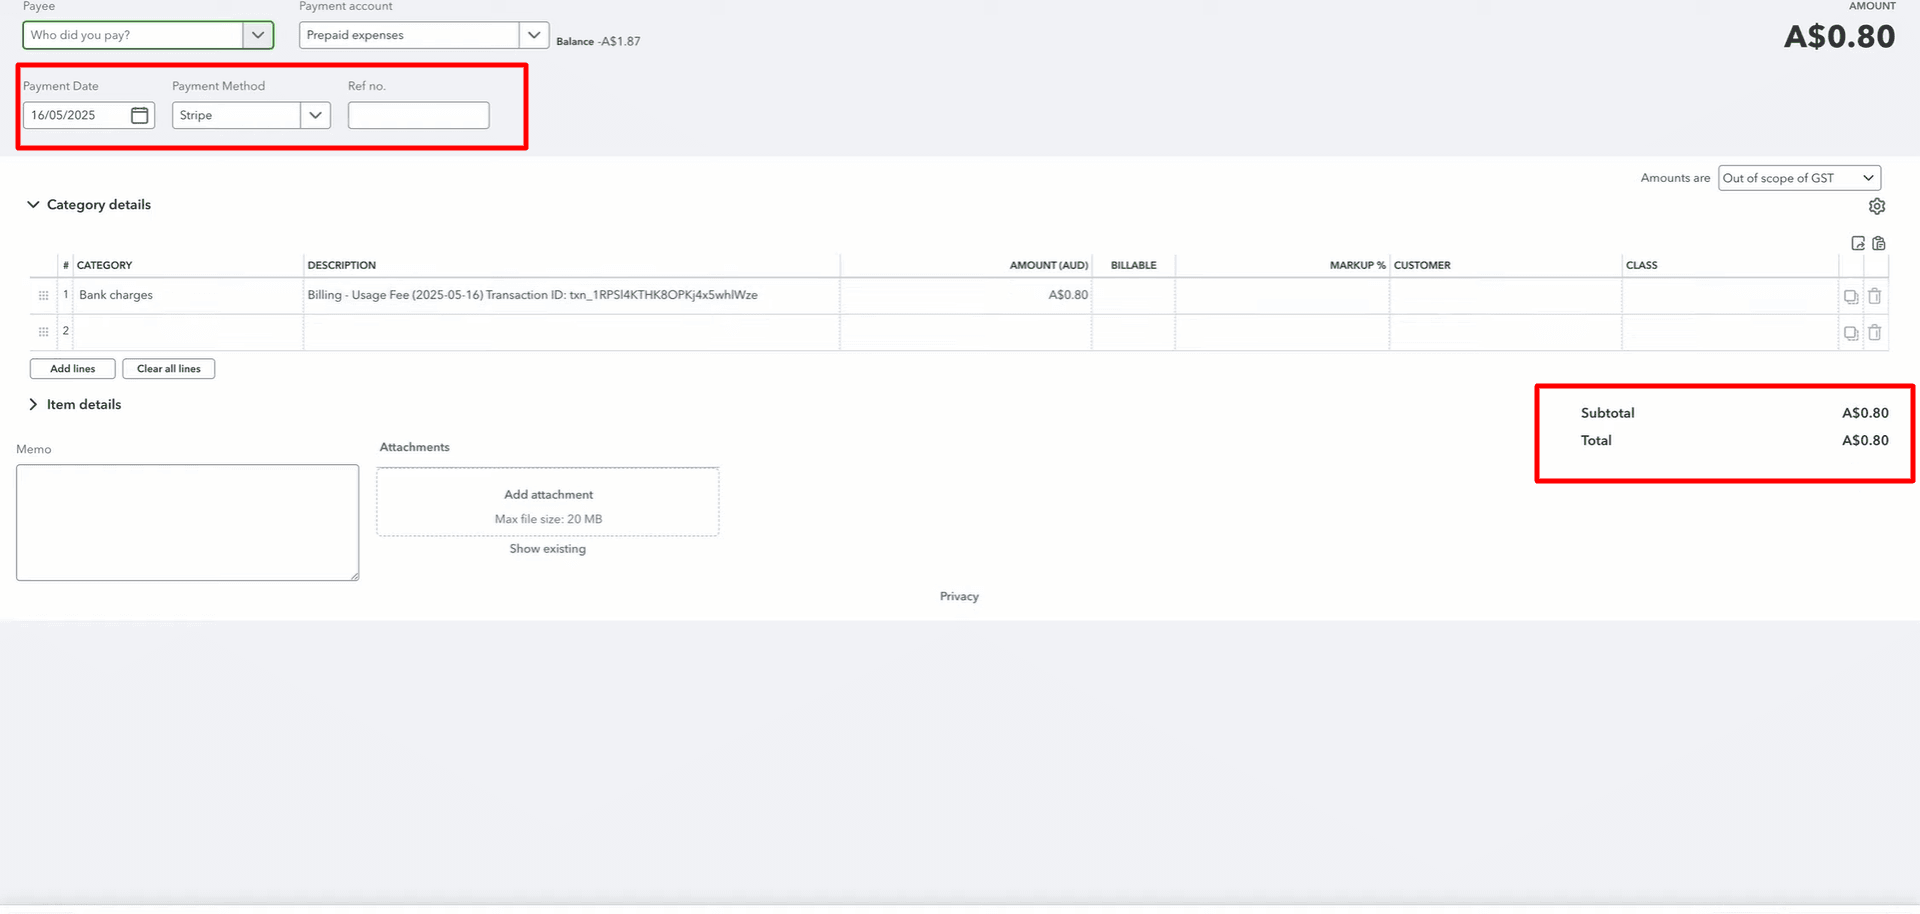
For an Expense transaction, review the details shown under the Expense section.
Check the Vendor selected for the Stripe expense.
Review the Expense Category mapped for the transaction.
Confirm the Clearing Bank Account used for the Stripe transaction.
Select the correct tax code if tax tracking is required for this transaction.
PayTraQer may show a reminder to disable QuickBooks banking rules to avoid duplicate transactions.
Once all details look correct, click Review & Sync to sync the Stripe transaction into QuickBooks Online.
Step 5: Confirm the synchronization result
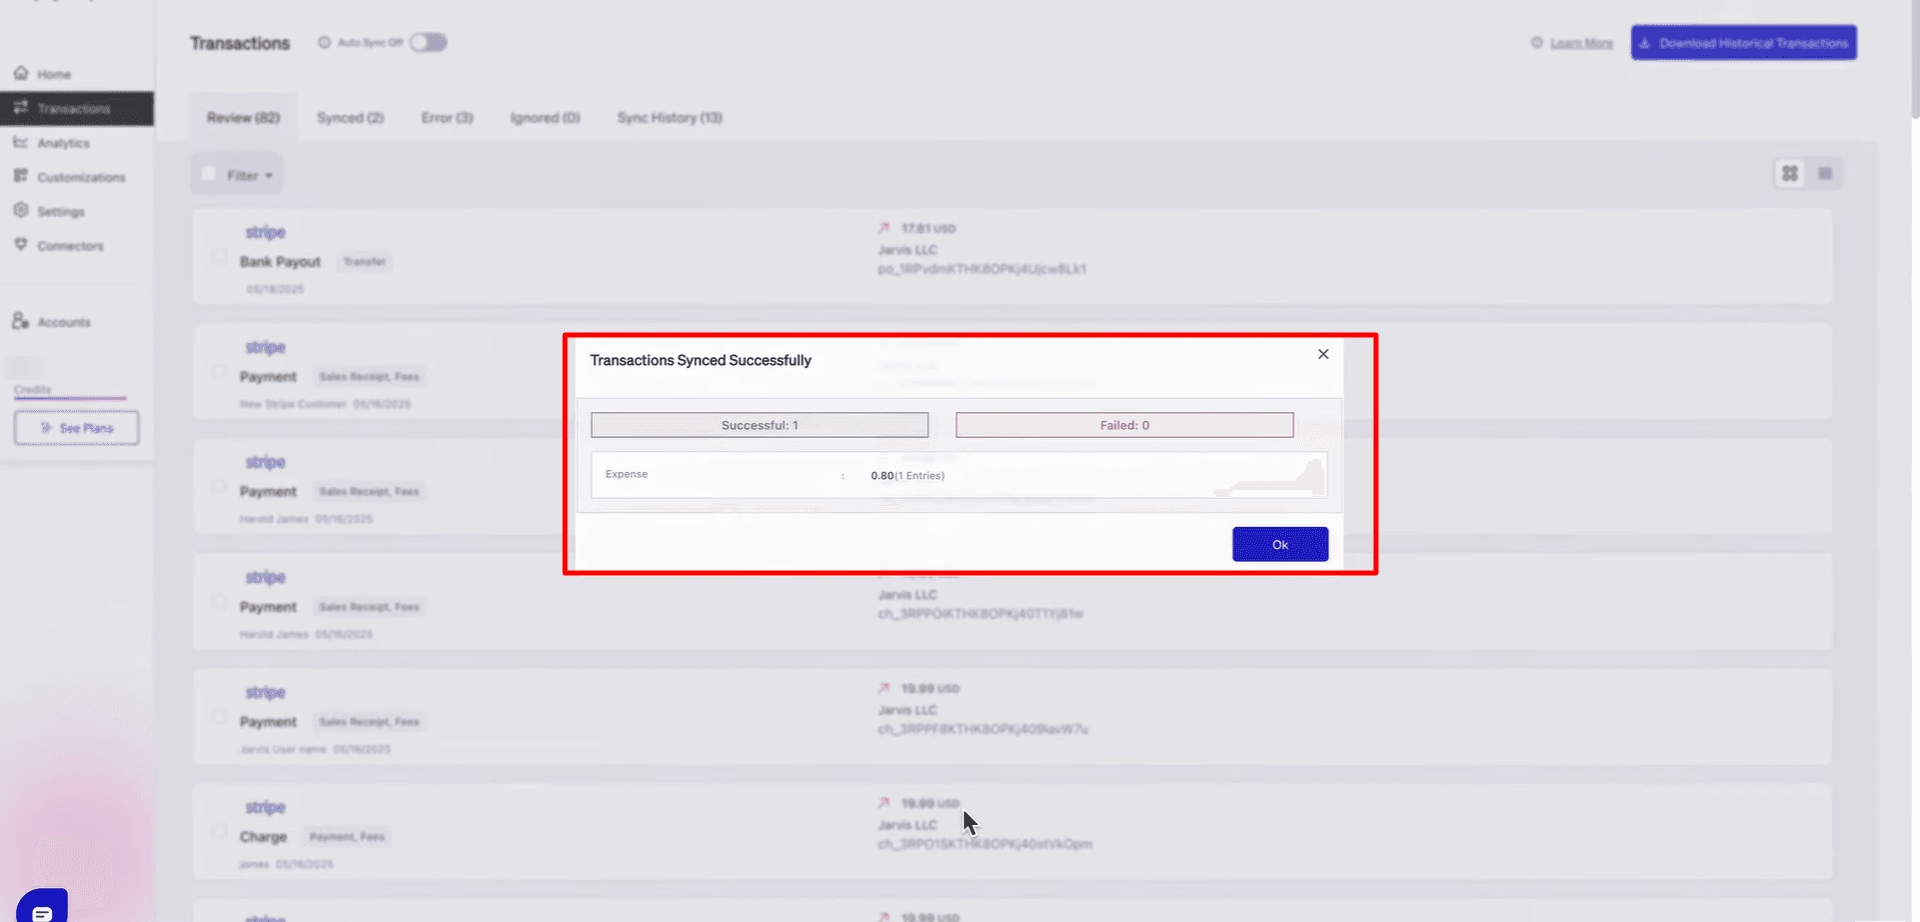
After clicking Review & Sync, PayTraQer will display the Transactions Synced Successfully window.
Check the sync summary shown on the screen.
Make sure the Successful count shows the transaction was synced.
Review the transaction type and amount shown in the result window.
For this Stripe transaction, PayTraQer shows the synced record as an Expense entry.
Once the sync result looks correct, click OK to close the confirmation window.
Step 6: Verify the synced Stripe transaction in PayTraQer
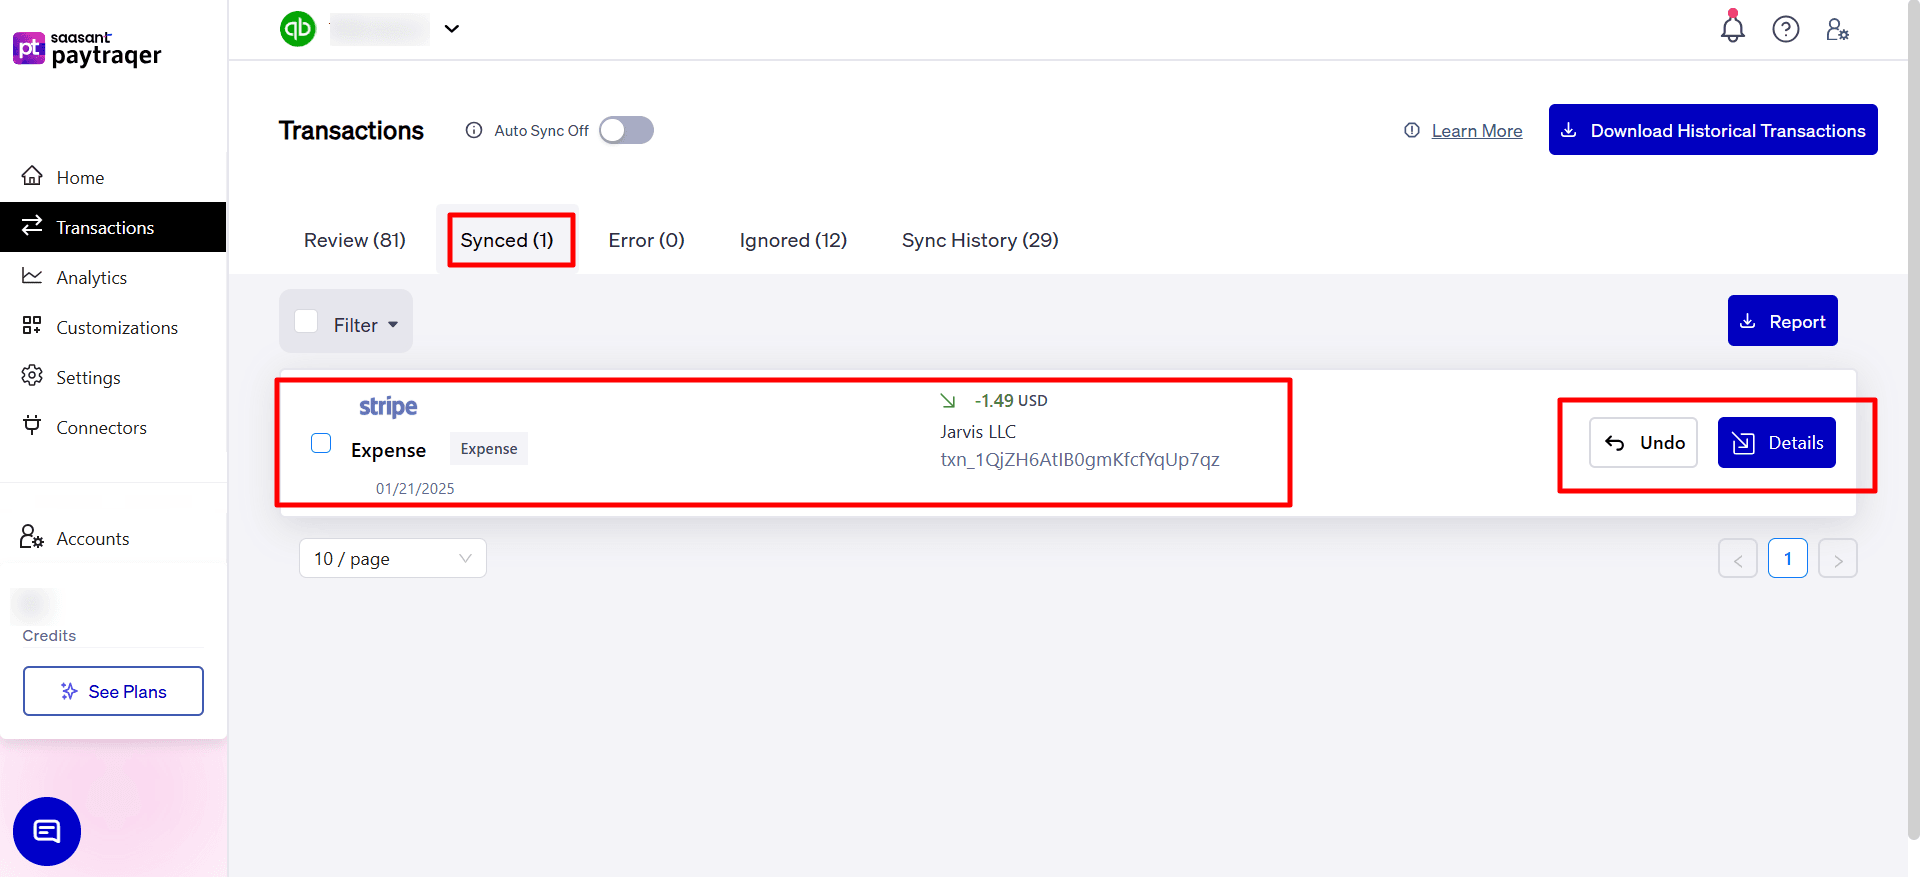
Go to the Synced tab on the Transactions page.
Find the Stripe transaction that was synced into QuickBooks Online.
Review the transaction type, amount, customer or vendor name, transaction date, and transaction number.
Click Details to view the QuickBooks entries created for the synced Stripe transaction.
PayTraQer will open the transaction details on the right side of the screen.
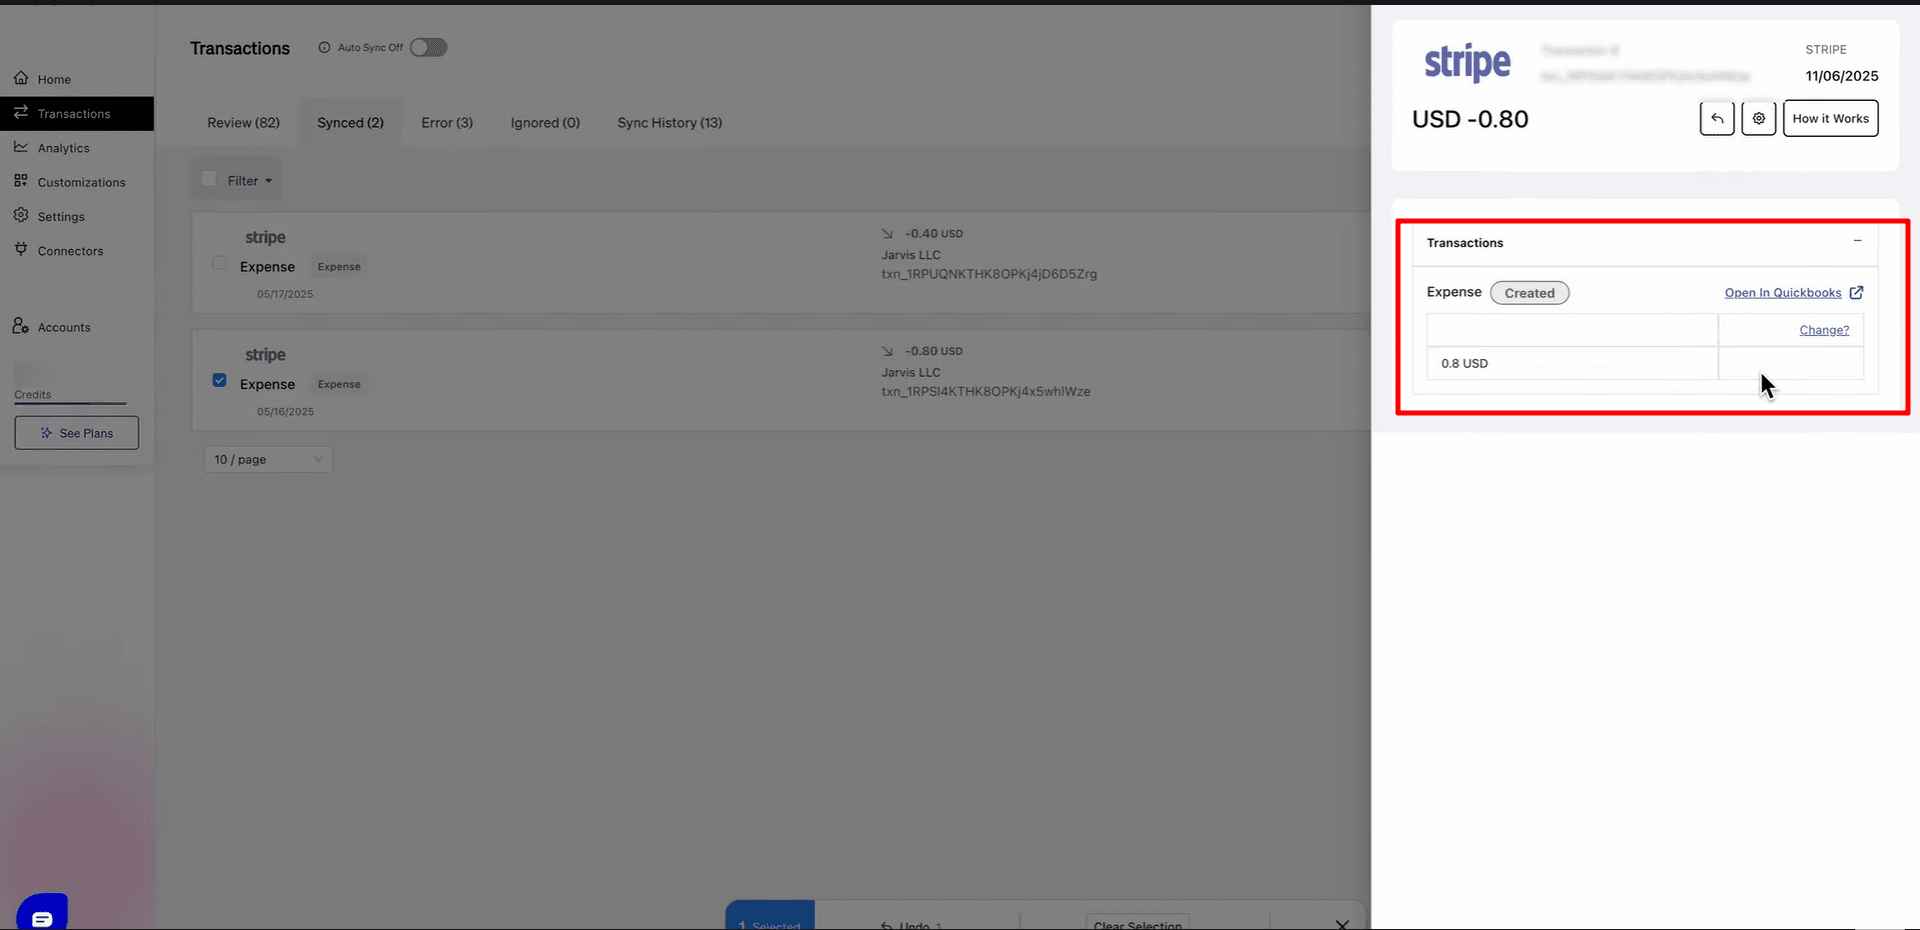
Under the Transactions section, check the QuickBooks transaction created for the Stripe record.
Make sure the status shows Created.
For this Stripe expense transaction, confirm that the Expense entry has been created successfully.
Review the synced amount shown in the details section.
Click Open in QuickBooks to verify the created transaction directly in QuickBooks Online.
If the transaction was synced by mistake, click Undo from the Synced tab to reverse the sync from PayTraQer.
Step 7: Review past Stripe sync activity
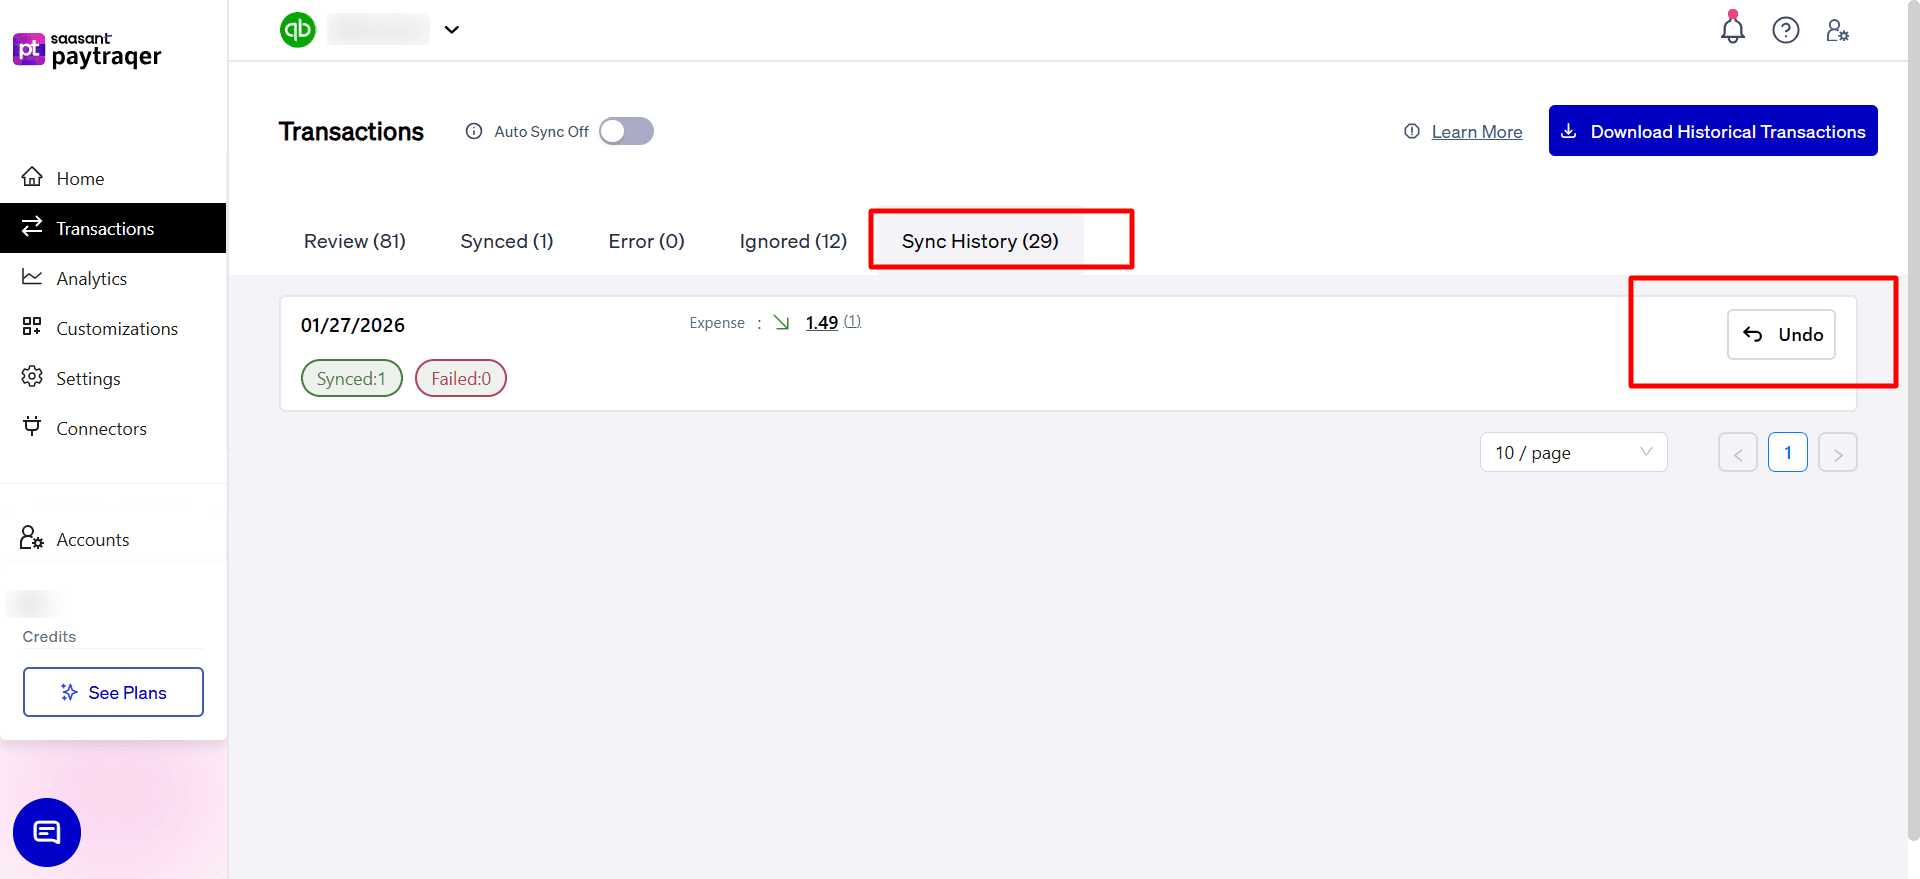
Go to the Sync History tab on the Transactions page.
Review the previous Stripe sync activity listed on the screen.
Check the sync date to confirm when the transaction was posted to QuickBooks Online.
Review the transaction type shown in the sync history, such as Expense.
Check the total synced amount and the number of synced records.
Make sure the Synced count shows the transaction was successfully posted.
Use this page to track earlier Stripe syncs and verify what was sent to QuickBooks Online.
If the transaction was synced by mistake, click Undo to reverse the synced Stripe transaction from PayTraQer.
Step 8: Open the Stripe Sync Settings page

From the left menu, select Settings.
Choose Sync Settings from the list of options.
Find the Stripe connector card on the Sync Settings page.
Click Change Settings to open the Stripe sync configuration.
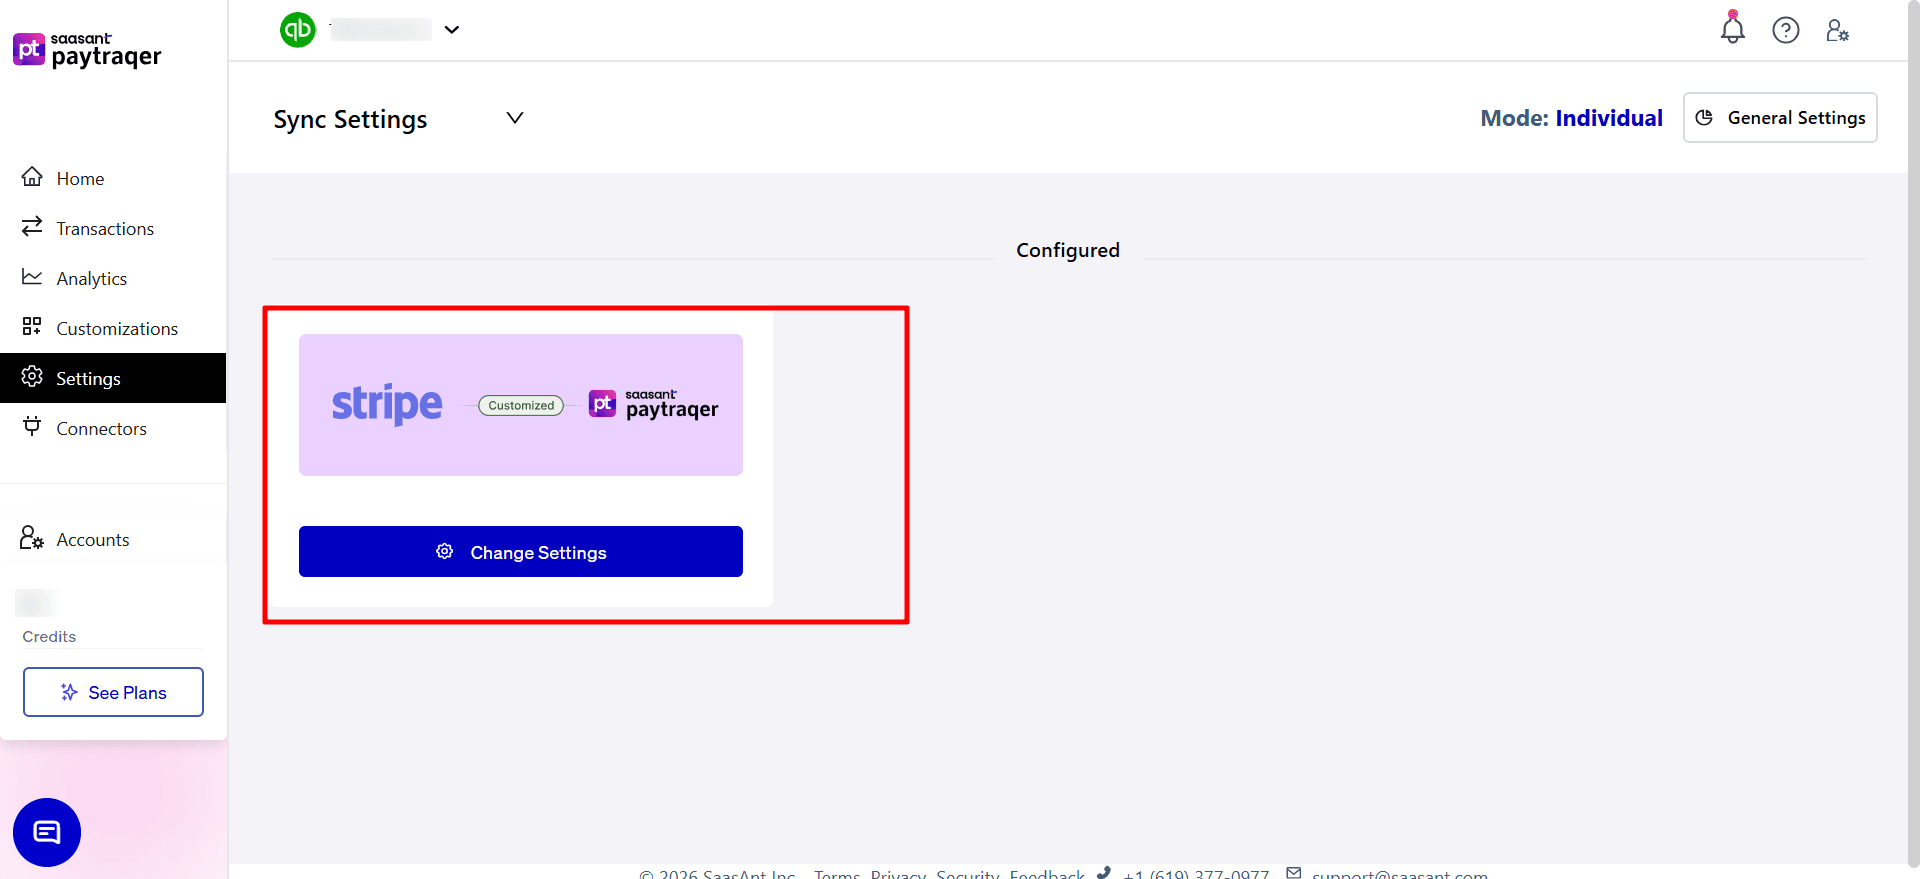
Make sure the Stripe settings screen is displayed before making any changes.
This page allows you to manage how Stripe sales, customers, products, taxes, fees, refunds, and payouts sync with QuickBooks Online.
Sales Settings
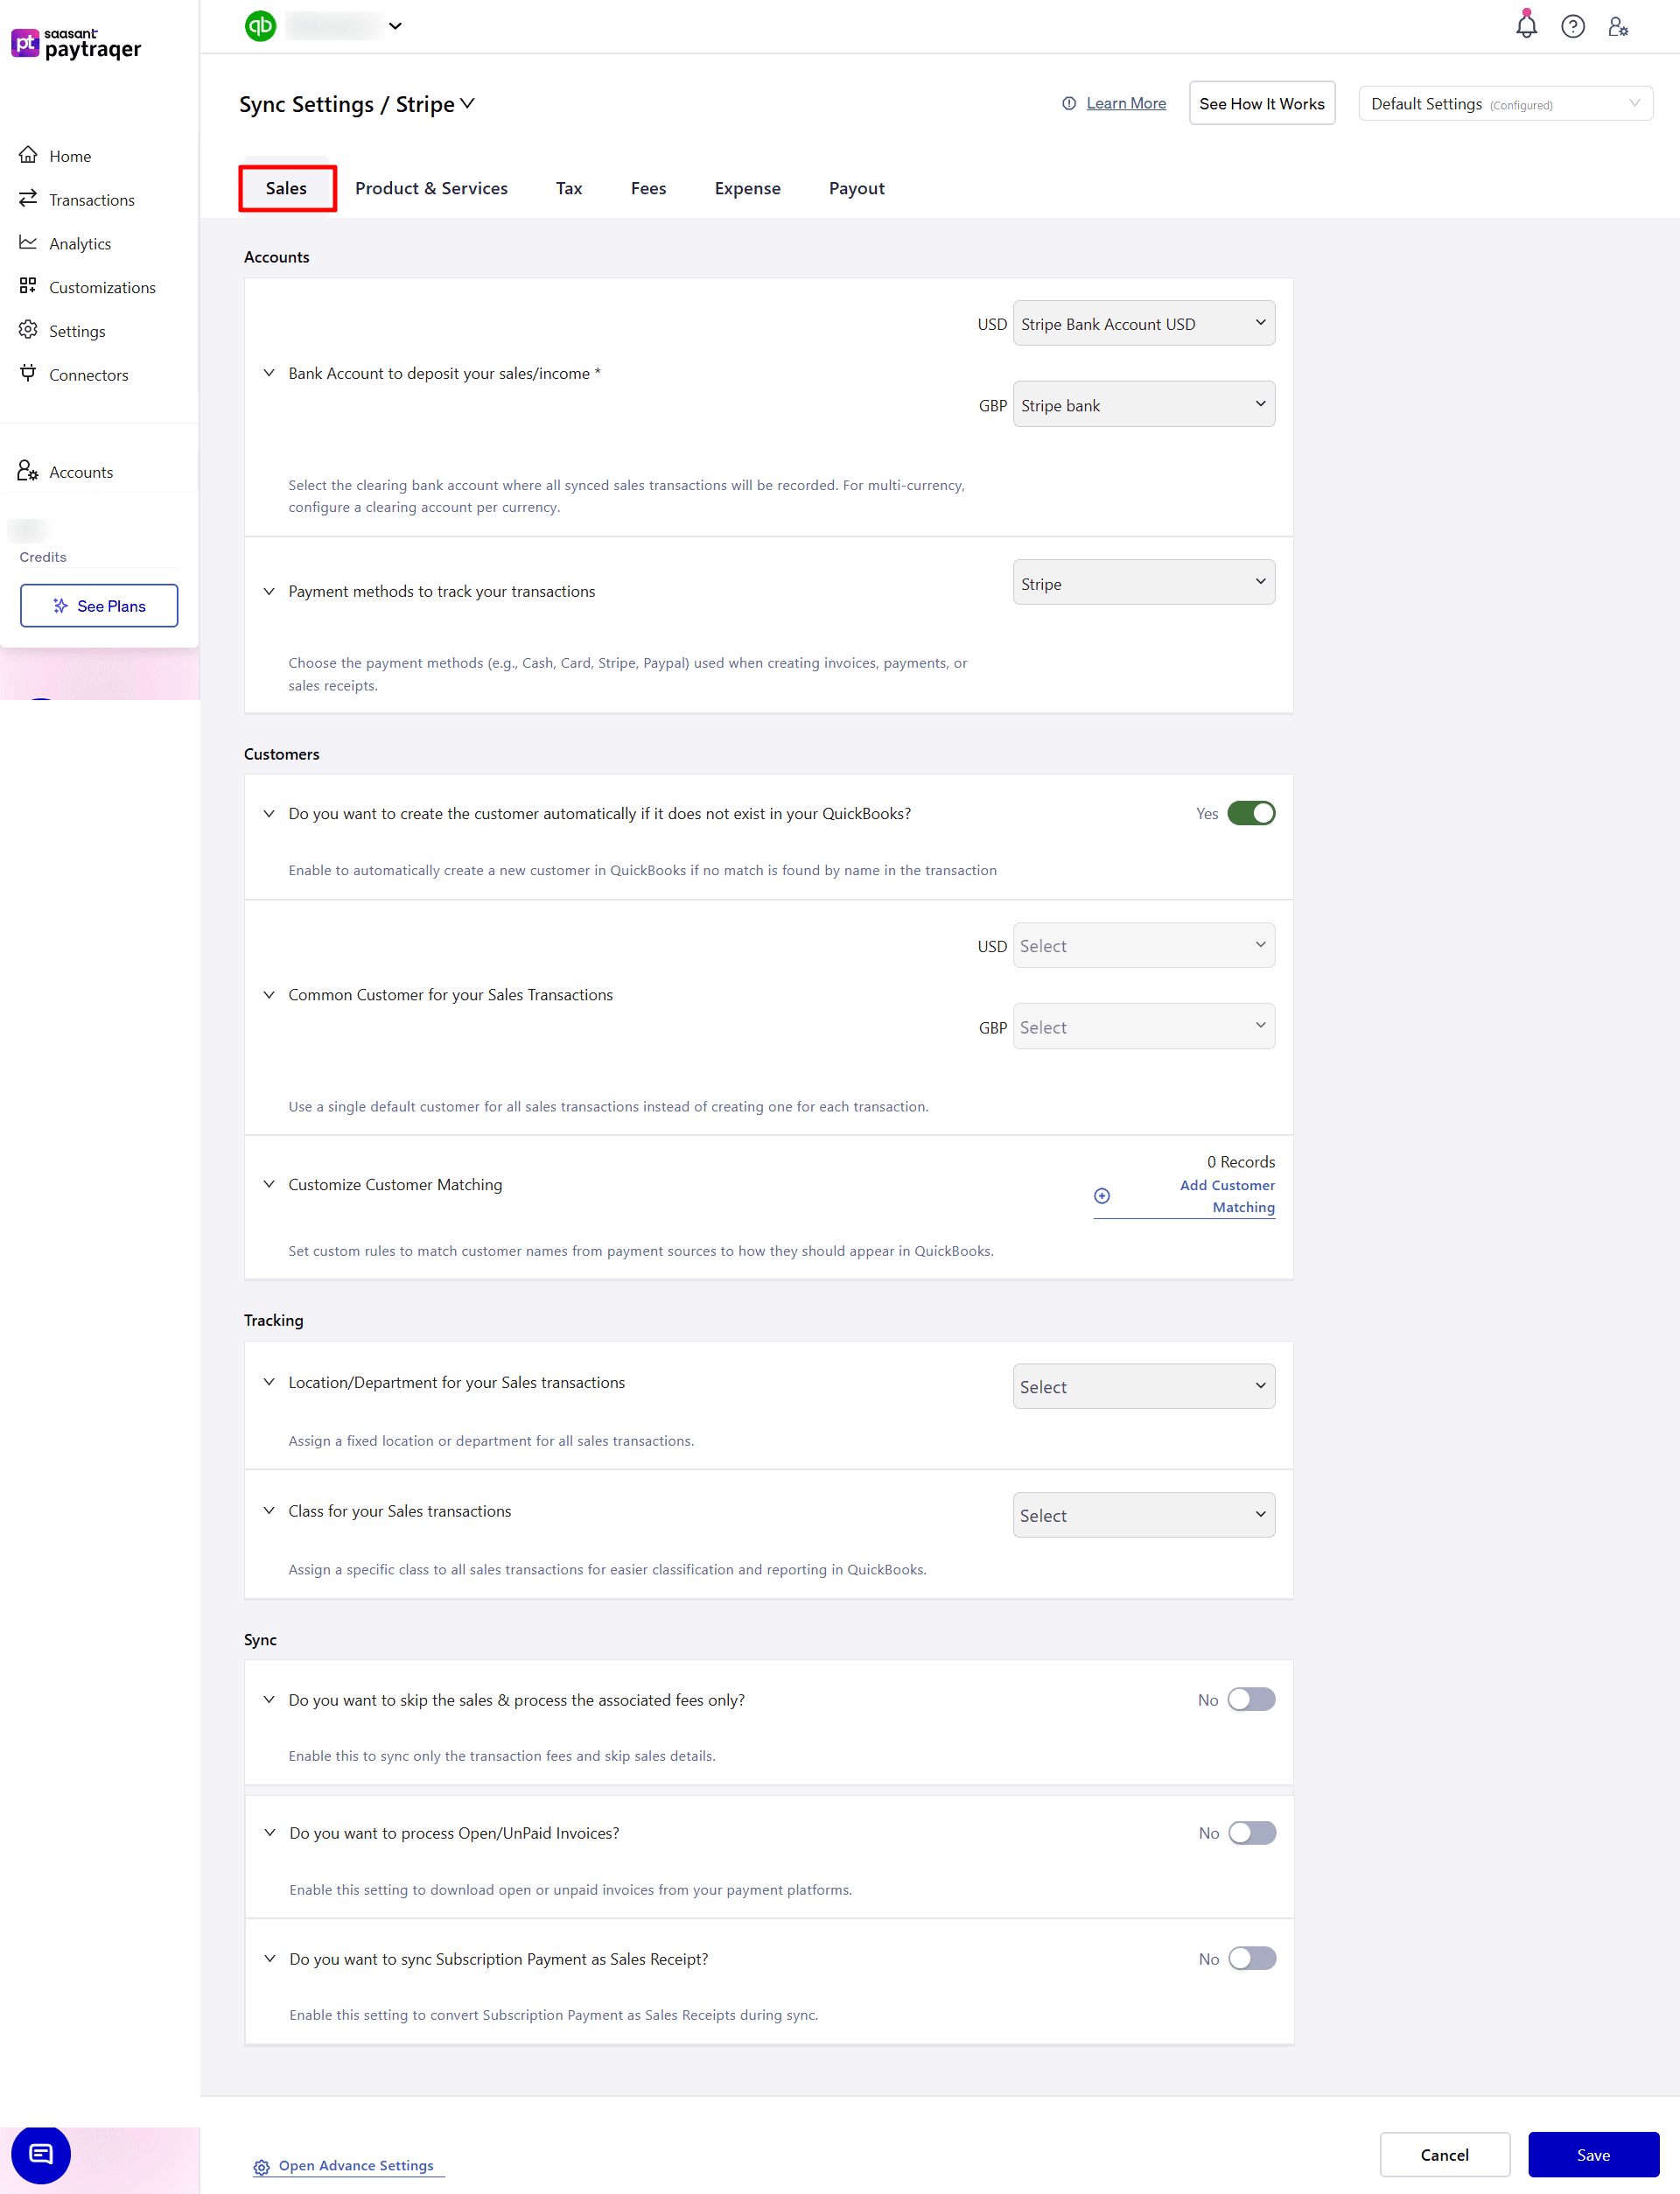
1) Bank Account to Deposit Your Sales/Income*
Select the clearing bank account where all synced sales transactions will be recorded.
For multi-currency, configure a clearing account per currency.
2) Payment Methods to Track Your Transactions: Choose the payment methods (e.g., Cash, Card, Stripe, PayPal) used when creating invoices, payments, or sales receipts.
3) Customers
Auto-Create Customer: Enable to automatically create a new customer in QuickBooks if no match is found by name in the transaction.
Common Customer for Your Sales Transactions: Use a single default customer for all sales transactions, rather than creating one for each transaction.
Customize Customer Matching: Use Add Customer Matching to set custom rules that match customer names from payment sources to how they should appear in QuickBooks.
4) Tracking
Location/Department for Your Sales Transactions: Assign a fixed location or department for all sales transactions.
Class for Your Sales Transactions: Assign a specific class to all sales transactions for easier classification and reporting in QuickBooks.
5) Sync Preferences
Skip Sales & Process Fees Only: Enable this to sync only transaction fees, skipping sales details.
Process Open/Unpaid Invoices: Enable this setting to download open or unpaid invoices from your payment platforms.
Sync Subscription Payment as Sales Receipt: Enable this setting to convert SubscriptionPayment as SalesReceipts during sync.
Products and Services Settings Configuration
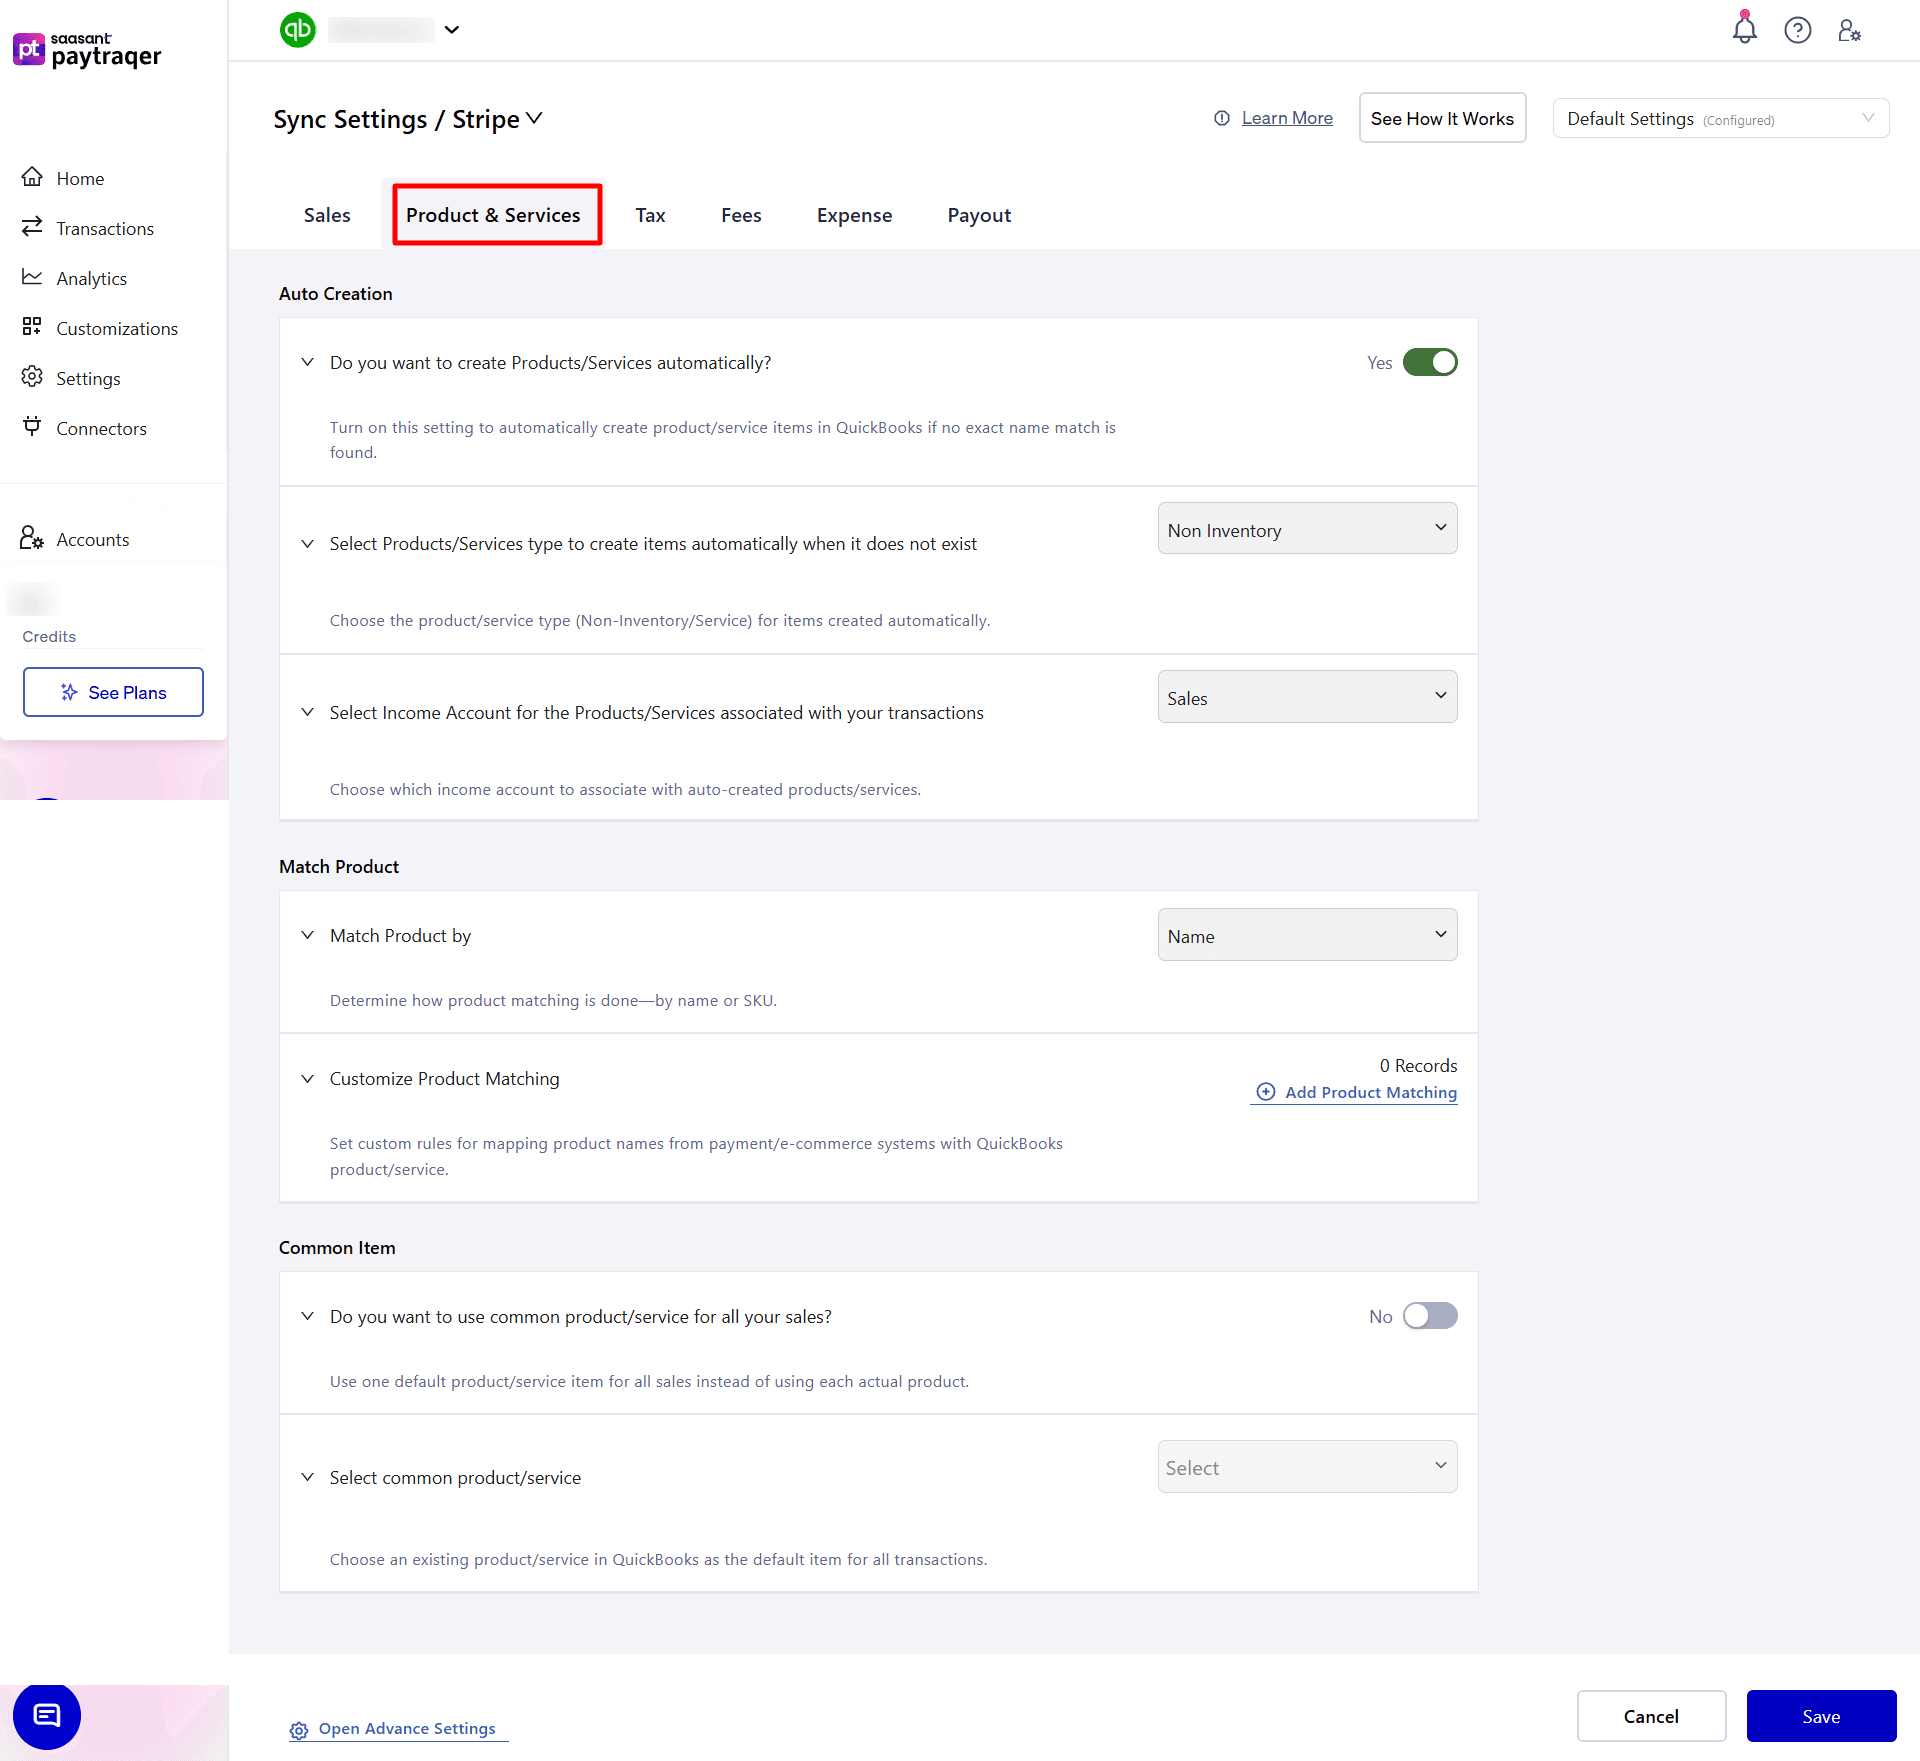
1) Auto Creation
Do you want to create Products/Services automatically?
Turn on this setting to automatically create product or service items in QuickBooks if no exact name match is found.Select Products/Services Type to create items automatically when it does not exist: Choose the product/service type (Non-Inventory or Service) for items created automatically.
Select Income Account for the Products/Services associated with your transactions: Choose the income account to associate with automatically created products/services.
2) Match Product
Match Product by: Determine how products should be matched—by Name or SKU.
Customize Product Matching:
Use Add Product Matching to create custom mapping rules.
Set custom mappings to match product names from payment or eCommerce systems with corresponding QuickBooks products/services.
3) Common Item
Do you want to use common product/service for all your sales?
Use one default product/service item for all sales instead of using each individual product.
Select common product/service:
Choose an existing product/service in QuickBooks to use as the default item for all synced transactions.
Tax Settings
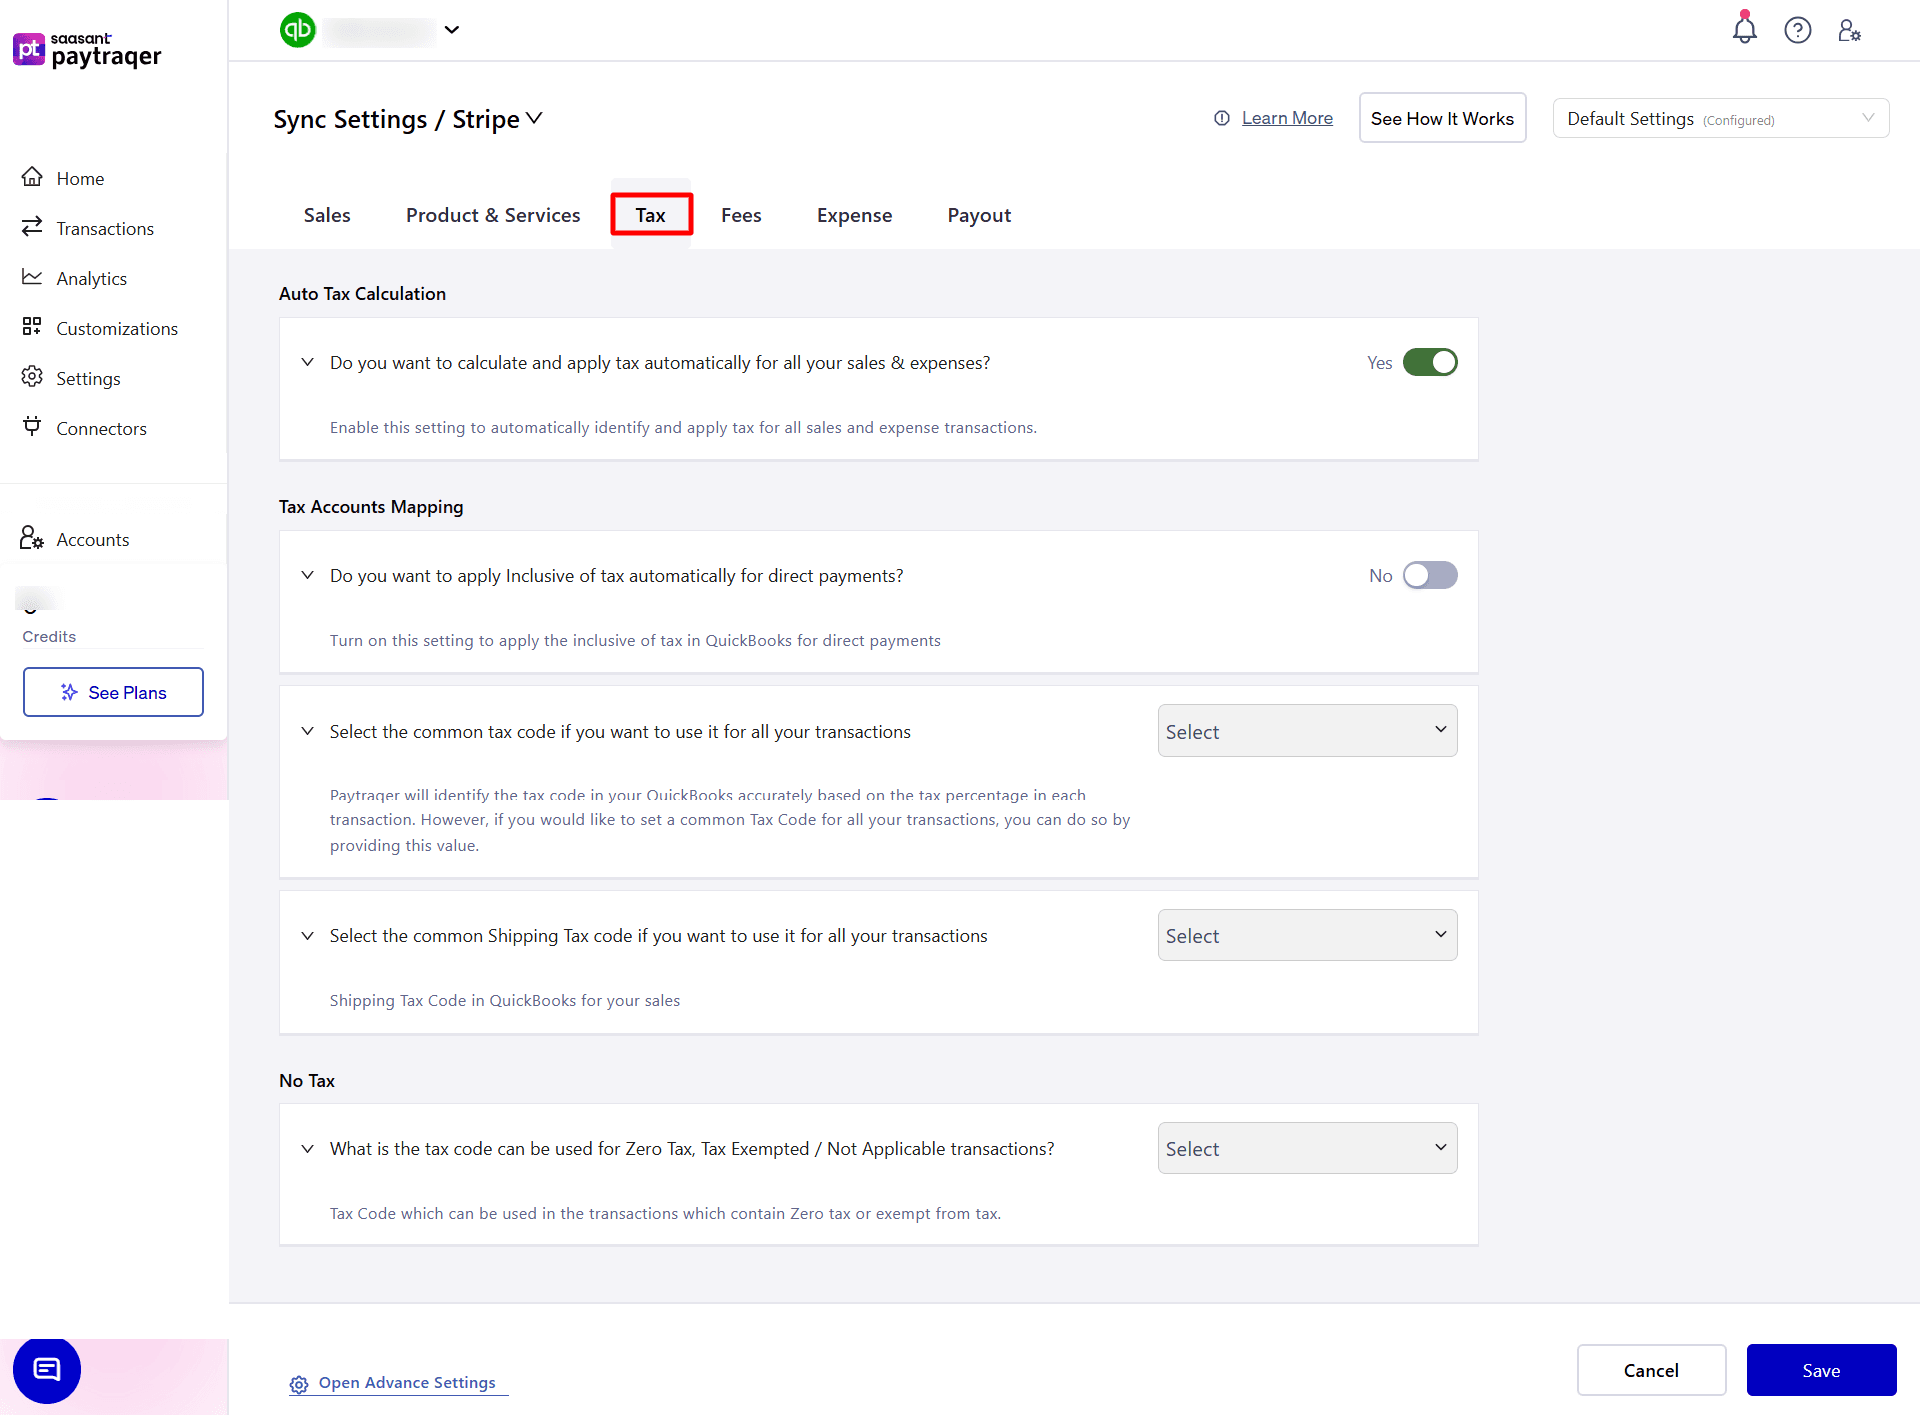
1) Auto Tax Calculation
Do you want to calculate and apply tax automatically for all your sales & expenses?
Enable this setting to automatically detect and apply the appropriate tax for all sales and expense transactions.
2) Tax Accounts Mapping
Do you want to apply Inclusive of Tax automatically for direct payments?
Turn on this setting to apply inclusive of tax in QuickBooks for direct payments.
3) Common Tax Code
Select the common tax code if you want to use it for all your transactions:
PayTraQer identifies the tax code in QuickBooks based on each transaction's tax percentage.
If you prefer to use a fixed tax code for all transactions, you can specify a standard Tax Code here.
4) Common Shipping Tax Code
Select the common Shipping Tax Code if you want to use it for all your transactions:
Choose the Shipping Tax Code in QuickBooks to apply tax to shipping amounts.
Example: No Tax if shipping is not taxable.
5) Zero Tax Code
What is the tax code that can be used for Zero Tax, Tax Exempted / Not Applicable transactions?
Choose the Tax Code to be used for transactions that are zero-rated, tax-exempt, or not applicable for tax.
Fees Settings
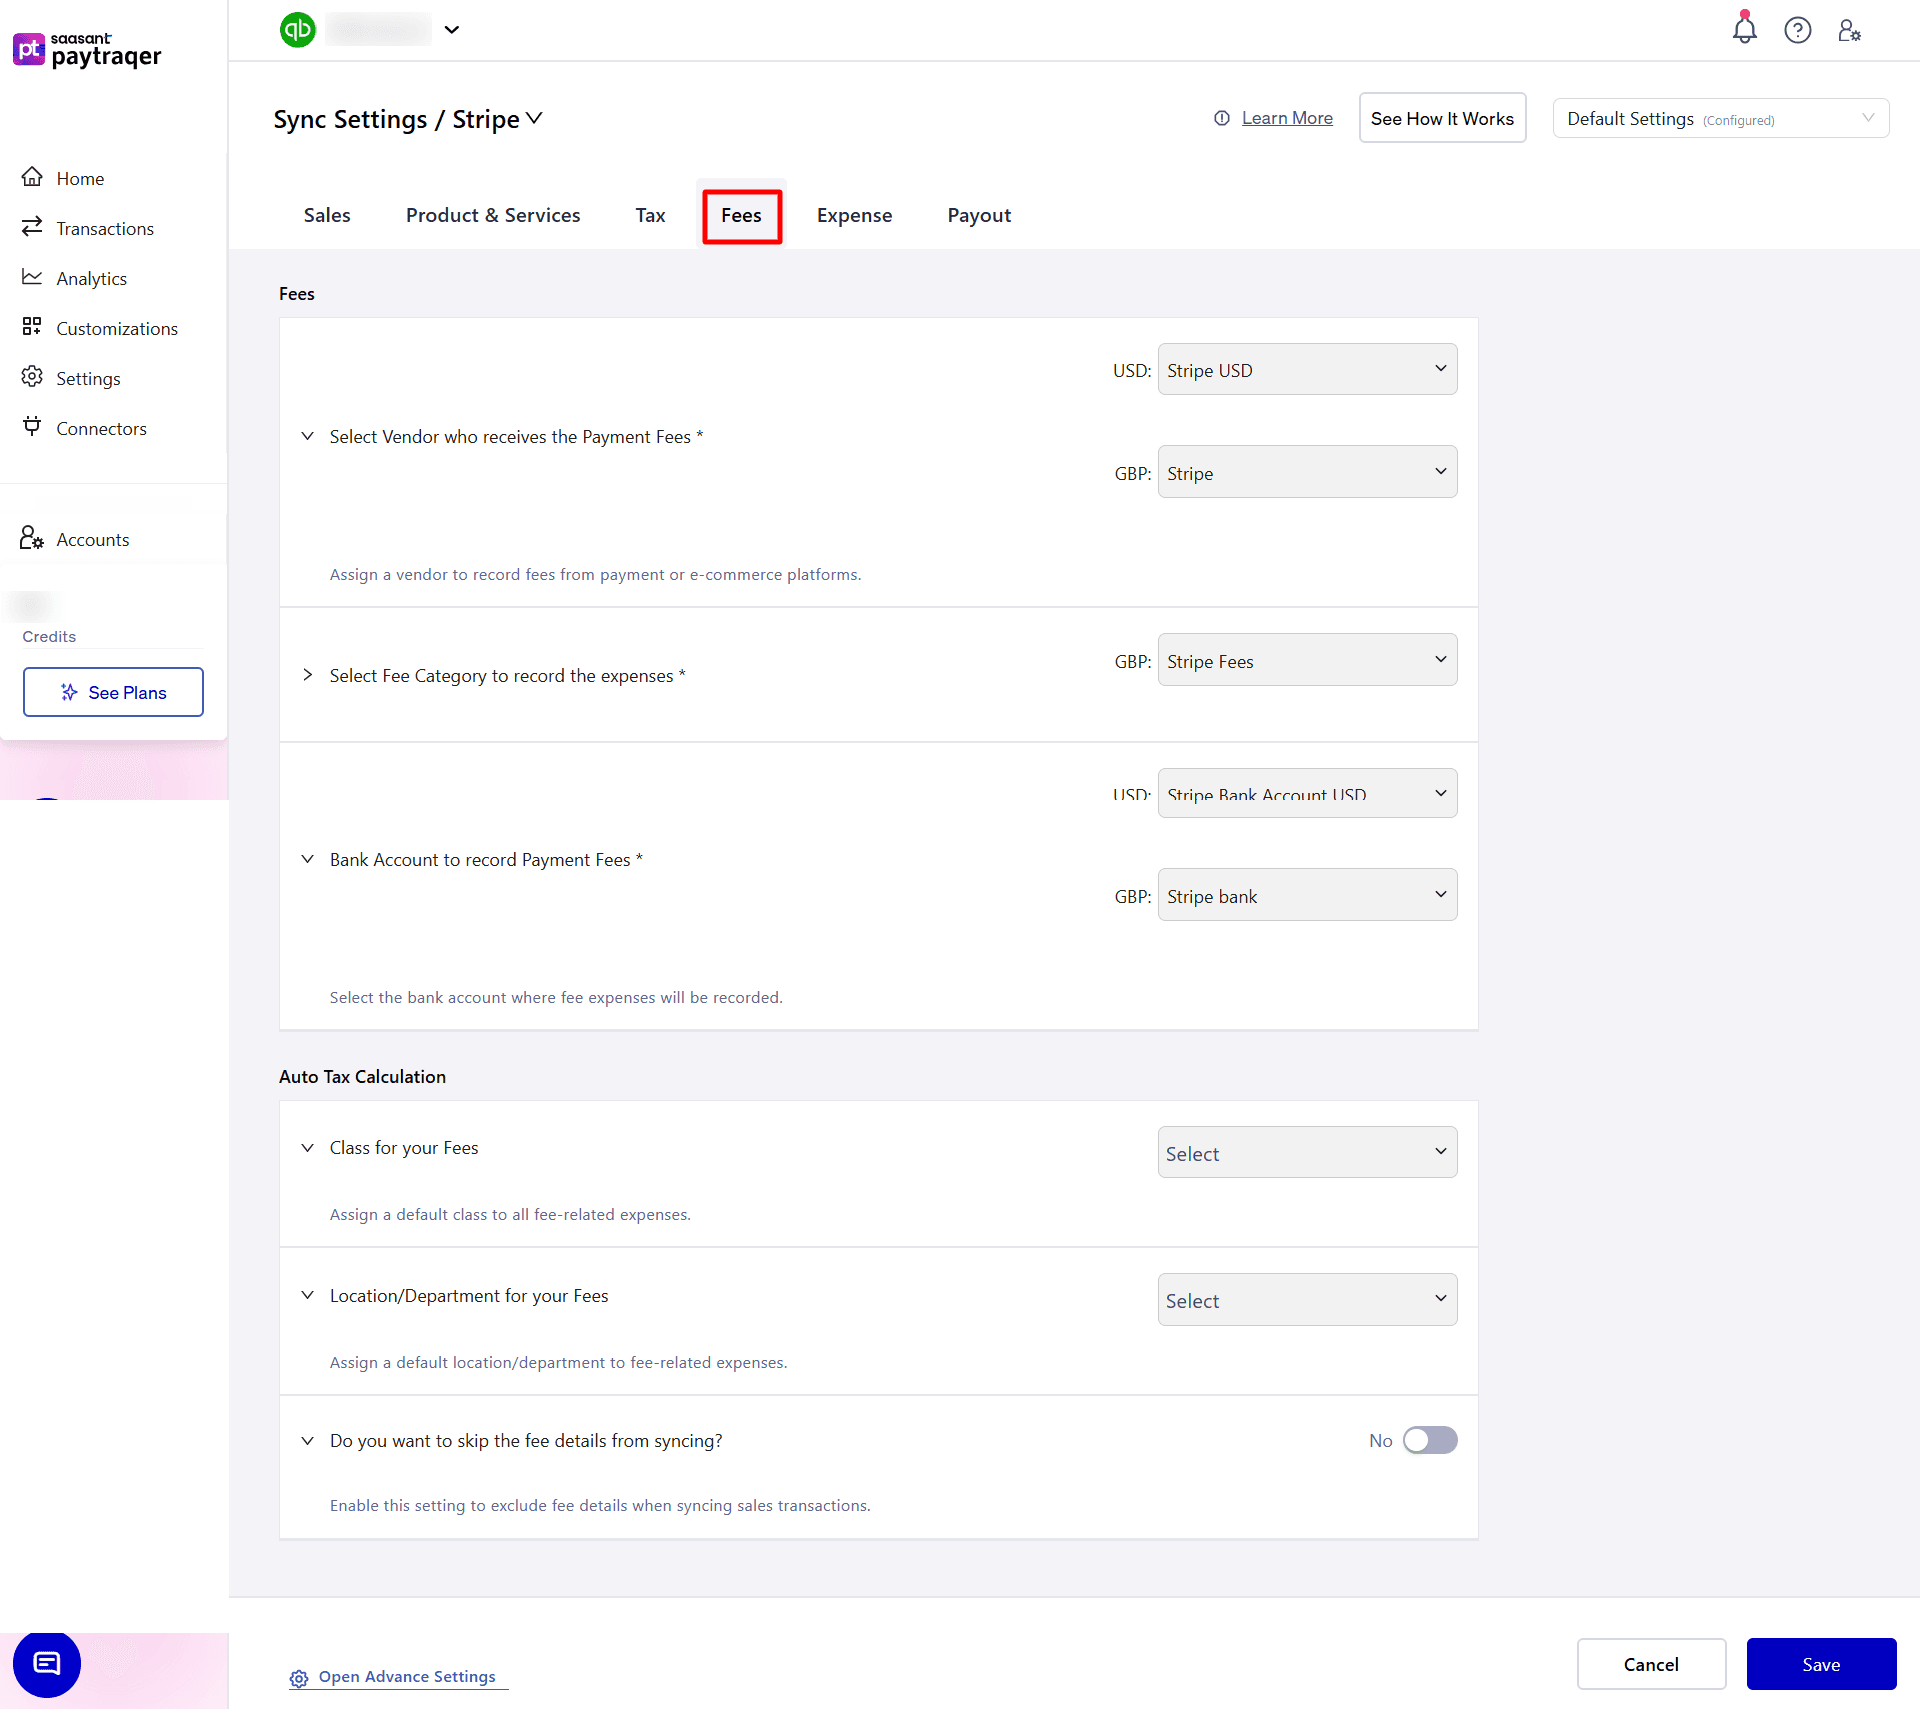
1) Vendor for Payment Fees
Select Vendor who receives the Payment Fees*
Assign a vendor to record payment processing fees from your payment or e-commerce platforms.
2) Fee Category
Select Fee Category to record the expenses*
Choose the appropriate expense category account for recording payment transaction fees.
3) Bank Account for Fee Recording
Bank Account to record Payment Fees*
Select the bank account where all fee-related expenses will be recorded.
4) Auto Tax Calculation for Fees
Class for your Fees:
Assign a default Class to all fee-related expenses for better categorization and reporting.
Location/Department for your Fees:
Assign a default Location or Department to all fee-related expenses for accurate tracking.
5) Sync Preferences for Fees
Do you want to skip the fee details from syncing?
Enable this setting to exclude detailed fee lines when syncing sales transactions.
Expense Settings
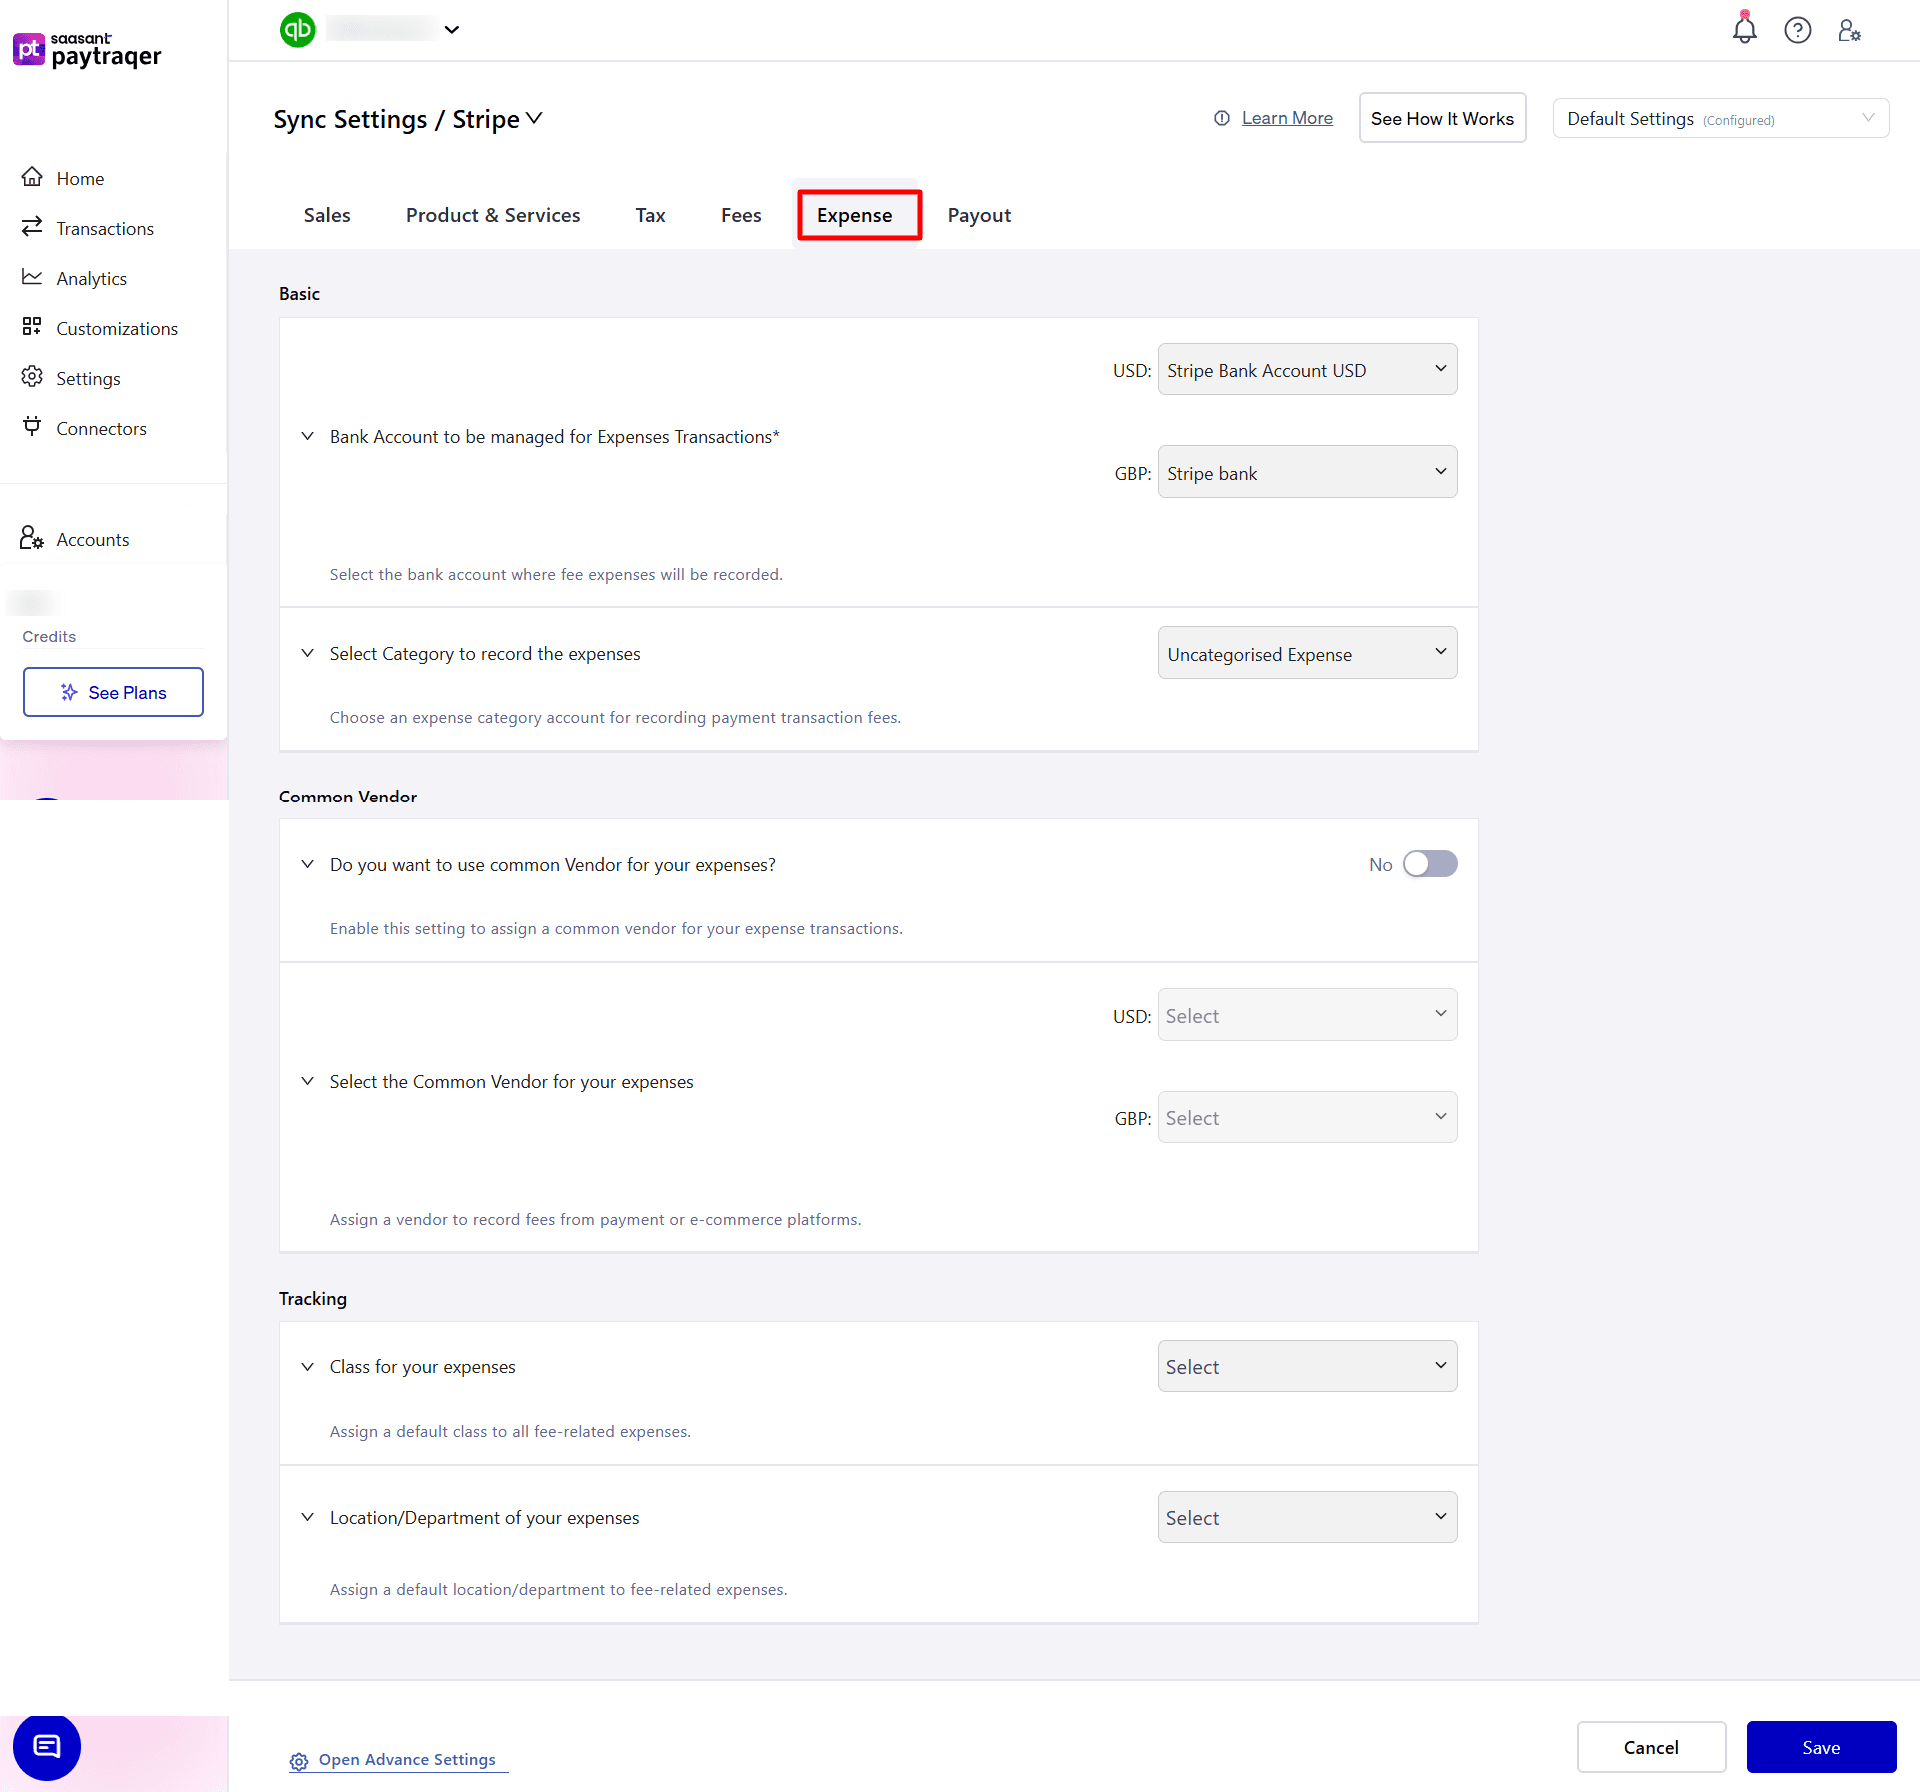
1) Bank Account for Expense Transactions
Bank Account to be managed for Expenses Transactions*
Select the bank account where all expense-related transactions will be recorded.
2) Expense Category
Select Category to record the expenses:
Choose the appropriate expense category account for recording payment transaction fees or other related expenses.
3) Common Vendor
Do you want to use common Vendor for your expenses?
Enable this setting to use a single common vendor for all expense transactions.
Select the Common Vendor for your expenses:
Assign a vendor to record fees and expenses from payment or e-commerce platforms.
4) Tracking
Class for your expenses:
Assign a default Class to all expense-related transactions for better reporting and categorization.
Location/Department of your expenses: Select
Assign a default Location or Department to expense transactions for accurate tracking and analysis.
Payouts Settings
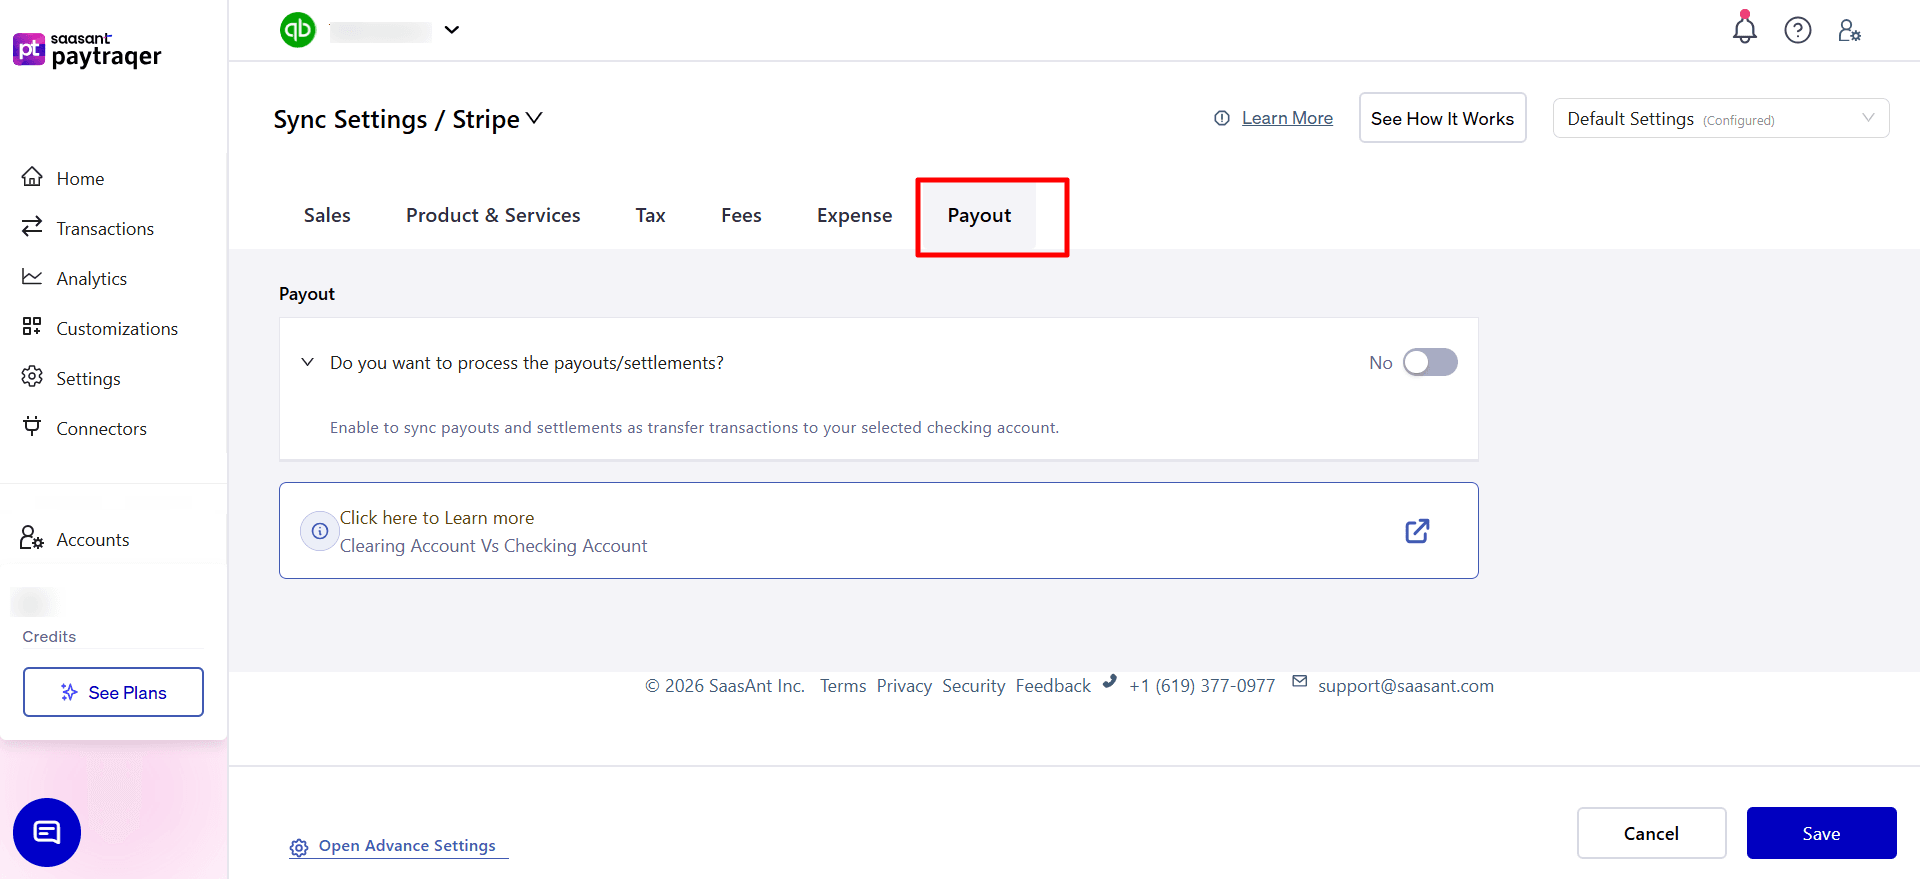
1) Process Payouts/Settlements
Do you want to process the payouts/settlements?
Enable this option to sync payouts and settlements as transfer transactions to your selected checking or settlement account.
2) Settlement Account Configuration
Transfer the sales to this settlement account:
Select the account where your sales revenue should be recorded or transferred after settlement.