How to Integrate Stripe with QuickBooks Online using PayTraQer?
October 17, 2025
How to integrate Stripe with QuickBooks Online using SaasAnt PayTraQer
Integrating Stripe and QuickBooks Online is very simple and is just a few clicks away with PayTraQer. SaasAnt PayTraQer - #1 user rated and Intuit trusted automation tool built exclusively for QuickBooks Online to synchronize Stripe data with QuickBooks Online.
PayTraQer synchronizes Stripe Customers, Sales, Payouts, Fees, Taxes, etc.. with your QuickBooks Online, keeping your books accurate and precise without the hassles of manual data entry.
Requirements
Permission to install apps in your QuickBooks Online company
A Stripe account with authorization access
If you’re not the admin, prepare to use the Invite admin/client option.
1) Install PayTraQer from QuickBooks
In QuickBooks Online, open the Apps section.
Search for PayTraQer.
Select SaasAnt PayTraQer and click Get app now.
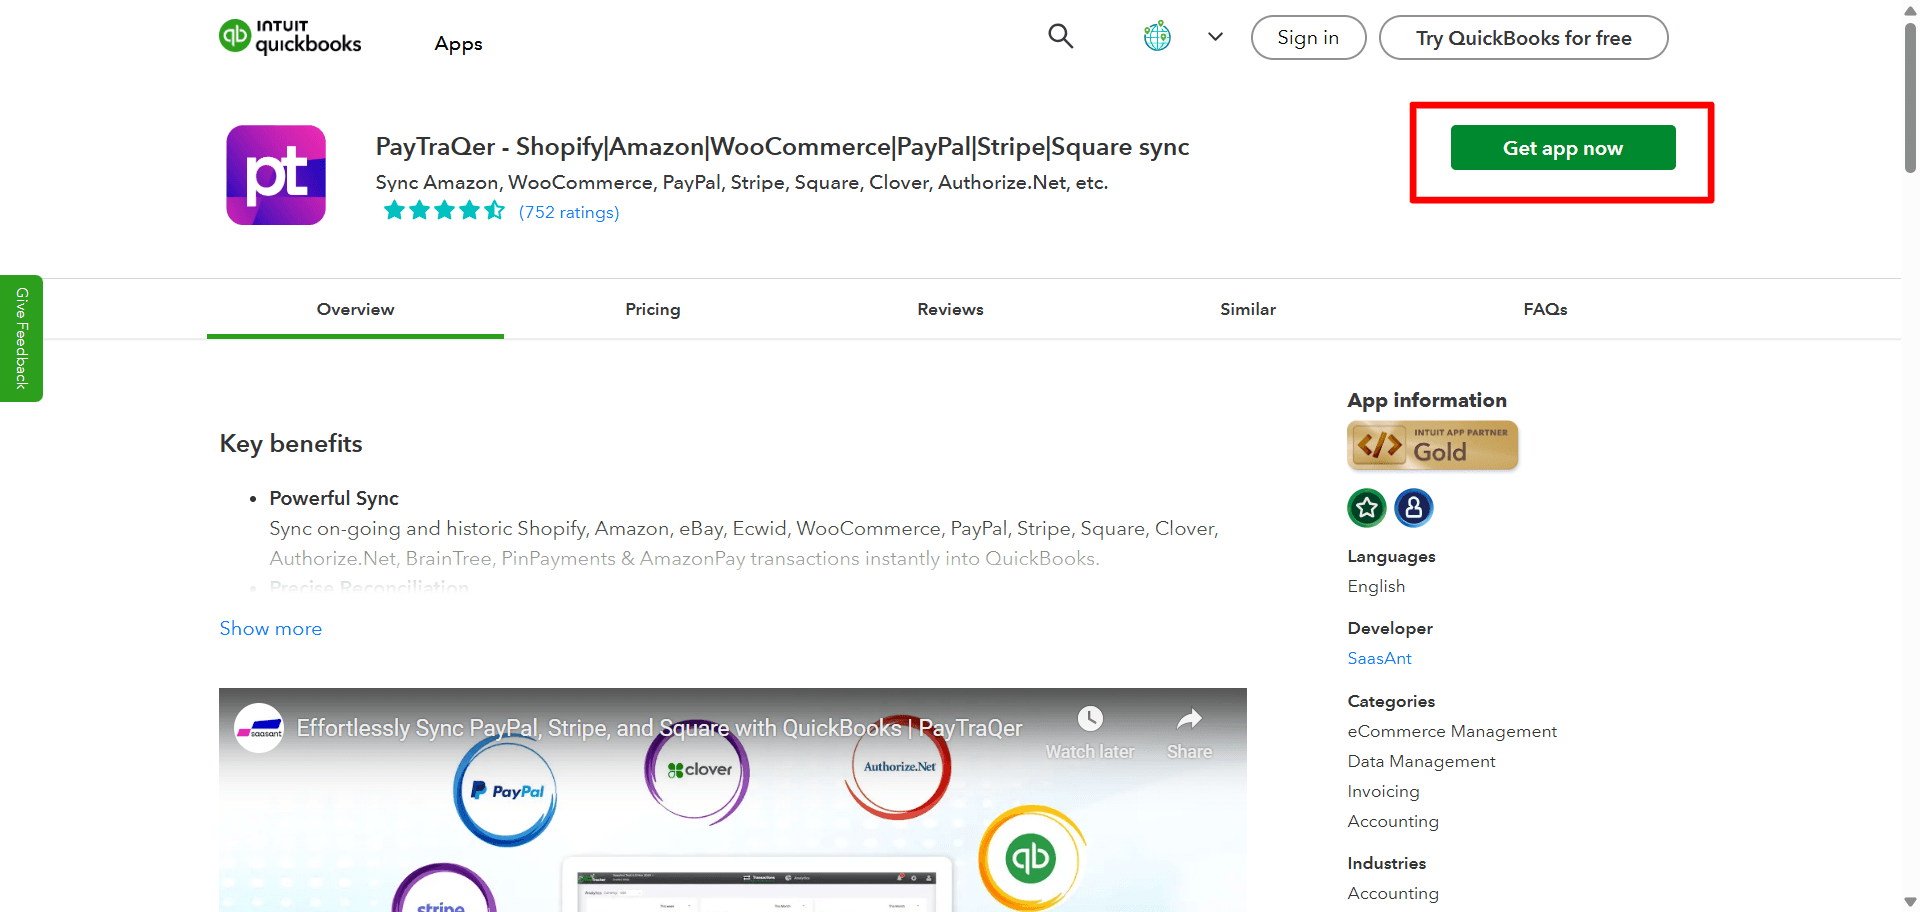
Follow the prompts and authorize access to your QuickBooks company.
2) Choose Your Sync Mode
After connecting to QuickBooks, decide how Stripe data should post:

Consolidated Sync (Sales Summary): fewer entries for faster reconciliation.
Itemized Sync (Individual): detailed entries with customer and item information.
Select your preferred mode and click Get Started. You can change this setting at any time.
3) Connect Stripe in PayTraQer
In PayTraQer, go to Connectors.
Open Payment connectors.
Select Stripe and click Connect.
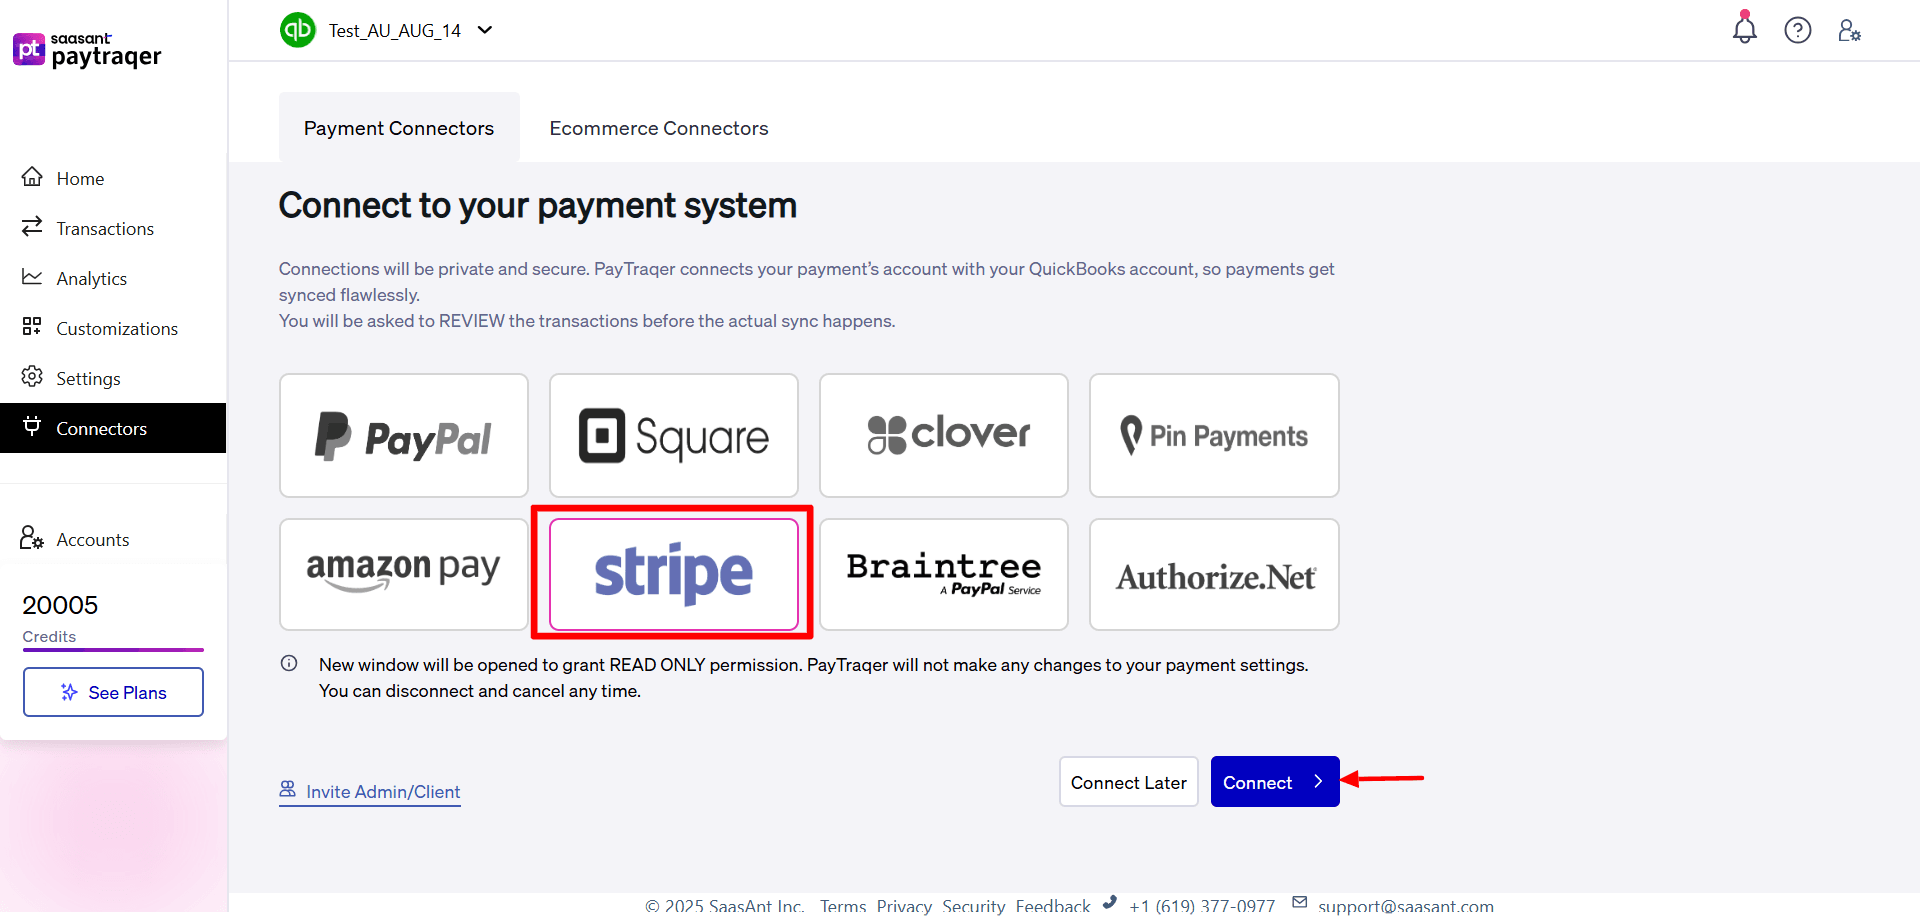
Sign in to Stripe and approve access.
If you’re not the admin, use Invite admin/client to send the approval link.

Permissions used:
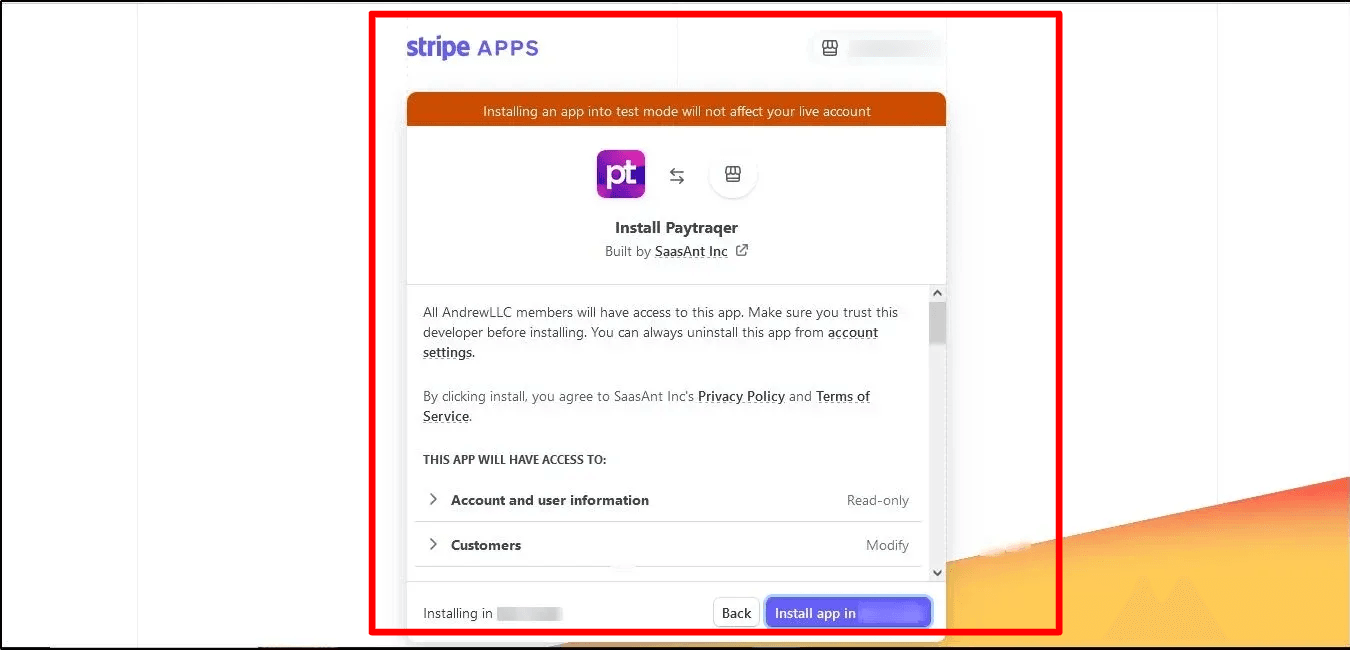
From Stripe: Read-only access to sales, fees, refunds, payouts, customers, and items.
In QuickBooks Online: With your approval, PayTraQer creates and updates records to maintain synchronization.
4) Complete Initial Setup After Stripe Approval
Once Stripe is connected, you’ll be redirected back to PayTraQer for initial configuration.
Process payments and settlements

Toggle On if you want PayTraQer to manage settlements.
Choose a Bank account to act as the clearing account.
Click Save.
Auto Download

After saving, PayTraQer will automatically download the last 60 days of Stripe data.
More History
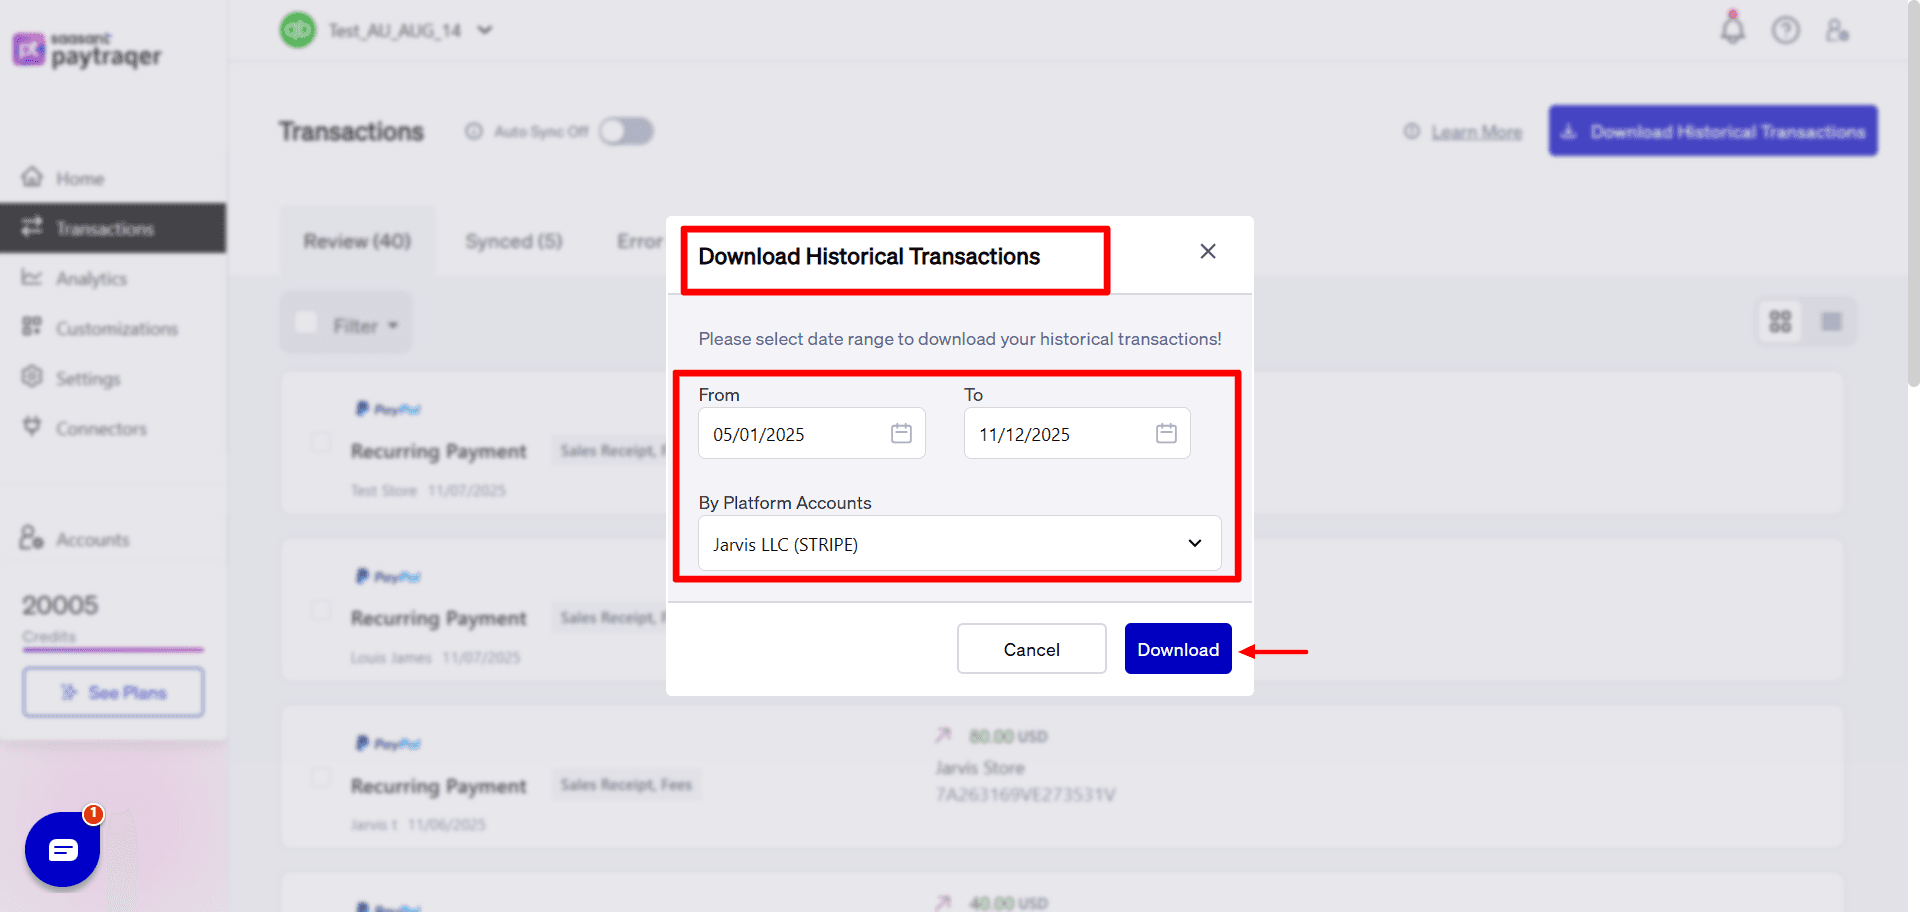
Use Download historical transactions to fetch older data using date filters.
Auto Sync
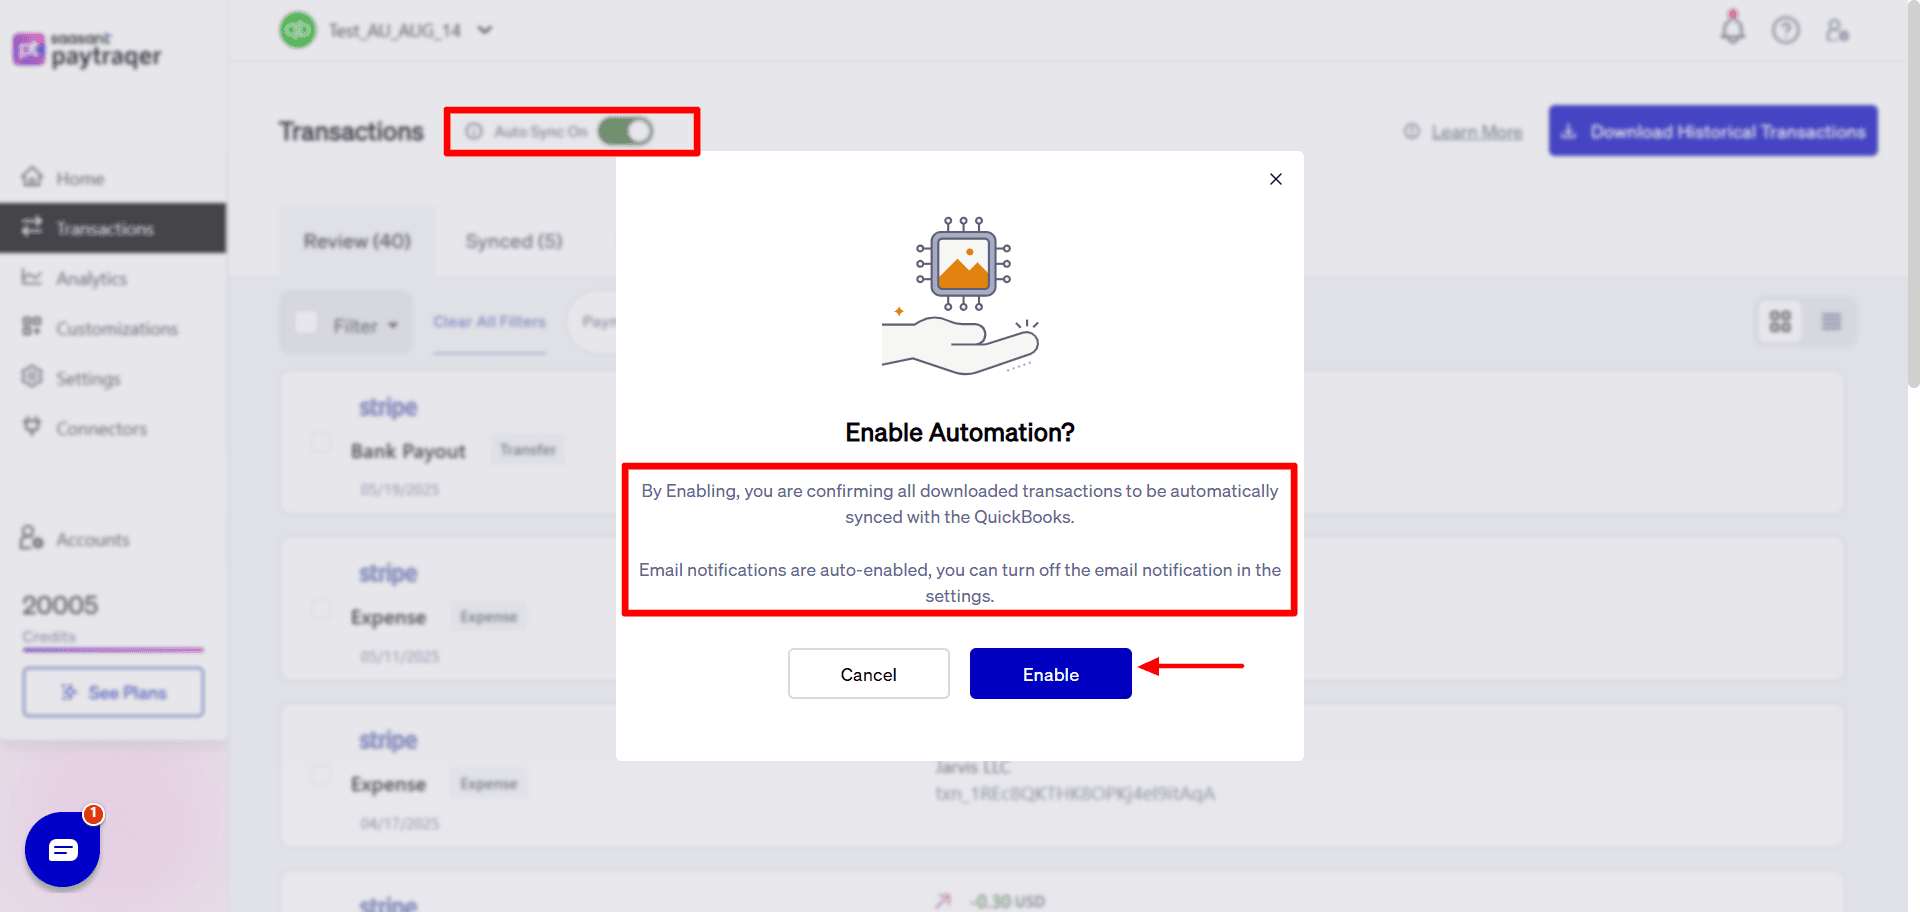
When enabled, PayTraQer regularly downloads and syncs new Stripe transactions with QuickBooks.
5) Sales Settings
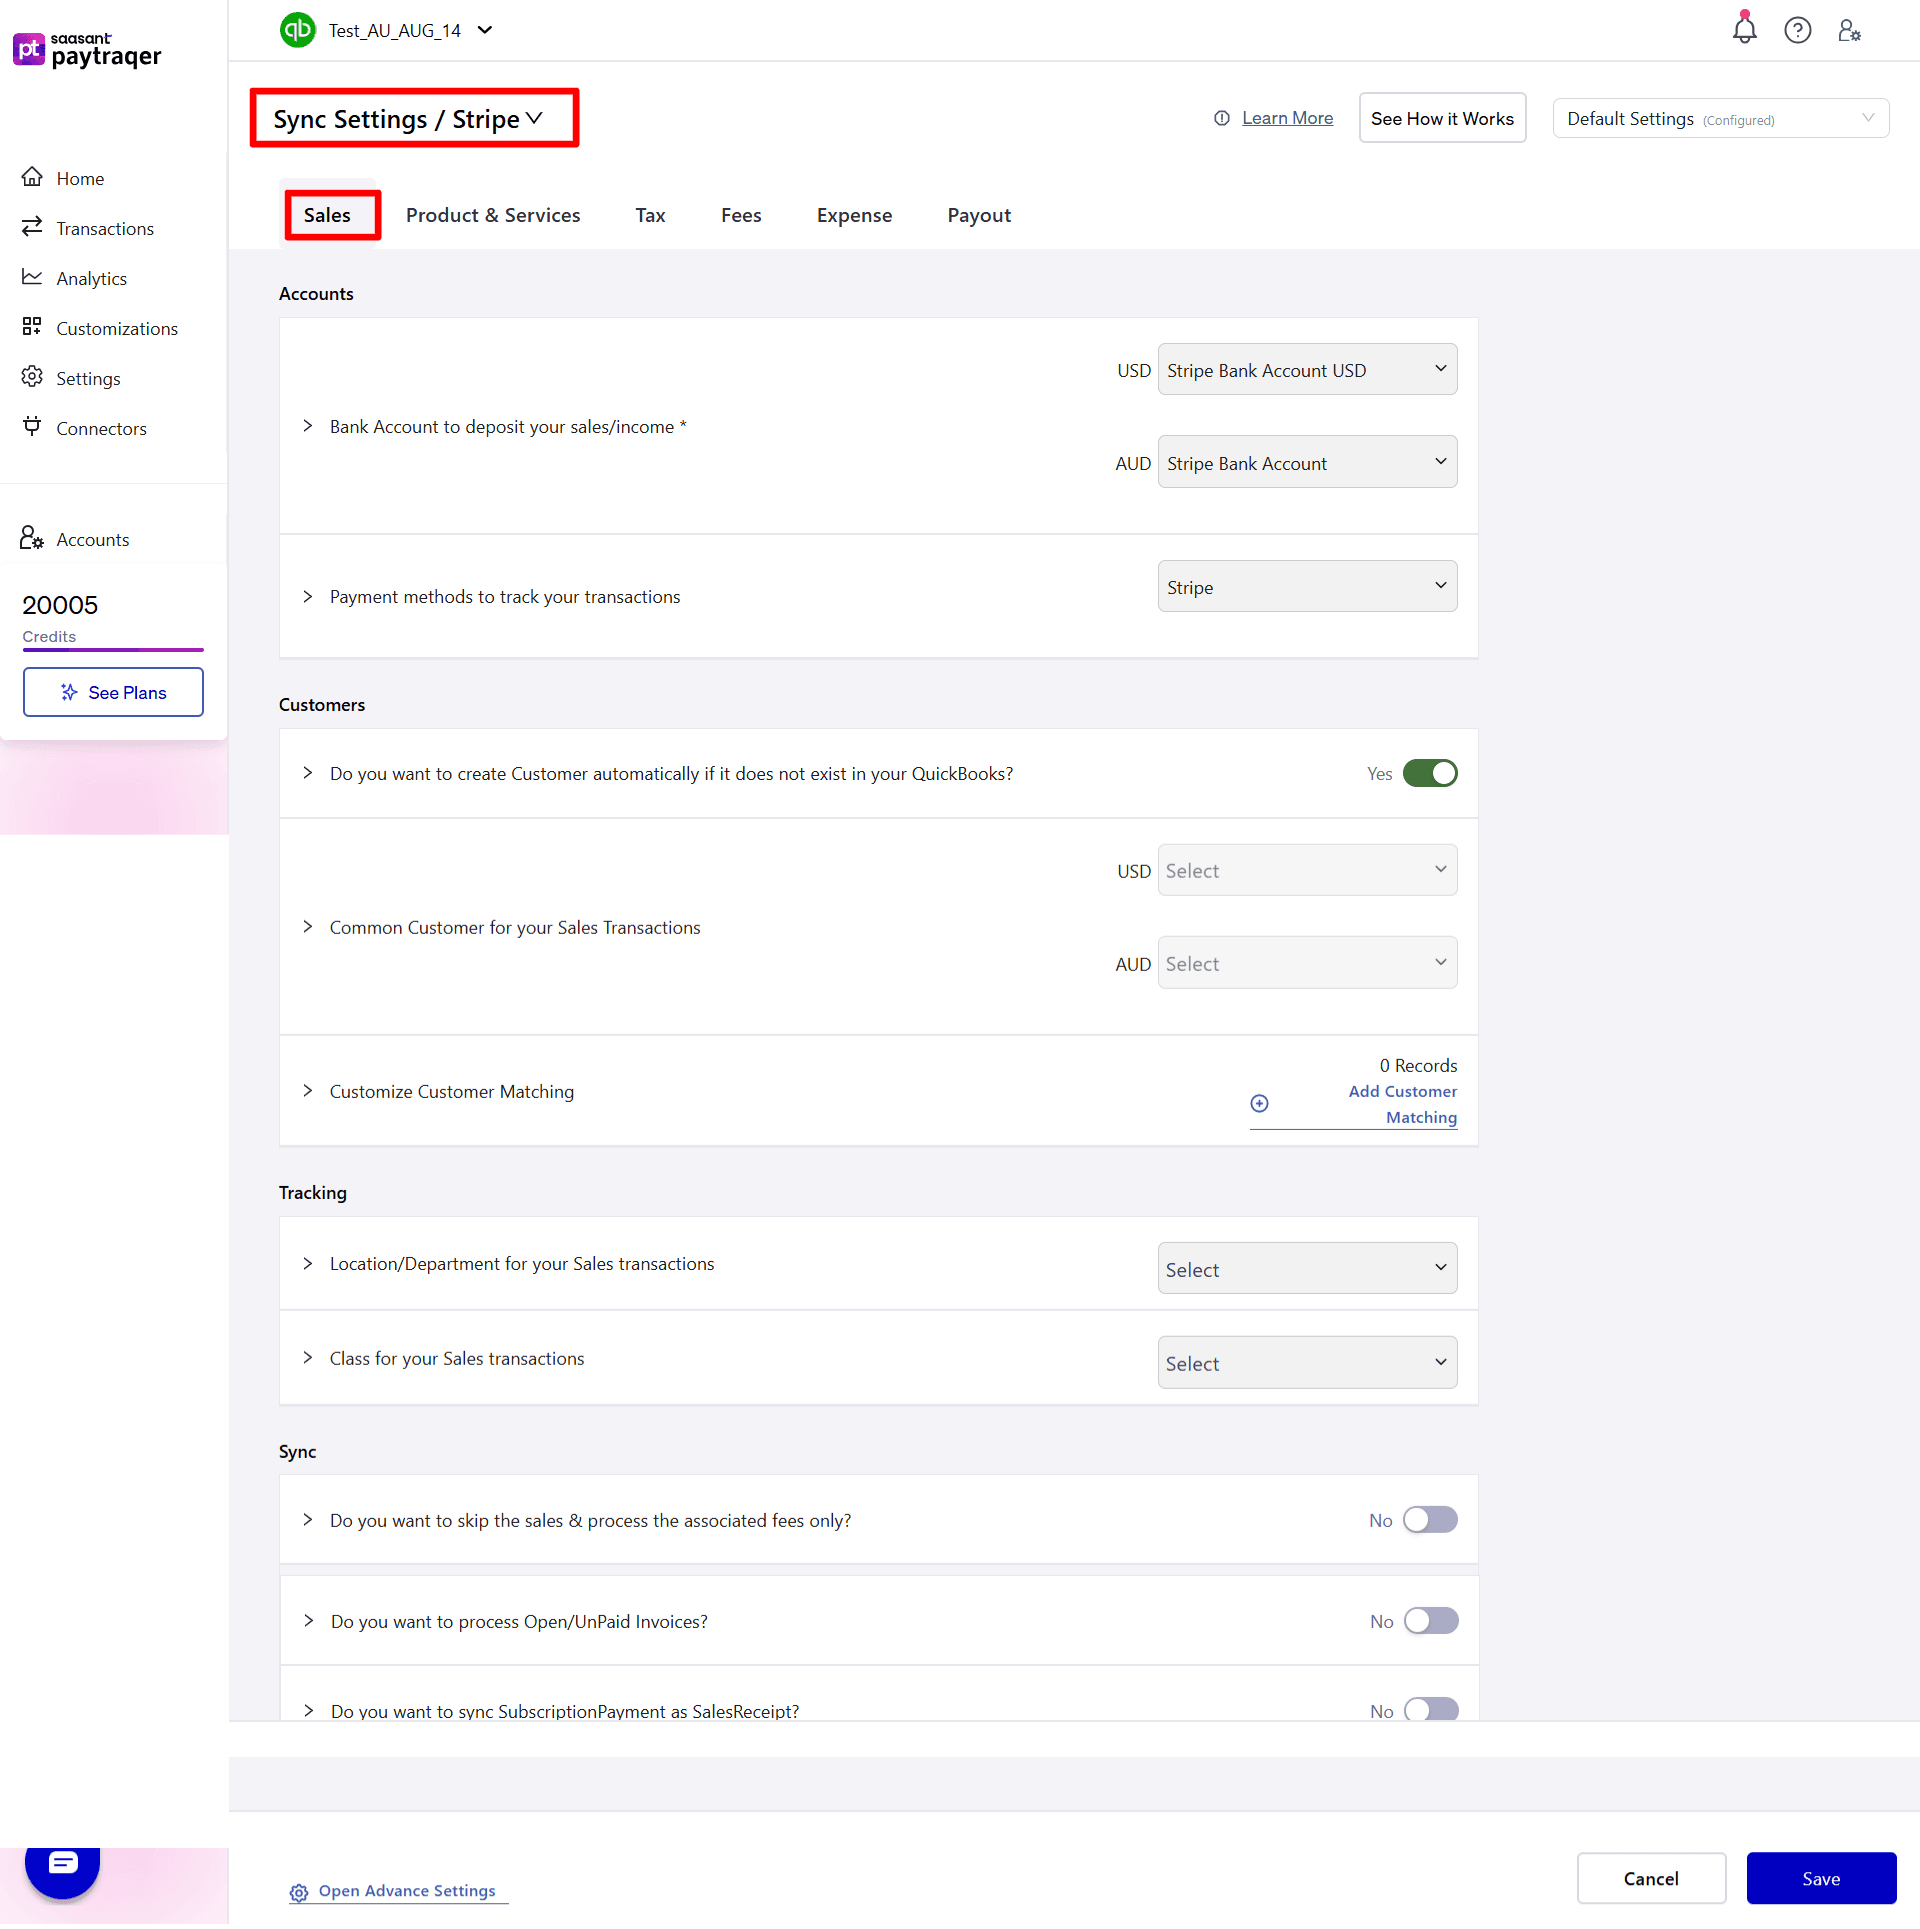
1) Bank Account to Deposit Your Sales/Income*
Select the clearing bank account where all synced sales transactions will be recorded.
For multi-currency, configure a clearing account per currency.
2) Payment Methods to Track Your Transactions: Choose the payment methods (e.g., Cash, Card, Stripe, PayPal) used when creating invoices, payments, or sales receipts.
3) Customers
Auto-Create Customer: Enable to automatically create a new customer in QuickBooks if no match is found by name in the transaction.
Common Customer for Your Sales Transactions: Use a single default customer for all sales transactions, rather than creating one for each transaction.
Customize Customer Matching: Use Add Customer Matching to set custom rules that match customer names from payment sources to how they should appear in QuickBooks.
4) Tracking
Location/Department for Your Sales Transactions: Assign a fixed location or department for all sales transactions.
Class for Your Sales Transactions: Assign a specific class to all sales transactions for easier classification and reporting in QuickBooks.
5) Sync Preferences
Skip Sales & Process Fees Only: Enable this to sync only transaction fees, skipping sales details.
Process Open/Unpaid Invoices: Enable this setting to download open or unpaid invoices from your payment platforms.
Sync Subscription Payment as Sales Receipt: Enable this setting to convert SubscriptionPayment as SalesReceipts during sync.
6) Products and Services Settings Configuration
1) Auto Creation
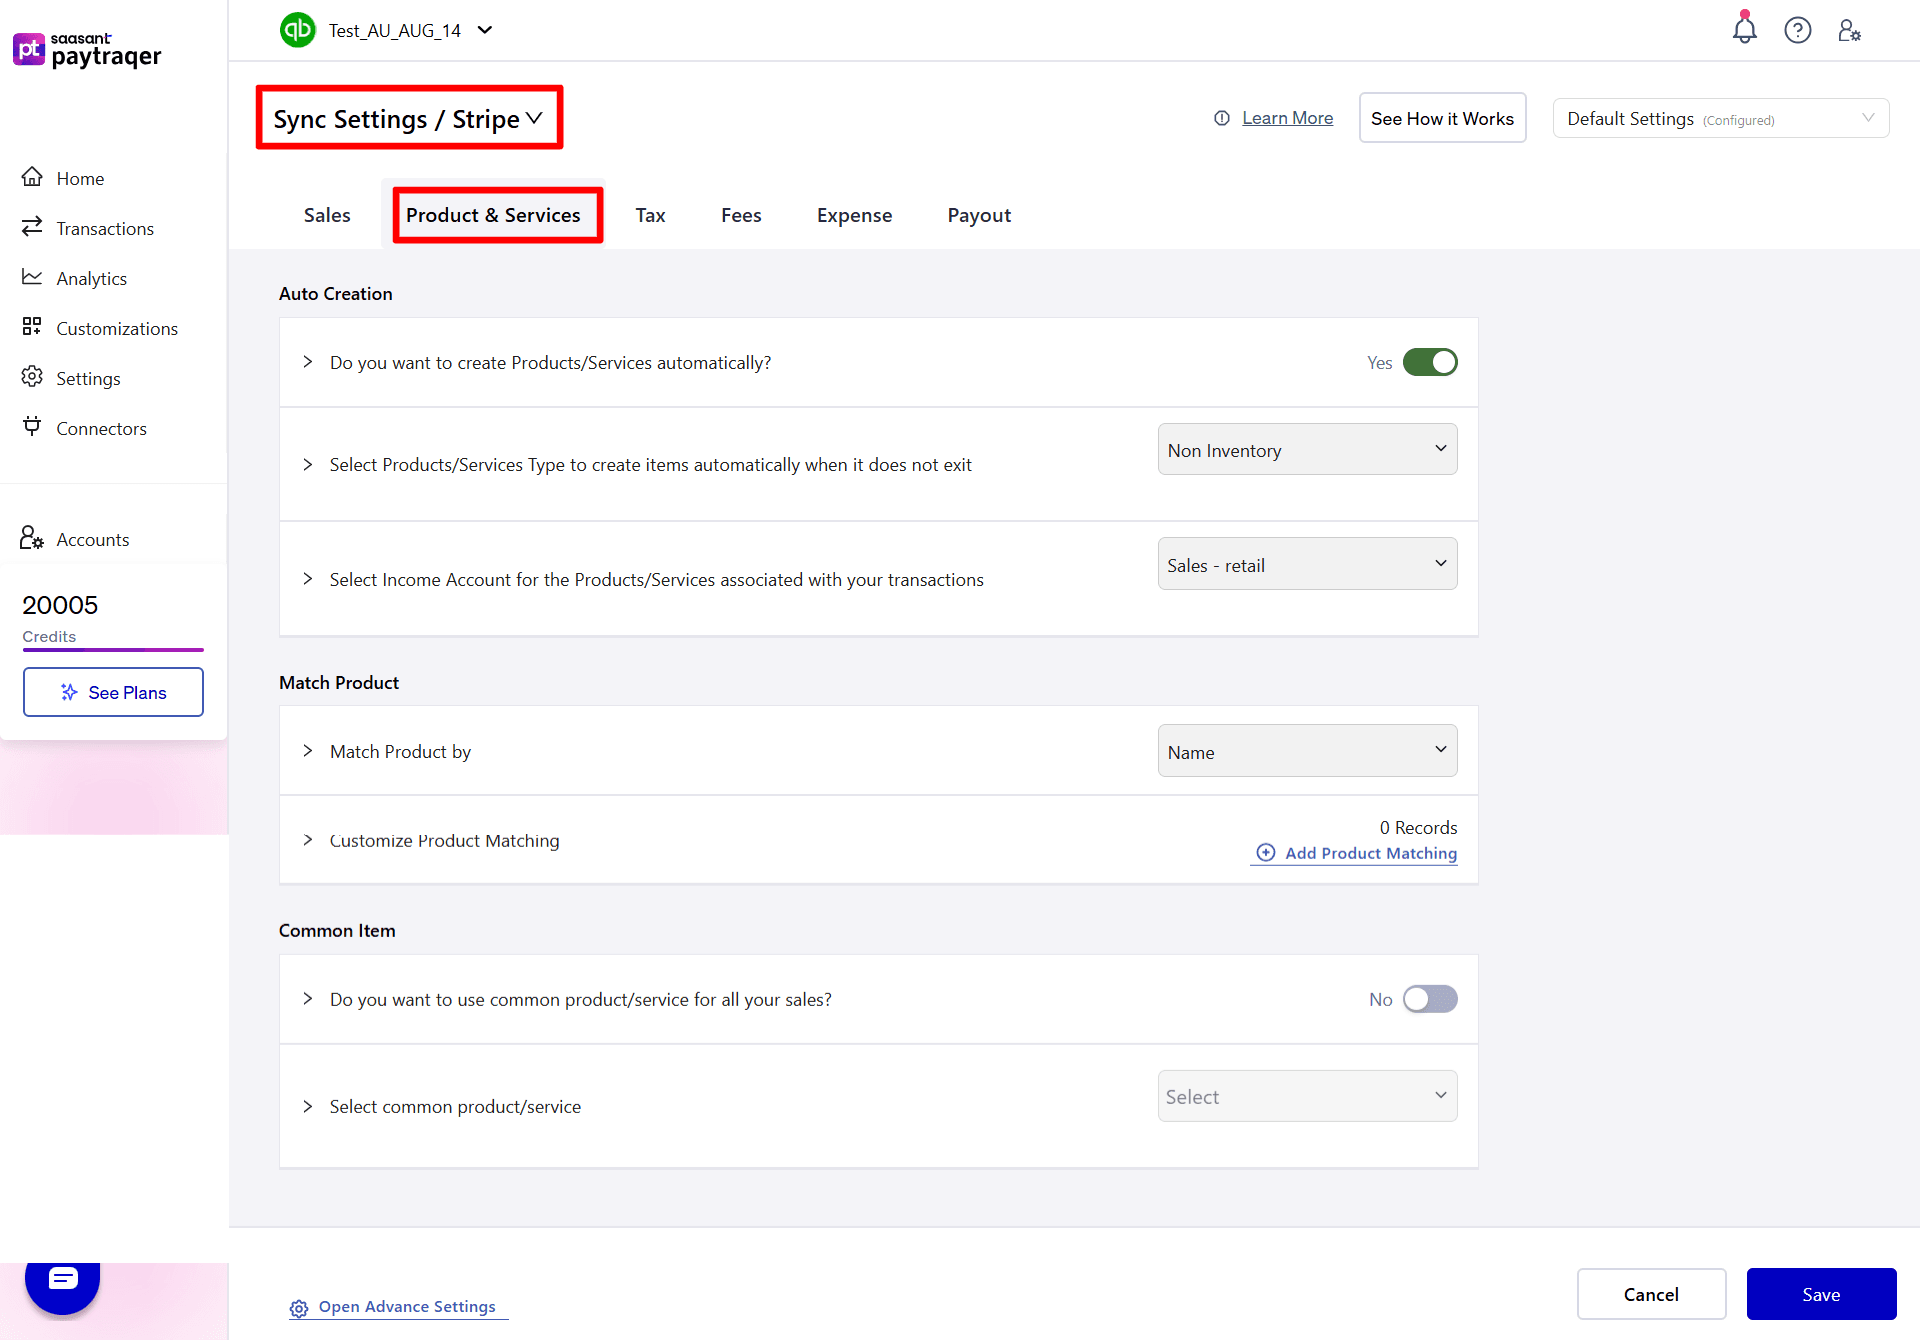
Do you want to create Products/Services automatically?
Turn on this setting to automatically create product or service items in QuickBooks if no exact name match is found.Select Products/Services Type to create items automatically when it does not exist: Choose the product/service type (Non-Inventory or Service) for items created automatically.
Select Income Account for the Products/Services associated with your transactions: Choose the income account to associate with automatically created products/services.
2) Match Product
Match Product by: Determine how products should be matched—by Name or SKU.
Customize Product Matching:
Use Add Product Matching to create custom mapping rules.
Set custom mappings to match product names from payment or eCommerce systems with corresponding QuickBooks products/services.
3) Common Item
Do you want to use common product/service for all your sales?
Use one default product/service item for all sales instead of using each individual product.
Select common product/service:
Choose an existing product/service in QuickBooks to use as the default item for all synced transactions.
7) Tax Settings
1) Auto Tax Calculation
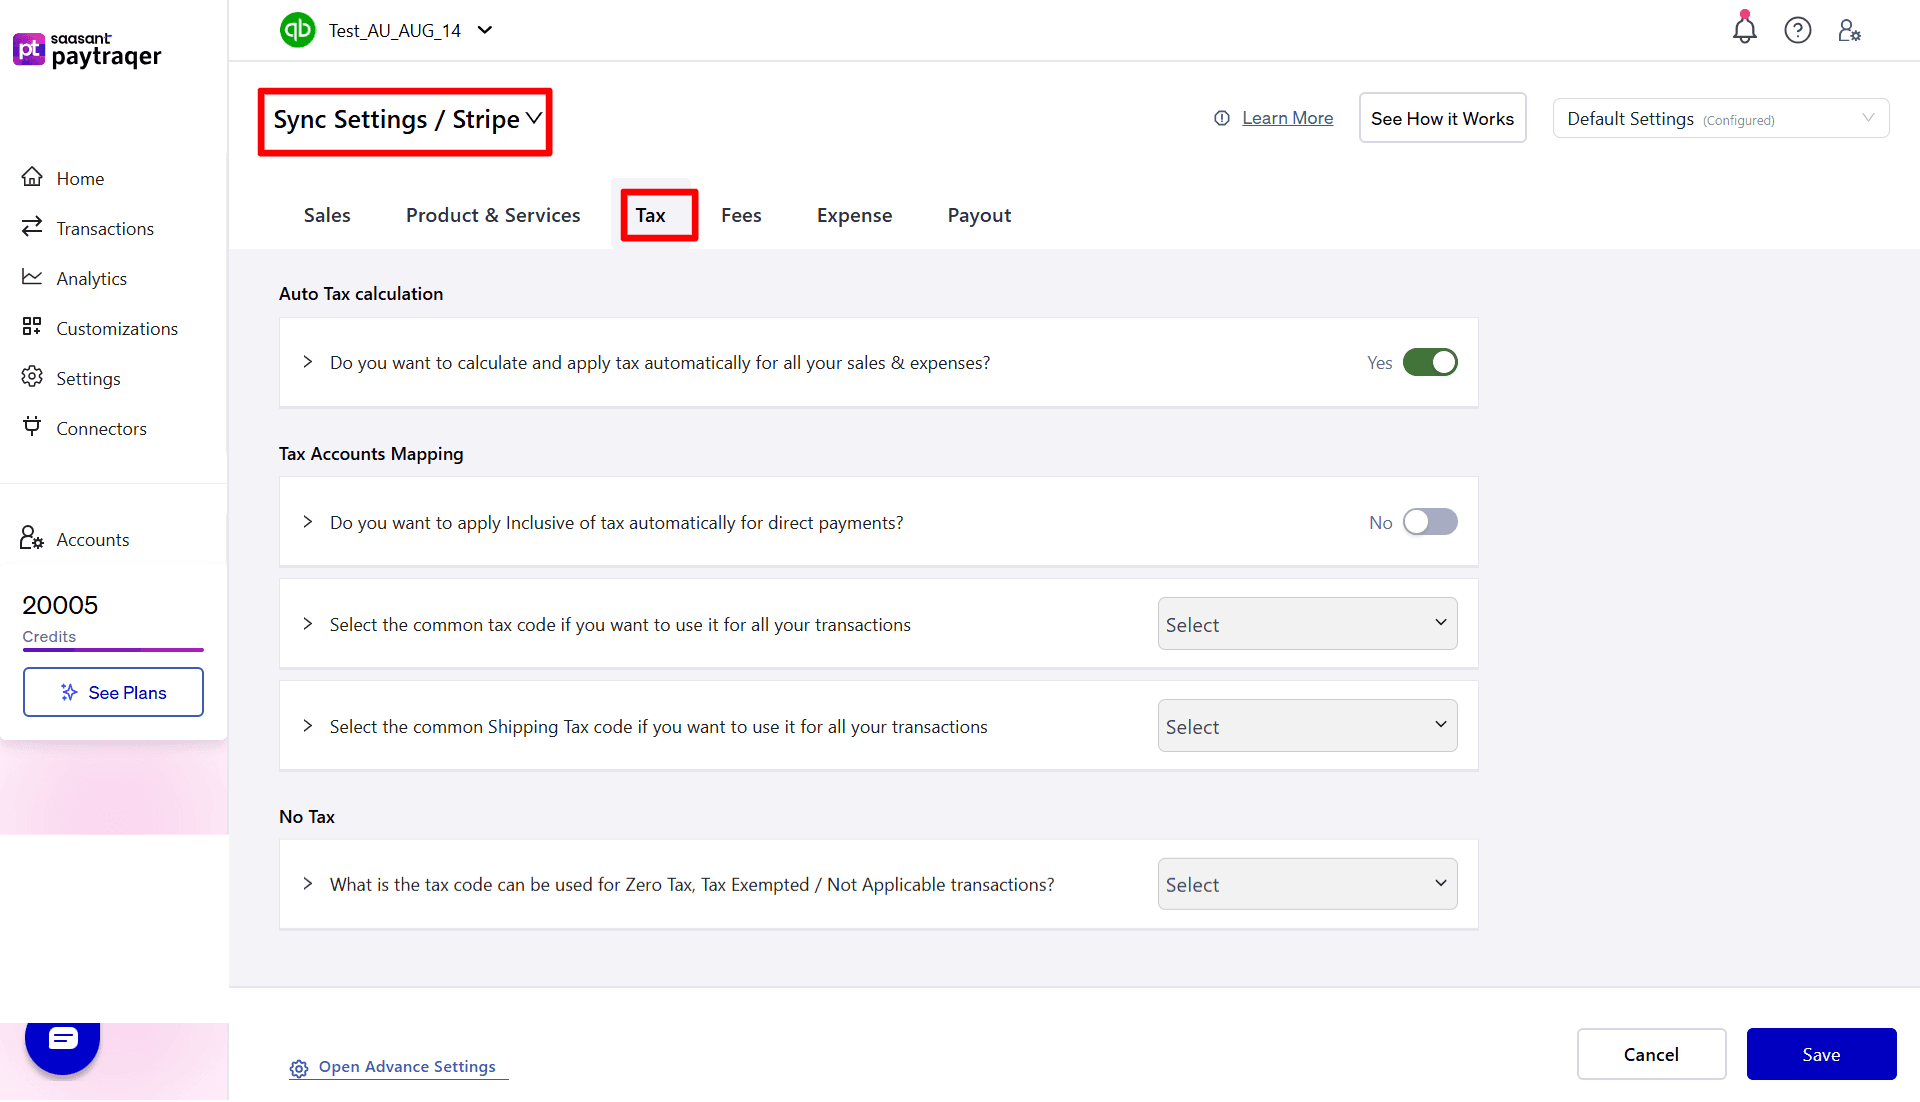
Do you want to calculate and apply tax automatically for all your sales & expenses?
Enable this setting to automatically detect and apply the appropriate tax for all sales and expense transactions.
2) Tax Accounts Mapping
Do you want to apply Inclusive of Tax automatically for direct payments?
Turn on this setting to apply inclusive of tax in QuickBooks for direct payments.
3) Common Tax Code
Select the common tax code if you want to use it for all your transactions:
PayTraQer identifies the tax code in QuickBooks based on each transaction's tax percentage.
If you prefer to use a fixed tax code for all transactions, you can specify a standard Tax Code here.
4) Common Shipping Tax Code
Select the common Shipping Tax Code if you want to use it for all your transactions:
Choose the Shipping Tax Code in QuickBooks to apply tax to shipping amounts.
Example: No Tax if shipping is not taxable.
5) Zero Tax Code
What is the tax code that can be used for Zero Tax, Tax Exempted / Not Applicable transactions?
Choose the Tax Code to be used for transactions that are zero-rated, tax-exempt, or not applicable for tax.
8) Fees Settings
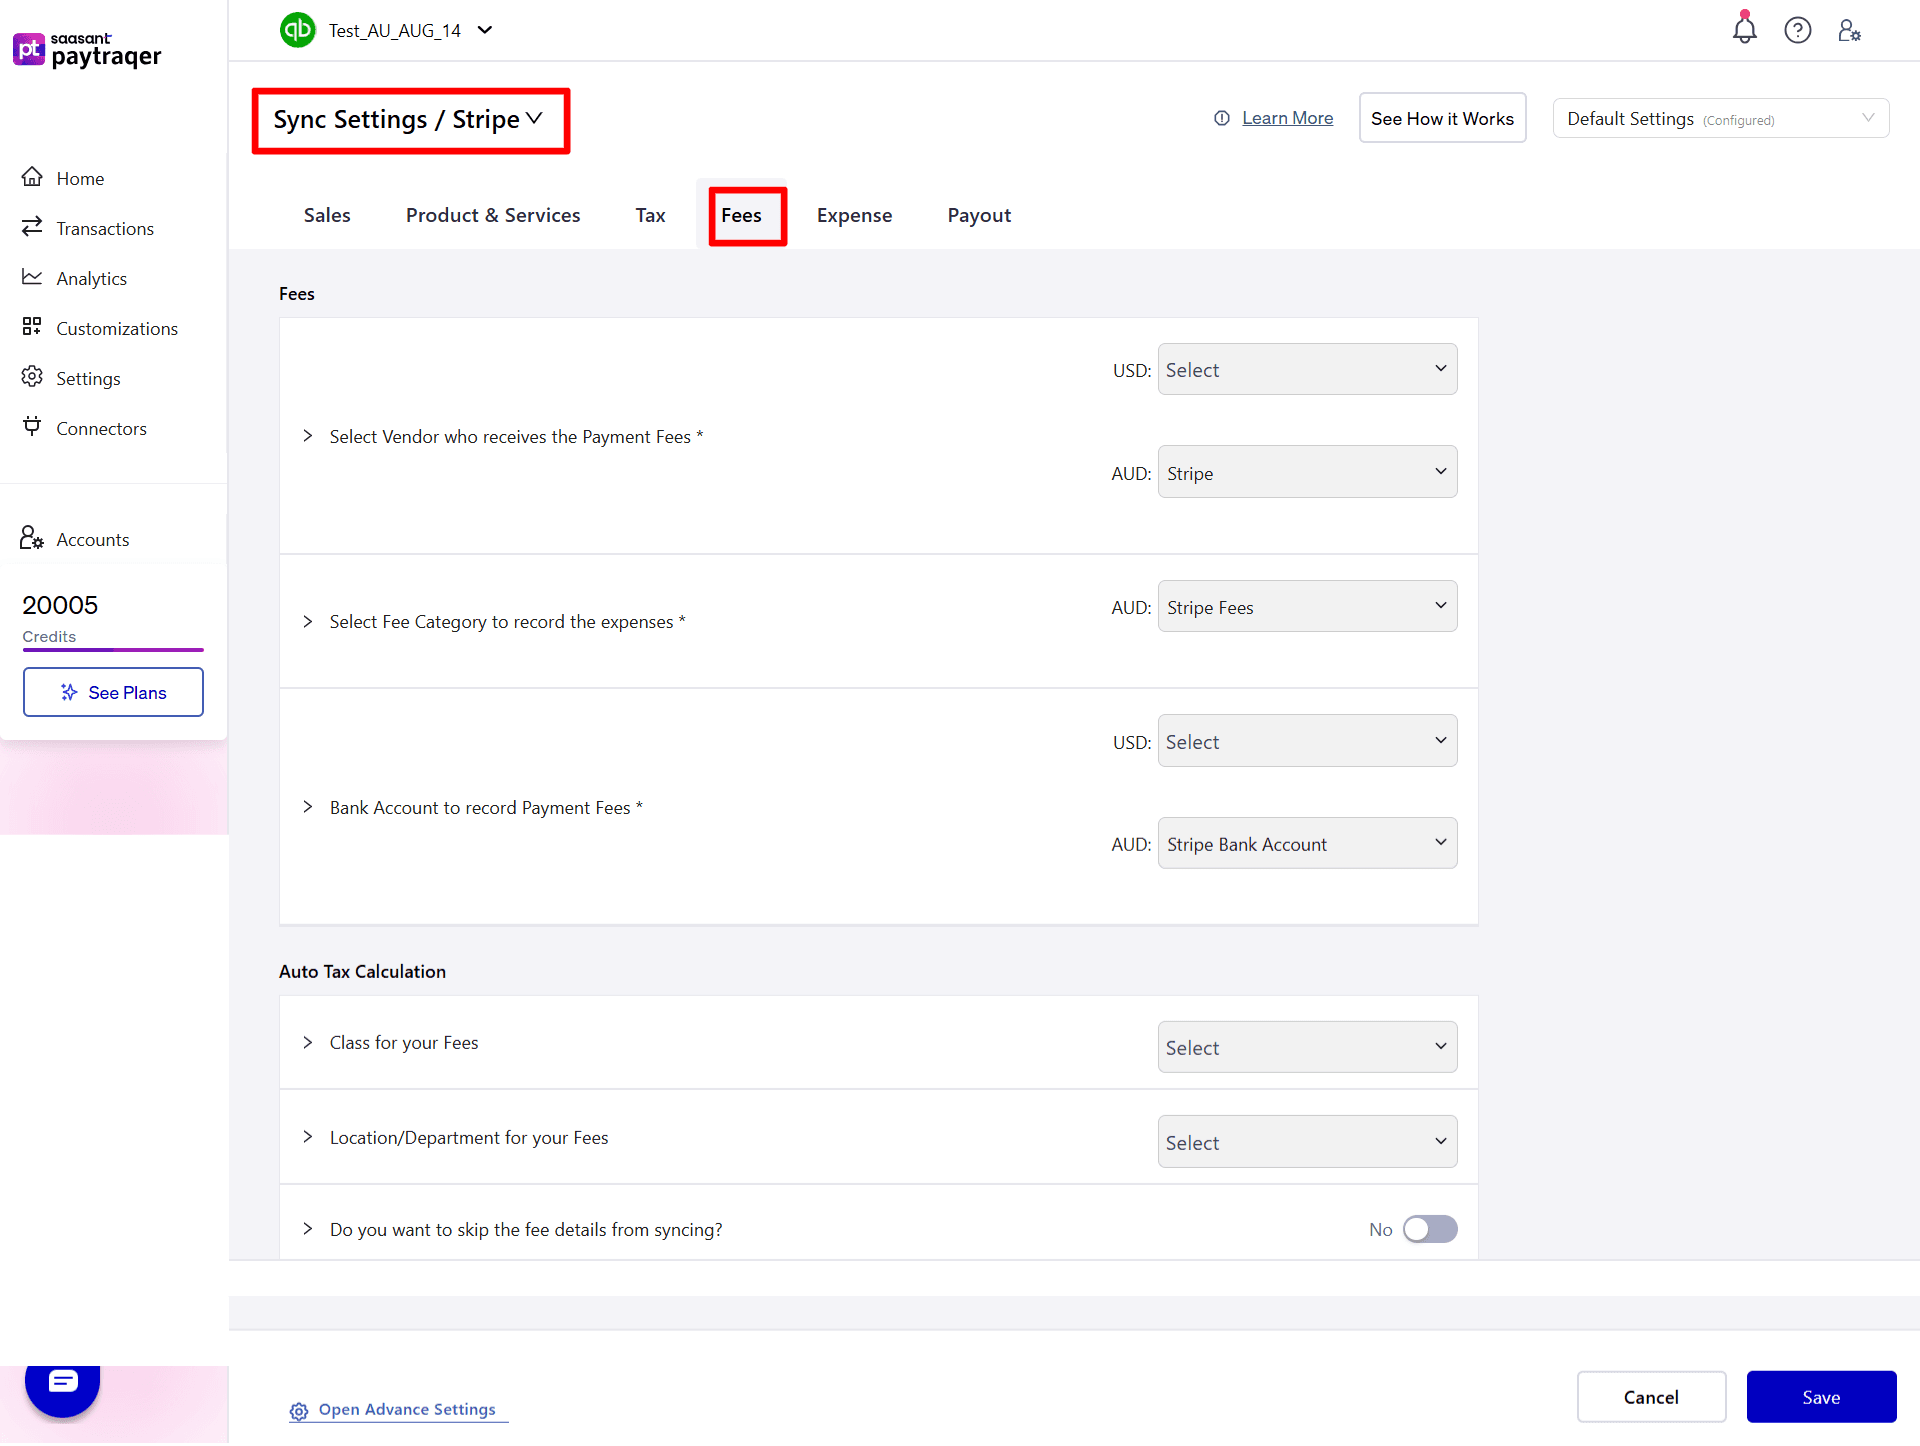
1) Vendor for Payment Fees
Select Vendor who receives the Payment Fees*
Assign a vendor to record payment processing fees from your payment or e-commerce platforms.
2) Fee Category
Select Fee Category to record the expenses*
Choose the appropriate expense category account for recording payment transaction fees.
3) Bank Account for Fee Recording
Bank Account to record Payment Fees*
Select the bank account where all fee-related expenses will be recorded.
4) Auto Tax Calculation for Fees
Class for your Fees:
Assign a default Class to all fee-related expenses for better categorization and reporting.
Location/Department for your Fees:
Assign a default Location or Department to all fee-related expenses for accurate tracking.
5) Sync Preferences for Fees
Do you want to skip the fee details from syncing?
Enable this setting to exclude detailed fee lines when syncing sales transactions.
9) Expense Settings
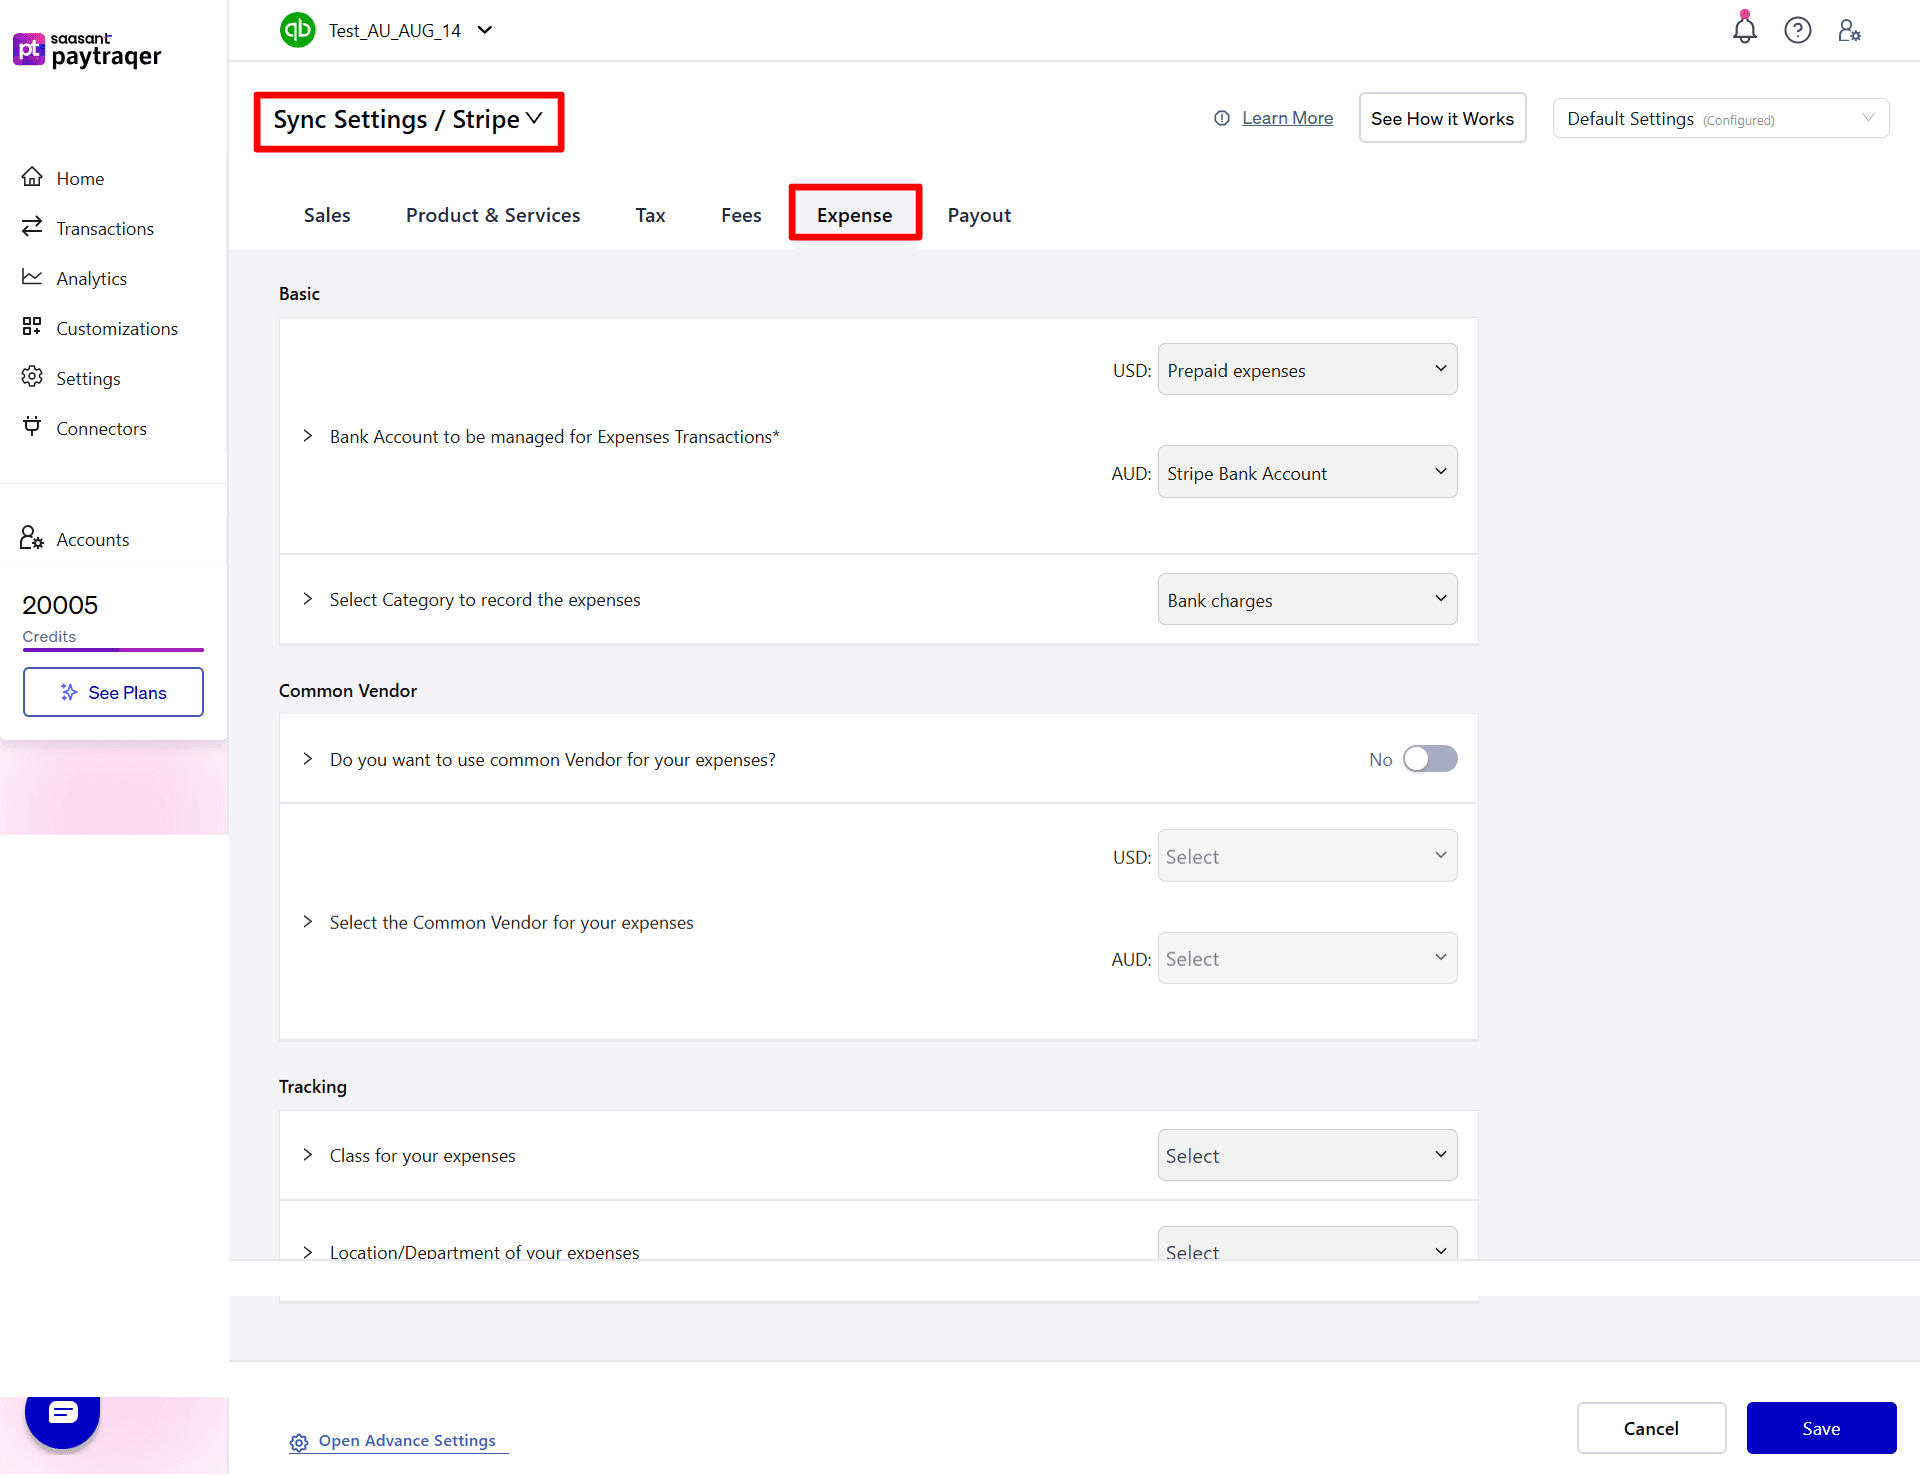
1) Bank Account for Expense Transactions
Bank Account to be managed for Expenses Transactions*
Select the bank account where all expense-related transactions will be recorded.
2) Expense Category
Select Category to record the expenses:
Choose the appropriate expense category account for recording payment transaction fees or other related expenses.
3) Common Vendor
Do you want to use common Vendor for your expenses?
Enable this setting to use a single common vendor for all expense transactions.
Select the Common Vendor for your expenses:
Assign a vendor to record fees and expenses from payment or e-commerce platforms.
4) Tracking
Class for your expenses:
Assign a default Class to all expense-related transactions for better reporting and categorization.
Location/Department of your expenses: Select
Assign a default Location or Department to expense transactions for accurate tracking and analysis.
10) Payouts Settings
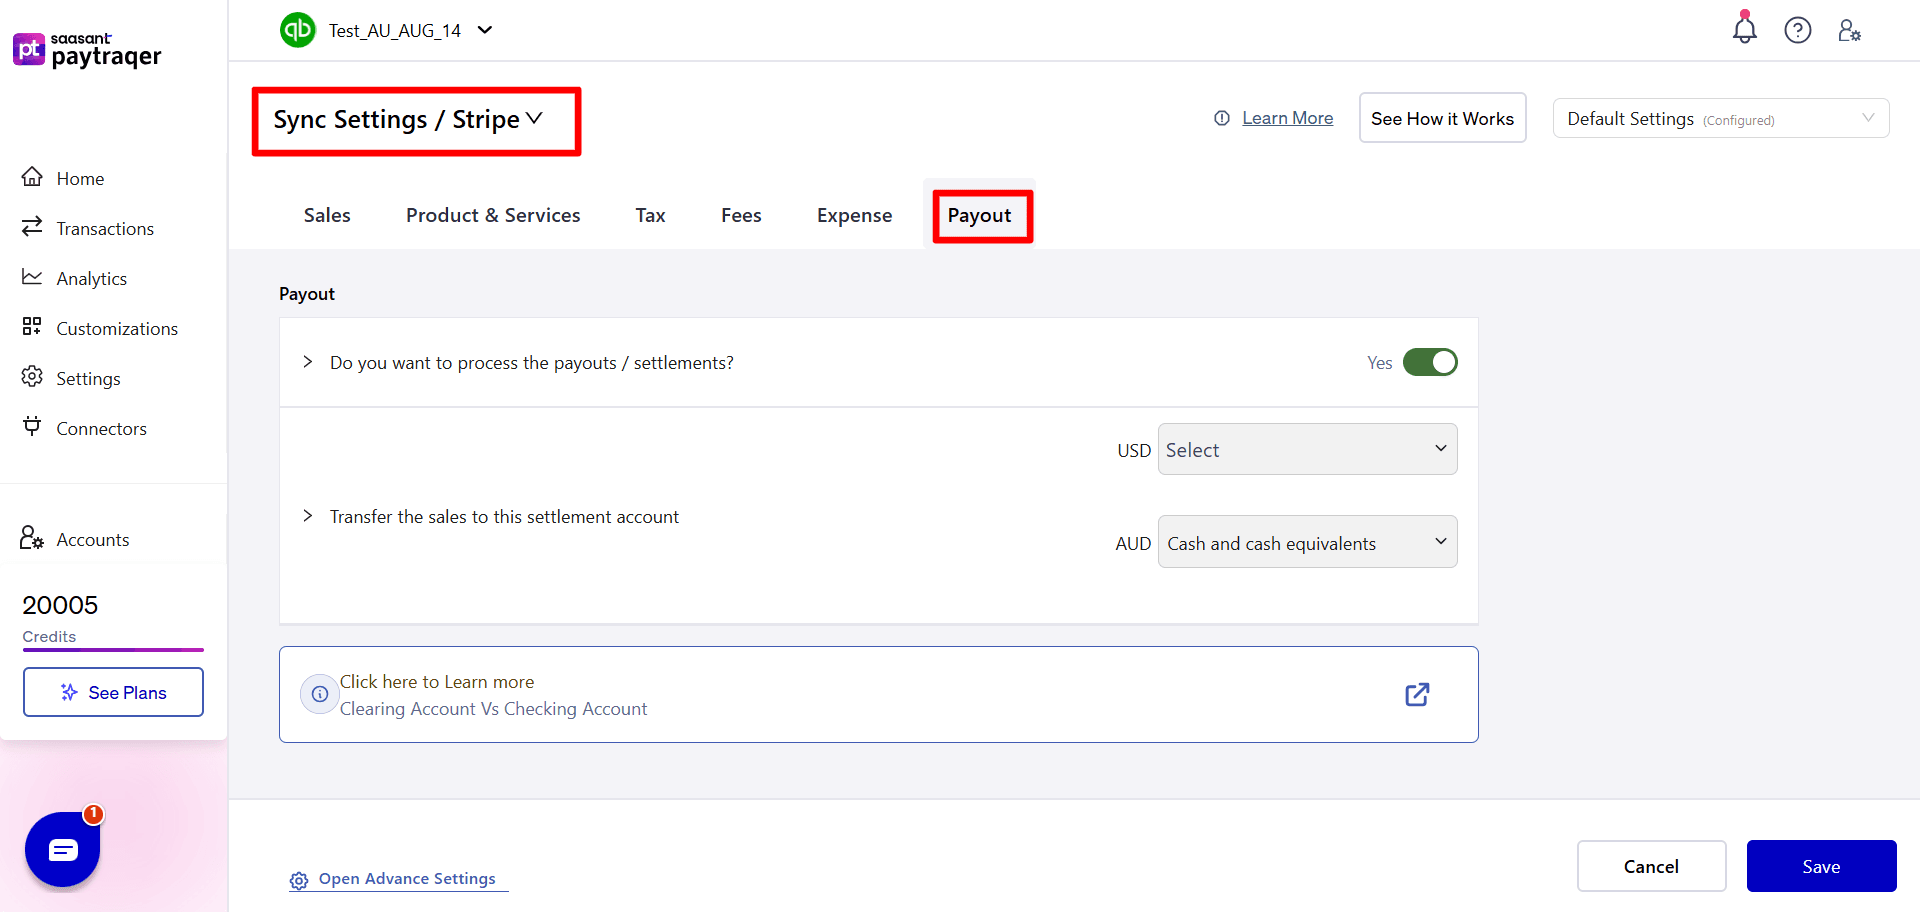
1) Process Payouts/Settlements
Do you want to process the payouts/settlements?
Enable this option to sync payouts and settlements as transfer transactions to your selected checking or settlement account.
2) Settlement Account Configuration
Transfer the sales to this settlement account:
Select the account where your sales revenue should be recorded or transferred after settlement.