Getting started With PayTraQer & QuickBooks Online
January 6, 2025
Getting started with SaasAnt PayTraQer for QuickBooks Online
PayTraQer connects your payment gateways and online stores to QuickBooks Online. It brings in sales, fees, refunds, and payouts, and posts them using your rules so bank deposits match and reports stay accurate.
Who this is for
Bookkeepers and accountants who want clean, matched deposits without manual work.
Business owners and ops teams who accept payments online and need reliable books.
Teams comparing sync tools who want a fast, safe path to a first successful sync.
What PayTraQer syncs
PayTraQer connects to payment processors and carts such as Stripe, PayPal, Square, Authorize.Net, eBay, Ecwid, WooCommerce, Amazon, and more.
It can create in QuickBooks:
Sales as Sales Receipts or Invoices + Payments
Fees as Expenses to your chosen fee account
Refunds as Refund Receipts
Payouts as Bank Transfers from clearing to checking
Quick setup: 5-minute success path
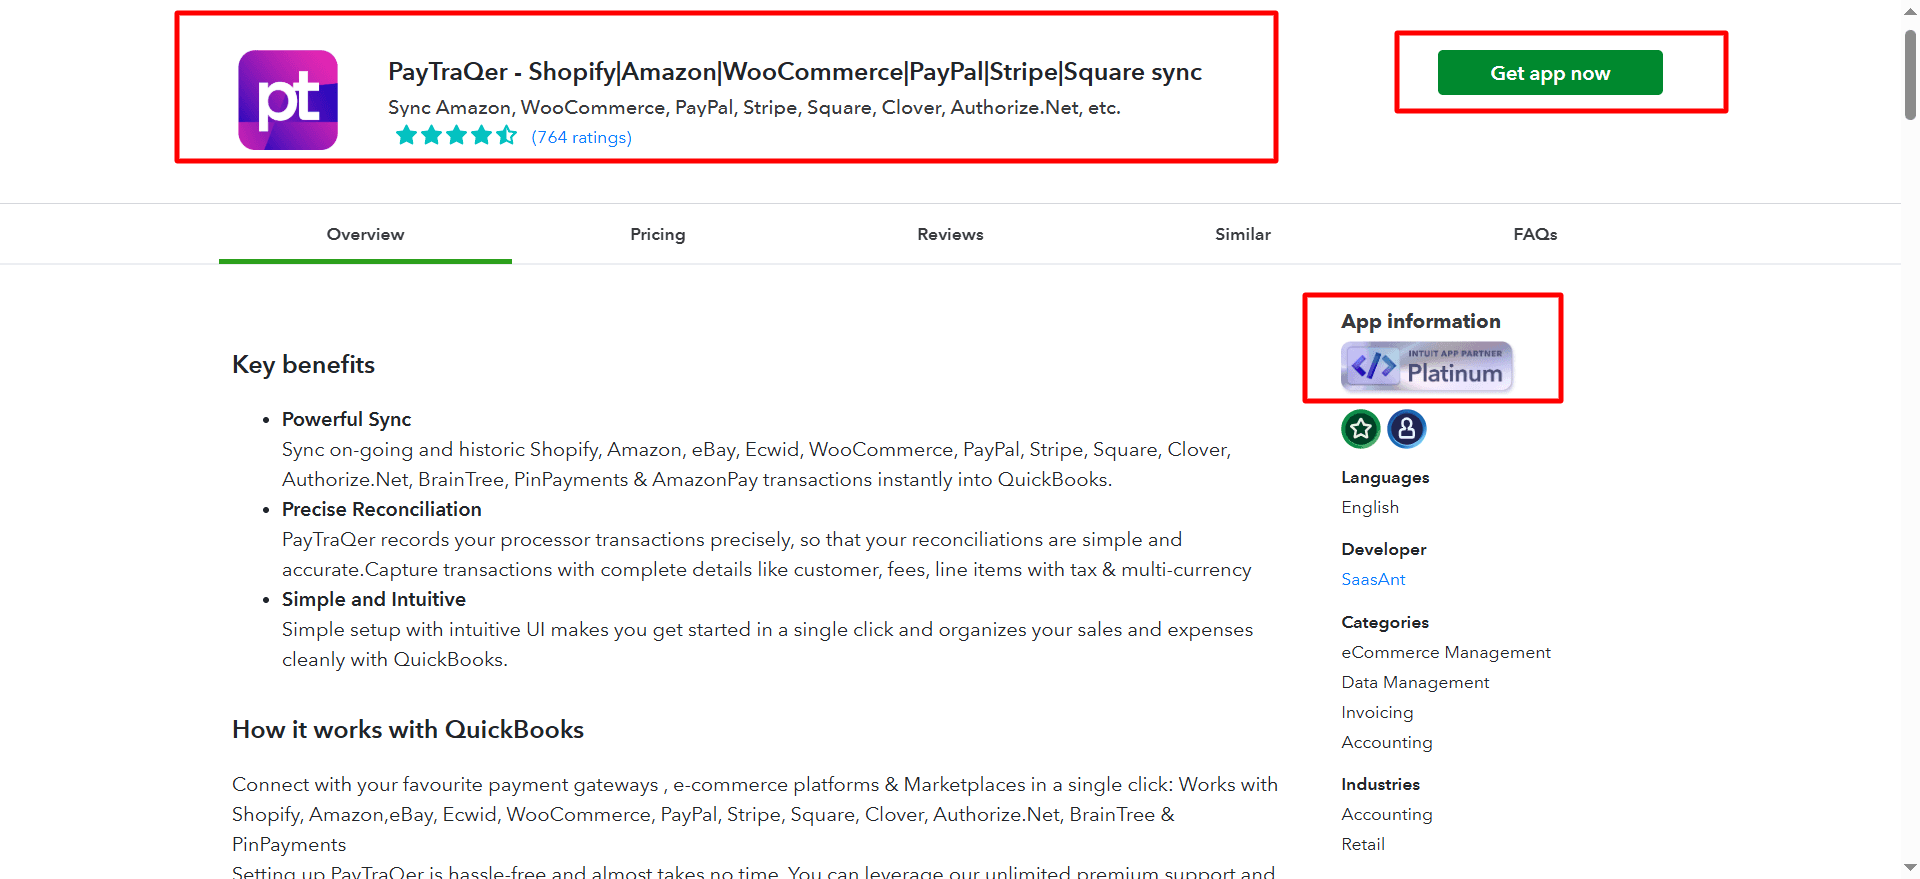
Install PayTraQer from QuickBooks Online Apps and authorize.
Choose Sync Mode: Consolidated (summary) or Itemized (one entry per sale).
Connect a processor or store in Connectors.
Set your clearing bank for sales and fees.
Turn on payouts if you want automatic bank matches.
Download a small date range and verify one sale, one fee, one transfer.
Key concepts
Clearing account vs checking account
Clearing account: a QuickBooks bank where PayTraQer posts sales and fees.
Checking account: your real bank that receives payouts.
When payouts are on, PayTraQer creates a Bank Transfer from clearing to checking that matches the bank deposit.
Consolidated vs Itemized sync
Consolidated (Summary): fewer entries, faster reconciliation, limited customer and item detail.
Itemized (Individual): customer and item level detail, more entries to reconcile.
You can change modes later. Test with a short date range before you switch.
Step by step
1) Install PayTraQer
In QuickBooks Online, open Apps, search PayTraQer, click Get app now, and allow access.
2) Pick your Sync Mode
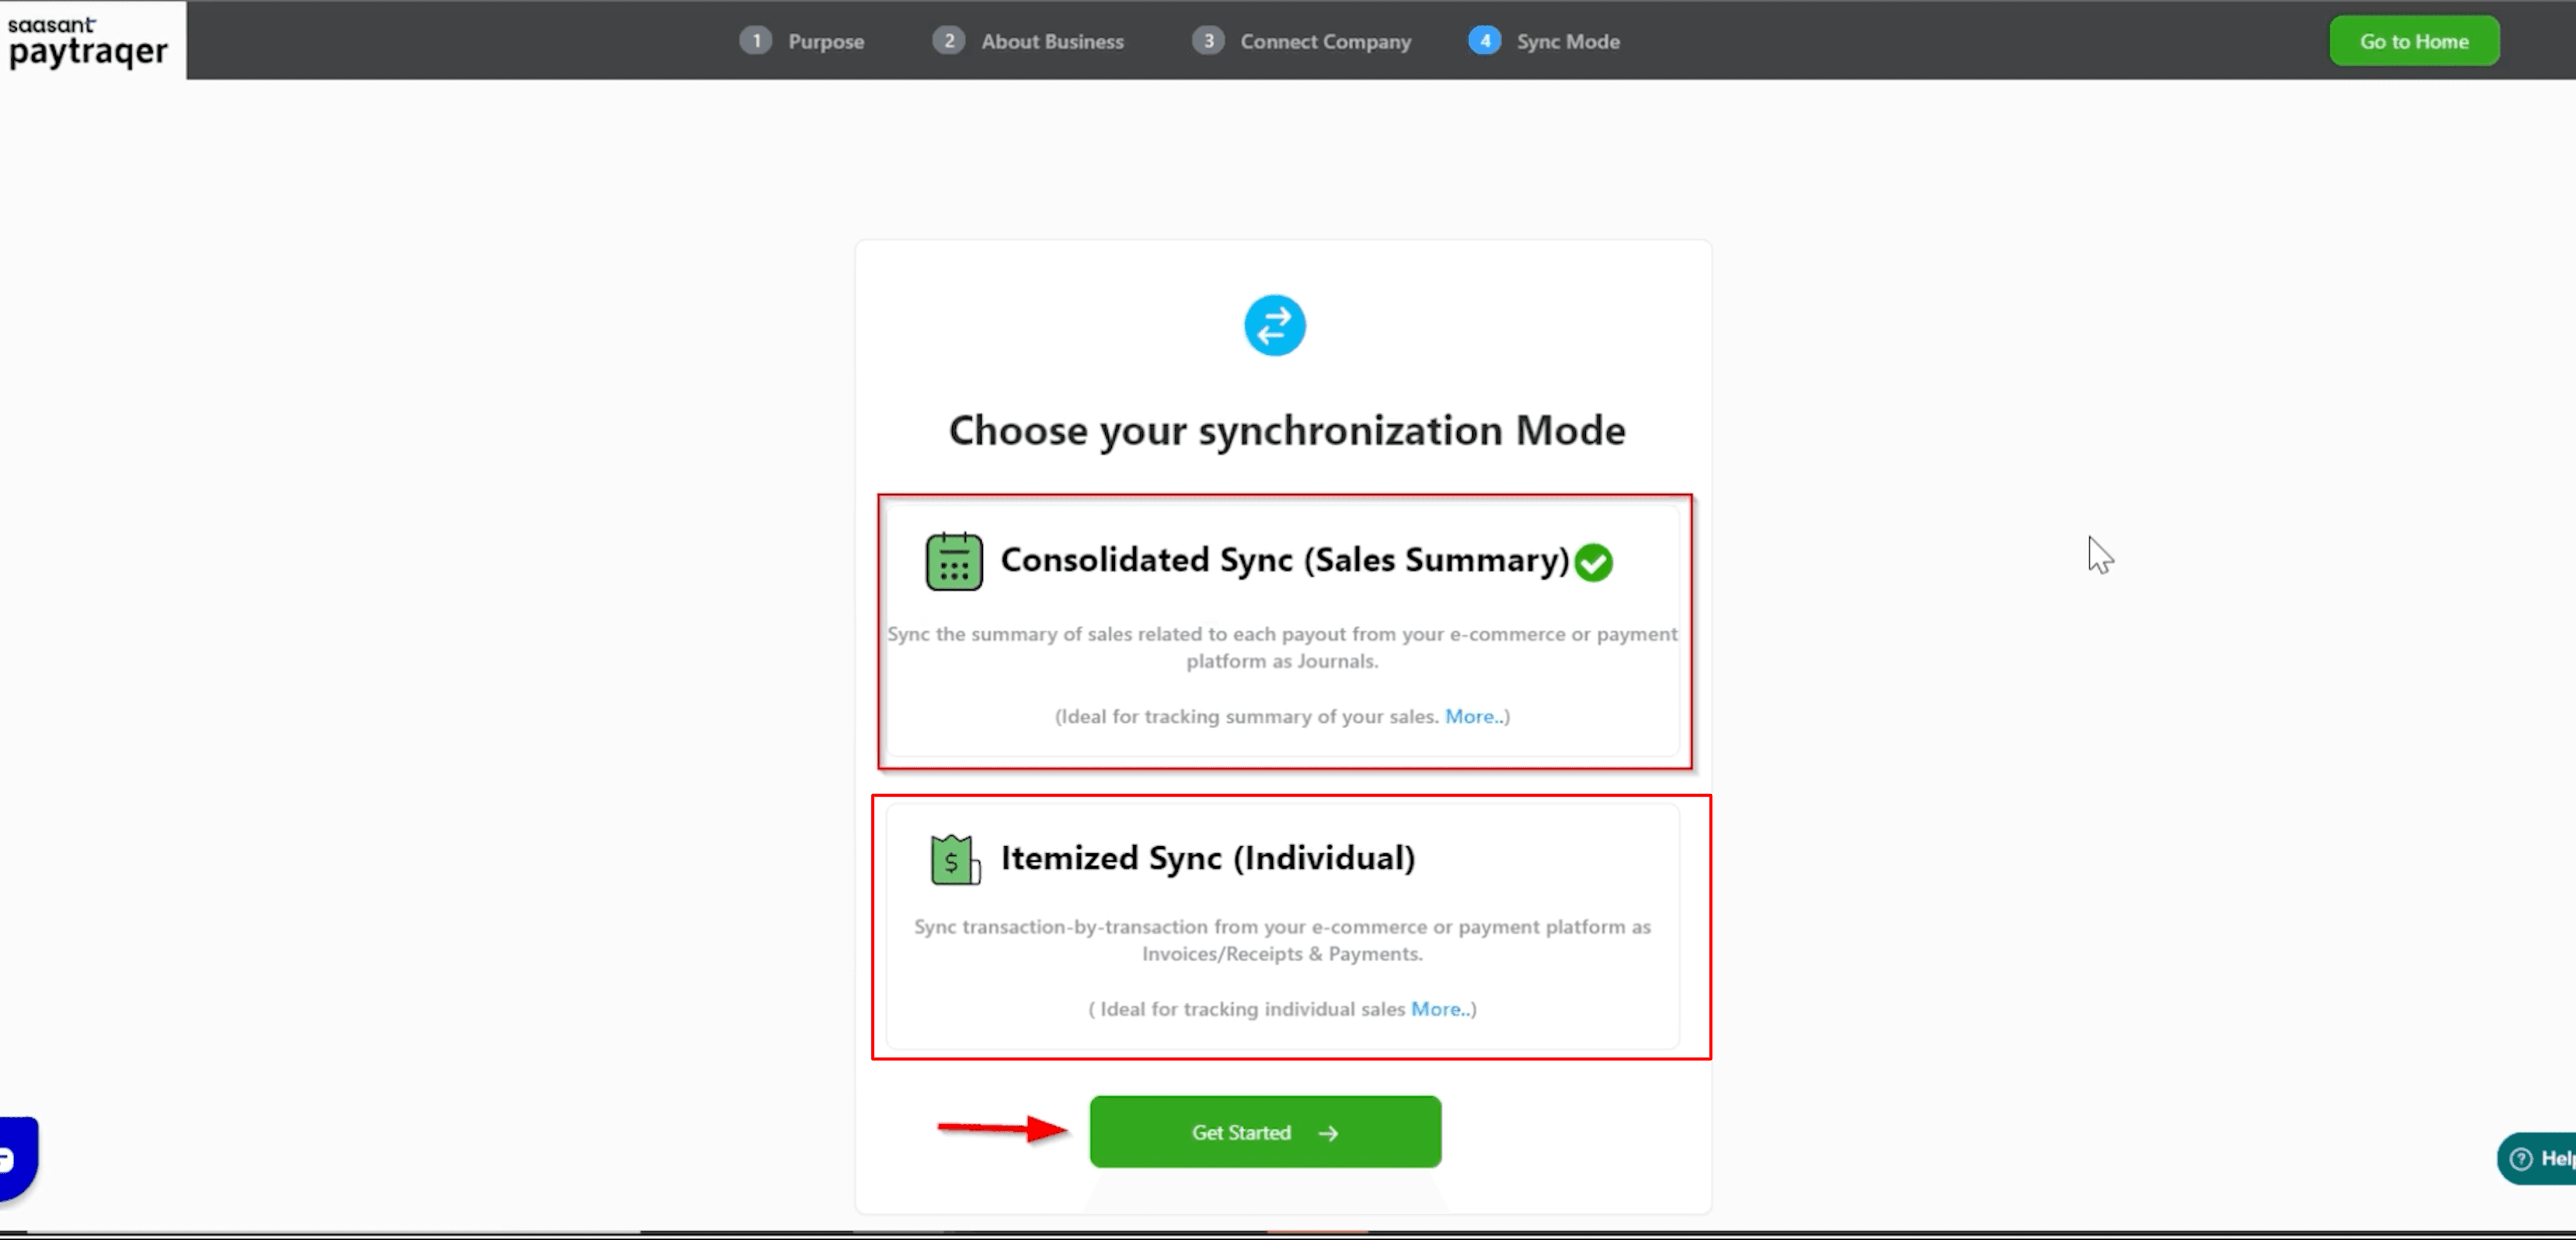
Choice | When to use | What you get |
Consolidated (Summary) | High volume, focus on quick bank match | Summary entries by day or payout |
Itemized (Individual) | Need customer or item reporting | One entry per sale with details |
You can change this later in settings.
3) Connect your processor or store

In PayTraQer, open Connectors, choose your brand, and authorize.
If you are not the admin, use Invite admin/client to send the auth link.
4) First-time settings
Bank Account to deposit your sales/income: choose your clearing bank.
Fees: set Vendor and Expense account for fees, and confirm the same clearing bank.
Payouts: turn on if you want PayTraQer to create Bank Transfers to your checking account.
Save. PayTraQer will auto download recent history. Use Download historical transactions for other dates.
5) Auto Sync
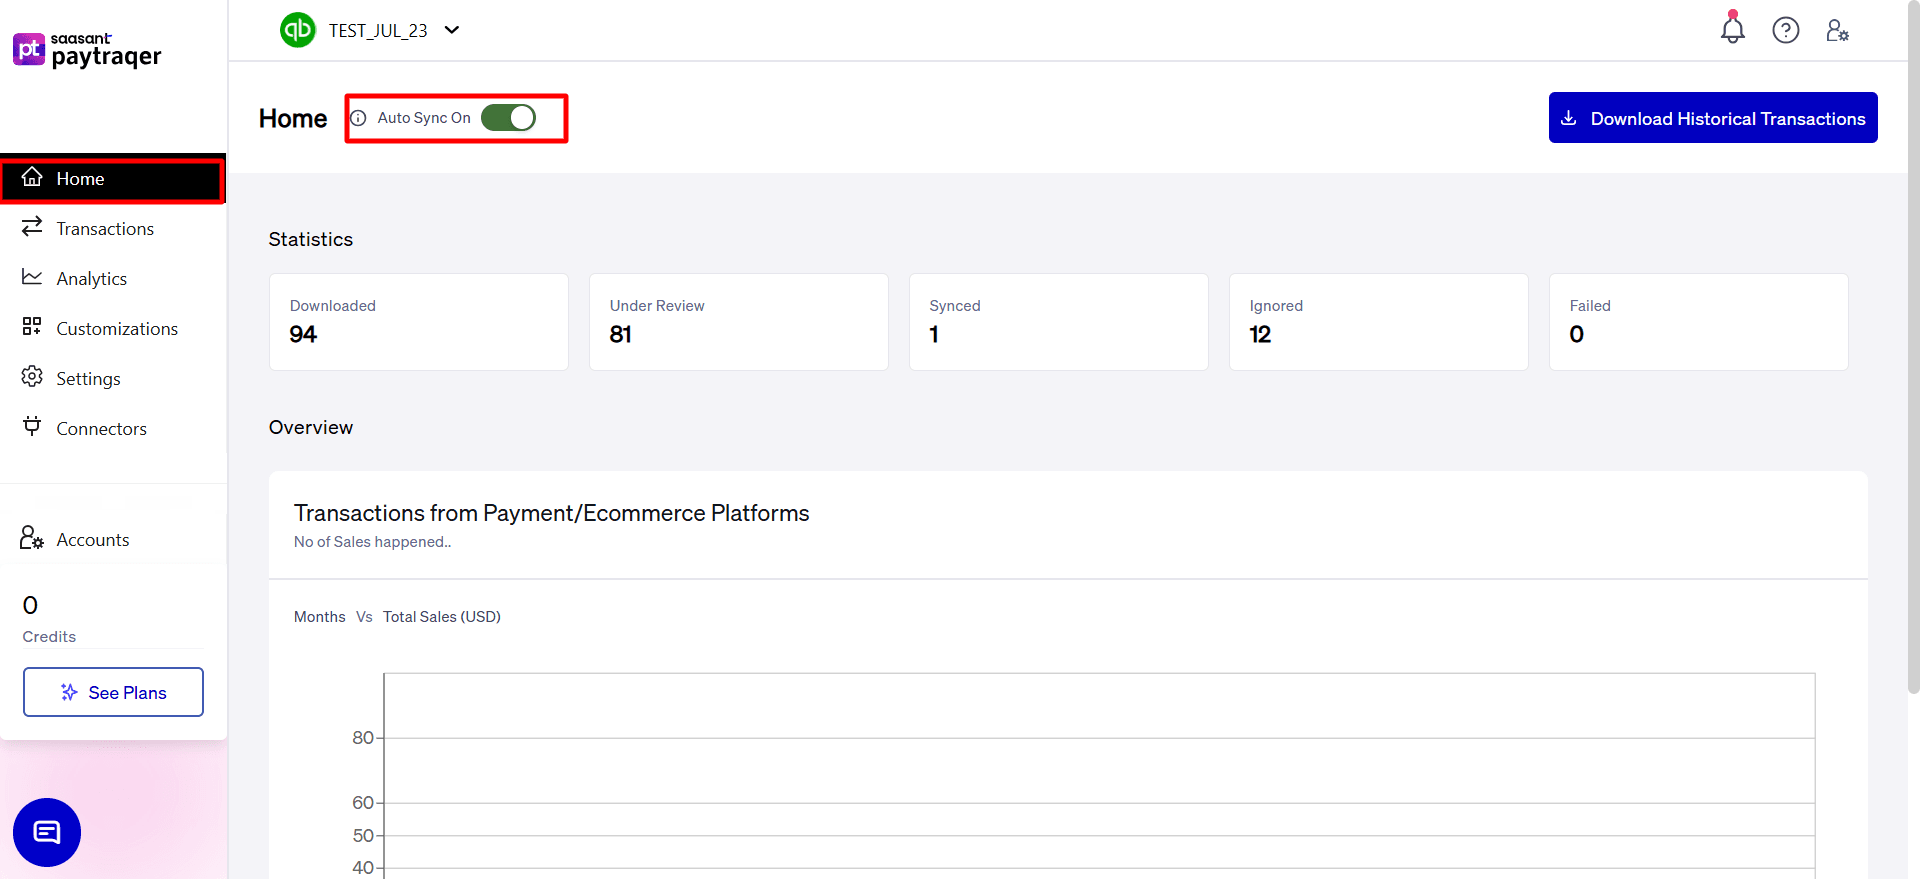
Turn on Auto Sync and set the interval to bring in new activity automatically.
Configure posting rules
Sales
Clearing bank per currency
Payment Method (PayPal, Stripe, Square, etc.)
Customer creation on if a name does not exist
Common Customer if you prefer one customer for summaries
Location and Class if you track them
Skip sales, fees only if another tool posts sales
Verify: Sales and fees land in the same clearing bank.
Products & Services
Auto-create items on to prevent missing item errors
Type: Service or Non-Inventory for new items
Income account for new items
Match by Name or SKU
Product Matching rules for name differences
Common Item for summary posting
Verify: No duplicate items after the first sync.
Tax
Auto tax on to detect taxes
Inclusive tax for direct payments if needed
Default tax code to override detection in edge cases
Shipping tax percent or code if shipping is taxable
Verify: Open a synced sale and confirm tax code and amount.
Fees
Vendor (for example, PayPal, Stripe, Square)
Expense account (for example, PayPal Fees)
Bank for fees: use the same clearing bank as Sales
Class and Location if needed
Skip fee details only if you do not want fee lines
Verify: A sample fee posts to the right account and bank.
Payouts
Process payouts/settlements on to create Bank Transfers from clearing to checking
Receiving account: your real checking account
Verify: Transfers match deposits in your bank feed.
Verify your first sync
Use a small date range and check these in QuickBooks:
A sale posts to the clearing bank with the correct Payment Method.
Customers map correctly or a Common Customer is used.
Items exist, map correctly, or were auto-created to the right income account.
One fee posts to your fee account with the right vendor.
Tax code and amount look right.
If payouts are on, a Bank Transfer moves funds to checking and matches the bank deposit.
Troubleshooting by symptom
Symptom | Likely cause | Fix |
Deposits do not match bank feed | Payouts off or wrong receiving account | Turn on payouts and select your checking account |
Clearing account does not zero | Sales and fees in different banks or payouts off | Post both to the same clearing bank and enable payouts |
Fees missing | Fee vendor or expense account not set, or “skip fee details” on | Set vendor and account, turn off skip, re-sync range |
Wrong items or duplicates | Name mismatch or wrong match mode | Match by SKU, add Product Matching rules, keep auto-create on |
Duplicate customers | Name differences across platforms | Add Customer Matching or use a Common Customer for summaries |
Tax looks off | Inclusive setting or default code not set right | Review Tax settings and test a short date range |
No data after connect | Authorization or date filters | Reconnect the connector and check filters |
FAQs
Can I post daily summaries instead of each order
Yes. Choose Consolidated in Sync Mode. You can switch later. Test on a short range first.
How do I record gateway fees to one expense account
In Fees settings, set the vendor and choose a fee expense account. Use the same clearing bank as Sales.
How do I match payouts with my bank feed
Turn on Payouts. PayTraQer creates a Bank Transfer from clearing to checking that matches the deposit.
Can I bring in historic transactions
Yes. Use Download historical transactions with date filters after the first connect.
What if I only want fees, not sales
Turn on Skip sales and process associated fees only in Sales settings.
Can I change from itemized to consolidated later
Yes. Change Sync Mode in settings. Test with a short date range and review results before turning Auto Sync back on.
Glossary
Clearing account
A QuickBooks bank where PayTraQer posts sales and fees before payout.
Checking account
Your real bank account that receives deposits.
Payout
Money moved from your processor to your bank. In QuickBooks, PayTraQer posts a Bank Transfer from clearing to checking.
Consolidated sync
Summary posting that reduces entry volume for easier reconciliation.
Itemized sync
One entry per sale for customer and item detail.
Common Customer
One default customer used on all sales.
Common Item
One default product or service used on all sales.
Privacy and permissions
From processors and stores: PayTraQer reads sales, fees, refunds, payouts, customers, and items after you authorize.
In QuickBooks Online: With your approval, PayTraQer creates or updates the records needed to keep books accurate.
Known limits and notes
Recent history is loaded on first connect. Use Download historical transactions for other periods.

For multi-currency, set a clearing bank per currency.
When switching Sync Mode, test with a short date range and review results before enabling Auto Sync.