Transfer/ Migrate Data From QuickBooks Online to QuickBooks Desktop
January 1, 2025
Transferring Data from QuickBooks Online to QuickBooks Desktop:
The data from QuickBooks Online will be exported into a CSV file using "SaasAnt Transactions (Online)" and the exported file will be imported using "SaasAnt Transactions" for QuickBooks Desktop.
For seamless migration, we've broken it down into 5 easy steps.
Initial Steps:
Step 1: You need to have a valid License for "SaasAnt Transactions (Desktop)"(QuickBooks Desktop) and "SaasAnt Transactions (Online)" (QuickBooks Online).
Step 2: Admin privileges are needed to convert the data from QuickBooks Online to QuickBooks Desktop.
Step 3: Create Necessary Sales tax Items and Sales tax group Item in the QuickBooks Desktop file.
Step 4: Enable the Multi-currency feature in the QuickBooks Desktop file if it is enabled in QuickBooks Online.
SaasAnt Transactions (Desktop) - Configuration:
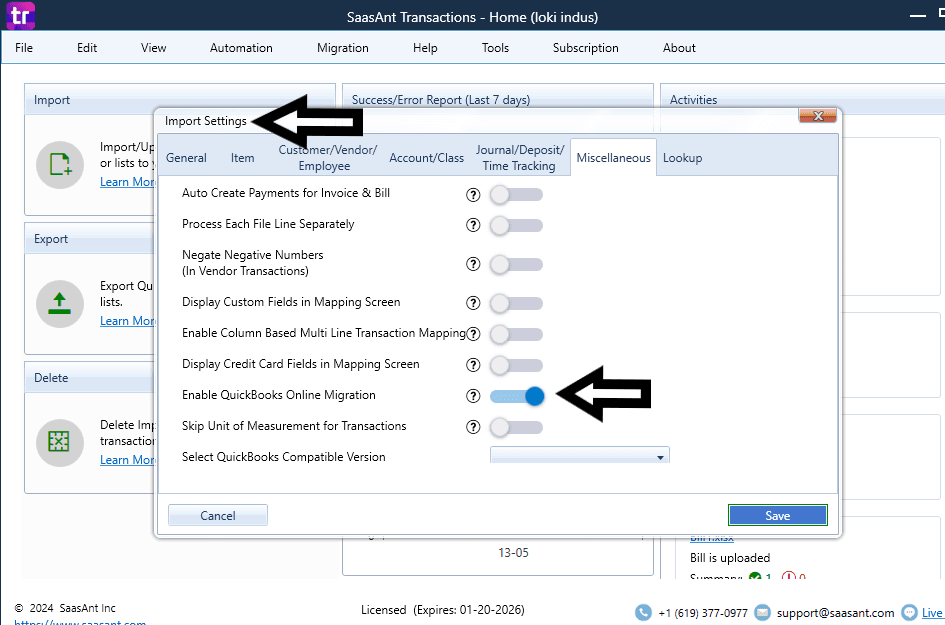
After the successful installation and activation of "SaasAnt Transactions (Desktop)", navigate to Import Settings (Edit>Import Settings).
Click on the "Miscellaneous" tab and turn on the "Enable QuickBooks Online Migration" feature.
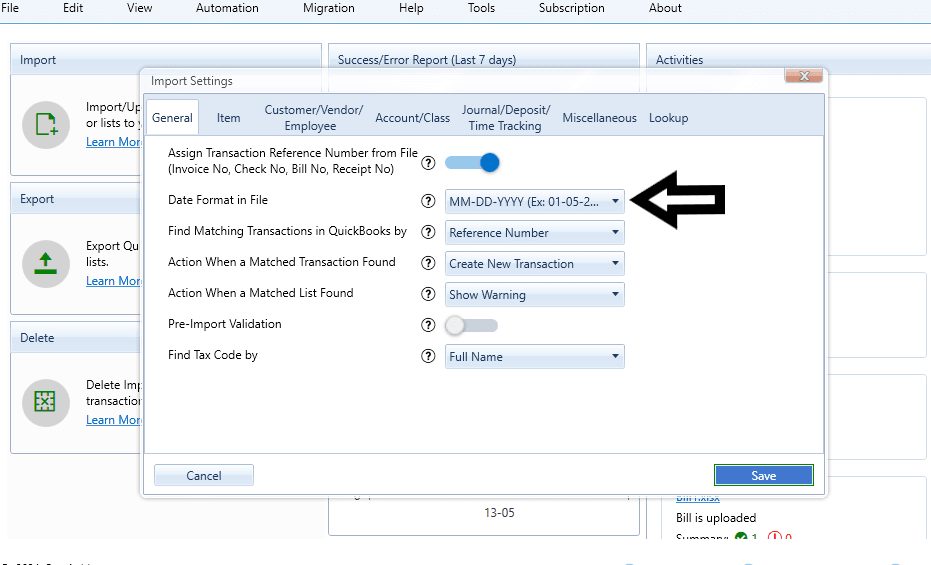
Click on the "General" tab and select date format in File as"YYYY-MM-DD".
Save the settings.


Exporting your data:
Login to "SaasAnt Transactions (Online)" using Intuit Credentials and Click on the "Export" Menu.
Select the appropriate date range and download the reports for all Lists and transactions.
Importing your data:
Now you can import each file downloaded from "SaasAnt Transactions (Online)" into QuickBooks Desktop using "SaasAnt Transactions". We highly recommend importing the "Lists" completely before migrating the transactions.
Launch "SaasAnt Transactions (Desktop)".
Click on the "Import" button.
Choose "Select QuickBooks Transaction/List Type" as one of the values based on the below table (an equivalent entity of QuickBooks Desktop).
Browse and select the exported file from "SaasAnt Transactions (Online)".
Click "Next" on the File upload Screen.
Click "Next" on Mapping Screen.
Click "Send to QuickBooks" on the Review Screen.
If there are any issues during conversion an error may display immediately.
In the table below, we've noted the equivalent transactions and lists for QuickBooks Online and QuickBooks Desktop.
QuickBooks Online | QuickBooks Desktop |
|---|---|
Lists | |
Chart Of Accounts | Account |
Customer | Customer |
Vendor | Vendor |
Employee | Employee |
Product/ Service | Item |
Class | Class |
Sale Transactions | |
Invoice | Invoice |
Receive Payment | Payment |
Estimate | Estimate |
Credit Memo | Credit Memo |
Sales Receipt | Sales Receipt |
Refund Receipt | --- |
Vendor/Expense Transactions | |
Expense | Credit Card Charge and Check |
Check | Check |
Bill | Bill |
Bill Payment | Bill Payment |
Purchase Order | Purchase Order |
Vendor Credit | Vendor Credit |
Credit Card Credit | Credit Card Credit |
Other Transactions | |
Journal Entry | Journal Entry |
Time Activity | Time Tracking |
Review:
When you have completed your QuickBooks Online to QuickBooks Desktop conversion, follow the below steps to review the migration.
Check account balances in QuickBooks Desktop match account balances in QuickBooks Online.
We suggest you run a full trial balance in both QuickBooks Desktop and QuickBooks Online for the end of the current month, and then compare the balances.
You may also see invoices and bills that were paid in Quickbooks Online but now show as awaiting payment in QuickBooks Desktop. In this case, payments will need to be applied again and reconciled.
Limitations:
Purchase Order with category accounts cannot be imported
Expenses need to be imported as Credit Card Charges or checks
Customers with SSN cannot be imported.
Account subtype or detail type cannot be imported.
Sales with Markup Percentage are not supported.