How to Customize QuickBooks Desktop Imports with SaasAnt Transactions Desktop
March 2, 2026
Files do not always arrive in the exact structure used in QuickBooks Desktop.
Your spreadsheet may already contain invoice numbers you need to preserve. Customer names may be slightly different from the names in QuickBooks. A file may contain new products that have not yet been created in QuickBooks. You may also need to check for transactions that were imported previously before running the file again.
SaasAnt Transactions Desktop provides Import Settings to control how these situations are handled during a QuickBooks Desktop import.
Instead of changing every Excel or CSV file manually, you can configure how SaasAnt handles transaction numbers, dates, matching records, customers, vendors, items, accounts, multiline transactions, custom fields, and other import requirements.
This guide explains each setting and, more importantly, when it can be useful in a real QuickBooks Desktop workflow.
SaasAnt Transactions (Desktop) provides limitless customizations to meet the unique requirements of every accountant. Following configurations are available in SaasAnt Transactions (Desktop).
Where Can You Find Import Settings in SaasAnt Transactions Desktop?
You can open Import Settings in either of these ways:
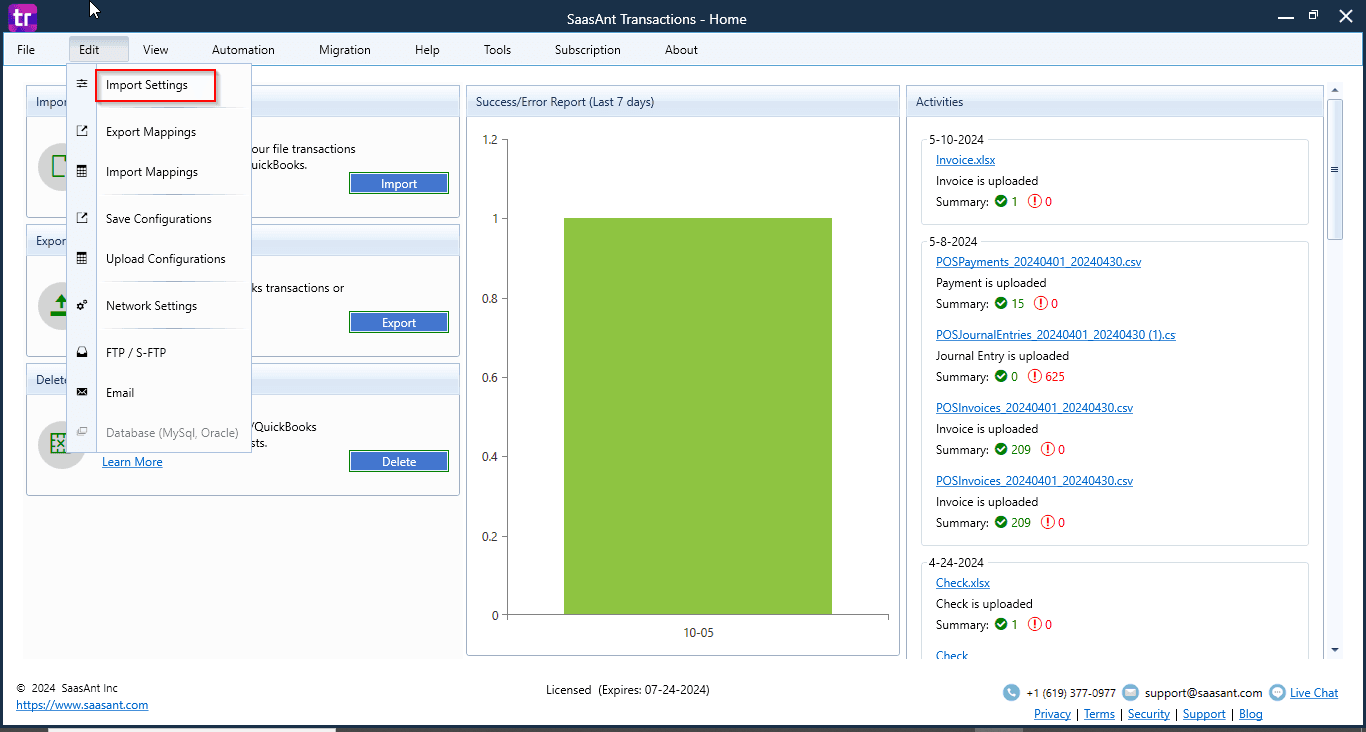
Edit → Import Settings
or
Click Import Settings from the import screen.
If you are already preparing an import, using the Import Settings button from the import workflow is usually the quickest option.
Before changing a setting, check what your source file contains and how you want that data to appear in QuickBooks Desktop.
Learn how to import transactions into QuickBooks Desktop using SaasAnt Transactions Desktop
Video Tutorial for How to Import Bulk Data into QuickBooks Desktop using SaasAnt Transactions Desktop:
General Settings
How to Keep Invoice, Bill, Check, or Other Reference Numbers from Your File
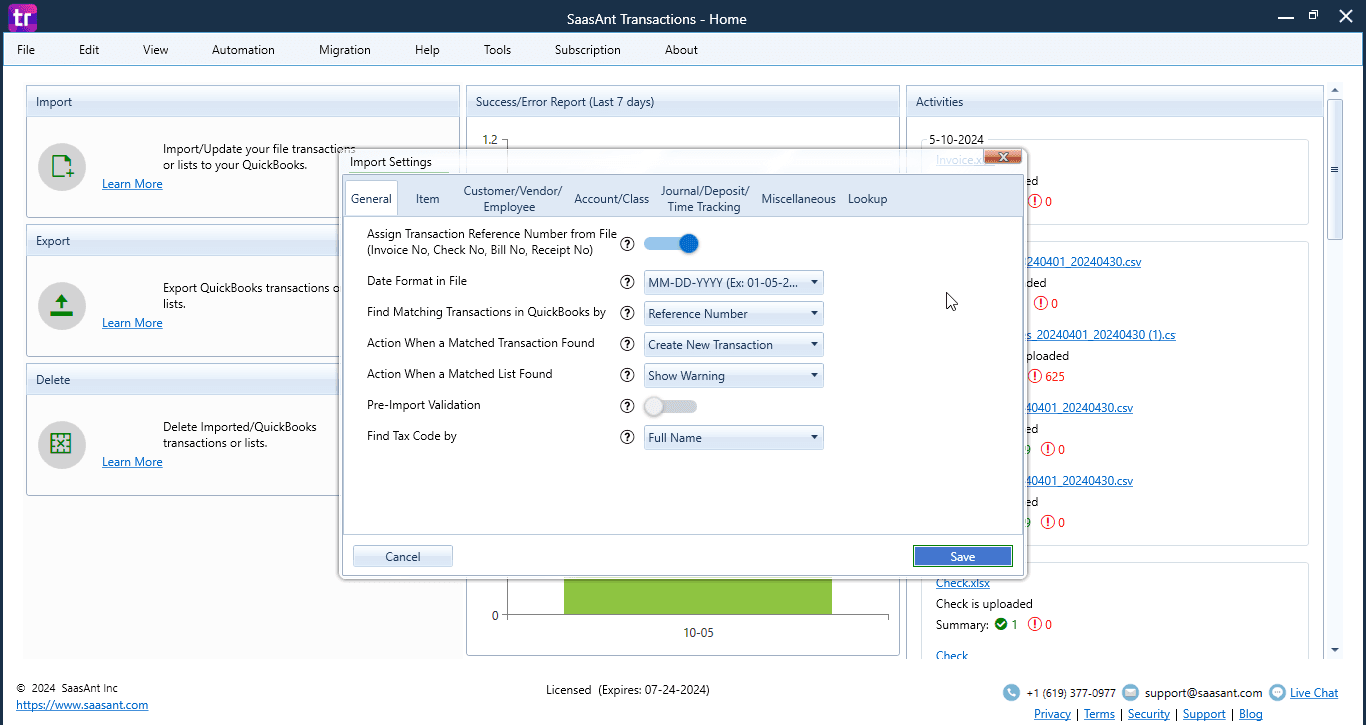
Setting: Assign Transaction Reference From File
Turn this setting on when the transaction numbers in your source file should also become the transaction numbers in QuickBooks Desktop.
This can apply to reference numbers such as:
Invoice Number
Check Number
Sales Receipt Number
Payment Number
Bill Number
When is this useful?
Suppose your billing system exports invoices numbered:
INV-10051
INV-10052
INV-10053
If those numbers are already being used to identify the invoices outside QuickBooks, you may want the same reference numbers in QuickBooks Desktop.
Turn Assign Transaction Reference From File on so SaasAnt uses the numbers supplied in your import file.
If you want QuickBooks to handle the transaction numbering instead, turn this setting off.
How to Import a File That Uses a Different Date Format
Setting: Date Format in File
Choose the date format used in your Excel or CSV file.
This helps SaasAnt interpret the dates correctly before sending the transactions to QuickBooks Desktop.
For example, your file may contain dates formatted as:
DD/MM/YYYY
or another supported date structure.
Instead of manually changing every date in the spreadsheet, select the format that matches your source file.
When is this useful?
This is particularly useful when files come from another system, another country, or another department where the date structure differs from the format normally used in QuickBooks.
Always check the dates in the Review and Import screen before sending the transactions to QuickBooks.
How to Check for Transactions That May Already Exist in QuickBooks
Repeated imports can be a problem when a file contains records that have already been added to QuickBooks.
SaasAnt lets you decide how an imported transaction should be matched with an existing QuickBooks transaction.
Setting: Find Matching Transactions in QuickBooks By
You can match transactions using:
Reference Number
Use the transaction reference number, such as an Invoice Number, Bill Number, or Payment Number, to look for an existing QuickBooks transaction.
QuickBooks Internal ID
You can also match using the QuickBooks Internal ID.
The QuickBooks Internal ID is generated by QuickBooks and can be obtained by exporting the transactions using SaasAnt Transactions Desktop.
When is this useful?
Suppose you imported invoices earlier in the week and later received a revised spreadsheet containing some of the same invoice numbers.
Before processing the new file, you can configure SaasAnt to find existing transactions using their reference numbers.
You can then decide how the matched transactions should be handled.
What Should SaasAnt Do When a Matching Transaction Is Found?
Setting: Action When a Matched Transaction Found
After choosing how SaasAnt should find an existing transaction, select what should happen when a match is found.
There are four available actions.
1. Create New Transaction
Choose this when you intentionally want SaasAnt to create another transaction even when the same reference number already exists.
Use this option carefully because it can result in transactions sharing the same reference number.
2. Ignore & Show Warning
Use this when you do not want a matched transaction processed again.
The matched record is reported on the results screen so you can review it.
Practical use case
You receive the same weekly file again but are unsure whether some invoices were already imported.
Match using the invoice reference number and use Ignore & Show Warning so existing matching transactions can be identified instead of intentionally creating another copy.
3. Replace Existing Transaction
Use this when you want the matched QuickBooks transaction to be replaced with the transaction information from the import.
Important: The complete transaction details are rewritten when this option is used.
Review the source file carefully before using Replace Existing Transaction.
Practical use case
A transaction was previously imported with incorrect information and your corrected source file contains the complete replacement transaction.
You can identify the existing record using its reference number or QuickBooks Internal ID and use the Replace option.
4. Append Existing Transaction
Use this option when the imported data should add a new line item to the existing matched transaction.
Practical use case
An invoice already exists in QuickBooks, but additional line-item data needs to be added to that same transaction.
Use the appropriate matching method and choose Append Existing Transaction.
What Should Happen When a Customer, Vendor, Employee, or Item Already Exists?
Setting: Action When a Matched List Found
SaasAnt can also identify matching QuickBooks list records such as:
Customers
Employees
Vendors
Items
You can choose:
Show Warning
The matching list record is reported on screen instead of being replaced.
Replace Existing List
The existing list information is replaced with the information supplied in the import.
Because the existing list details can be overwritten, check the source data carefully before using this option.
How to Check the Complete File Before Starting the Import
Setting: Pre-Import Validation
Turn on Pre-Import Validation when you want SaasAnt to validate the complete file before the actual import begins.
The validation can identify common issues such as missing customers or items.
The import begins only when validation for the complete file is successful.
When is this useful?
Consider a file containing several hundred invoices.
Without complete-file validation, you may not want to discover halfway through the workflow that required customers or items are missing.
Pre-Import Validation allows you to check the file first and correct the issues before starting the full import.
Product and Service Settings
Files from inventory, ecommerce, billing, or other business systems may contain items that are not yet available in the QuickBooks Item List.
The Product/Service settings control how those items are found or created.
How to Create Missing Products or Services During an Import
Setting: Create Product/Service Automatically
Enable this option when SaasAnt should create an item if the item name supplied in the file cannot be found in QuickBooks.
When is this useful?
Suppose you are importing invoices from another system and the file contains several new service or product names.
Instead of stopping to create each missing item separately in QuickBooks before continuing, you can configure SaasAnt to create the missing items during the import.
If you enable this option, review the related default item settings carefully.
How Should SaasAnt Find Existing Products or Services?
Setting: Find Product/Service By
You can choose how items from your file are matched to existing QuickBooks items.
Available options include:
1. Full Name
Matches the exact item name. The search is not case-sensitive.
2. Full Name - Ignore Spaces
Matches the item name while ignoring spacing differences.
3. Custom Field
Matches the item using a QuickBooks custom field instead of the item name.
4. Lookup
Matches the item using an uploaded lookup file.
Practical use case: Small naming differences
Your source file contains:
Installation Service
but spacing in the source data is inconsistent.
Using Full Name - Ignore Spaces can help when the difference is caused by spaces rather than the actual item identity.
Practical use case: External product codes
Your other business system identifies products using an internal product code stored in a QuickBooks custom field.
Instead of relying only on product names, you can use the associated custom-field value to locate the QuickBooks item.
Find Product/Service by Custom Field
Use this option when item matching should use an associated QuickBooks custom field.
The required custom field must already exist in QuickBooks.
What Defaults Are Used When SaasAnt Creates a New Item?
If Create Product/Service Automatically is enabled, you can configure the values used for newly created items.
Default Product/Service Type
Select the type of item SaasAnt should create:
Non Inventory
Inventory
Service
Choose the type that correctly represents the items being imported.
Default Income Account
Select the income account that should be assigned to the newly created item.
Default Expense Account
You can provide an expense account for the created item when required.
Default COGS Account
When creating an Inventory item, specify the Cost of Goods Sold account.
Default Asset Account
When creating an Inventory item, specify the asset account.
Default Asset Quantity
When creating an Inventory item, you can provide the initial quantity.
Default Tax Code
You can provide the tax code that should be used for automatically created items.
Because these settings affect how new items are created in QuickBooks, confirm the appropriate item type and accounts before running the import.
How to Apply an Existing Customer Price Level During Import
Setting: Apply Customer Price Level
If Price Level rules are already configured for customers in QuickBooks Desktop, enable this setting when you want those rules to be used when calculating item pricing.
This setting is useful when customers already have QuickBooks price-level rules and the imported transaction should follow those configured prices.
Advanced Options:
How to Import Shipping, Discount, and Handling Amounts from Separate Columns
Your source file may contain separate columns for:
Shipping
Discount
Handling
Instead of manually adding those amounts after the transactions are imported, use the Shipping/Discount settings.
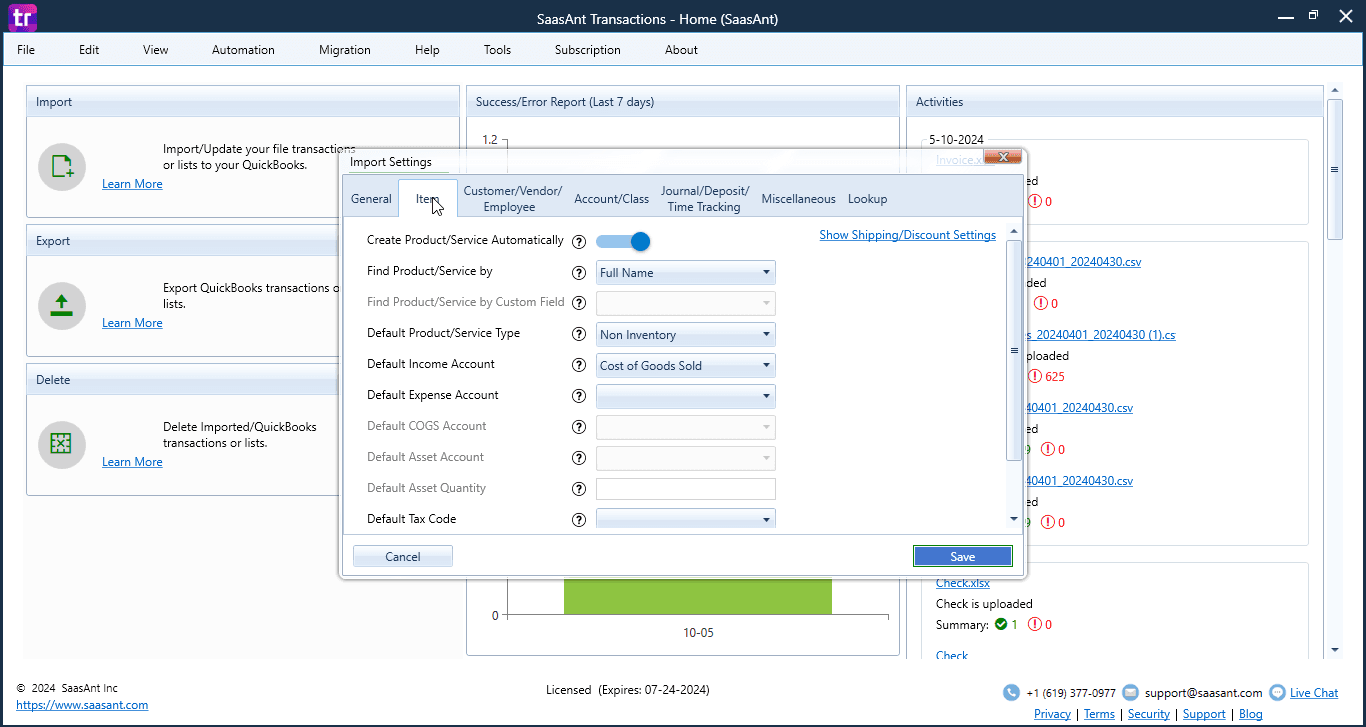

Step 1: Turn On Show Shipping/Discount Settings
Enable Show Shipping/Discount Settings.
Step 2: Select the Appropriate QuickBooks Items
Provide the item names used for:
Shipping Charges
Discount
Handling Charges
Step 3: Map the Amount Columns
On the mapping screen, map your source columns to:
Shipping Amount
Discount
Handling Charge
Practical use case
An order export contains:
Invoice | Product | Amount | Shipping | Discount |
|---|---|---|---|---|
INV-501 | Product A | 200 | 15 | 10 |
You can map the transaction values and the separate shipping and discount columns rather than manually adding those values to the invoice after import.
Customer, Vendor, and Employee Settings
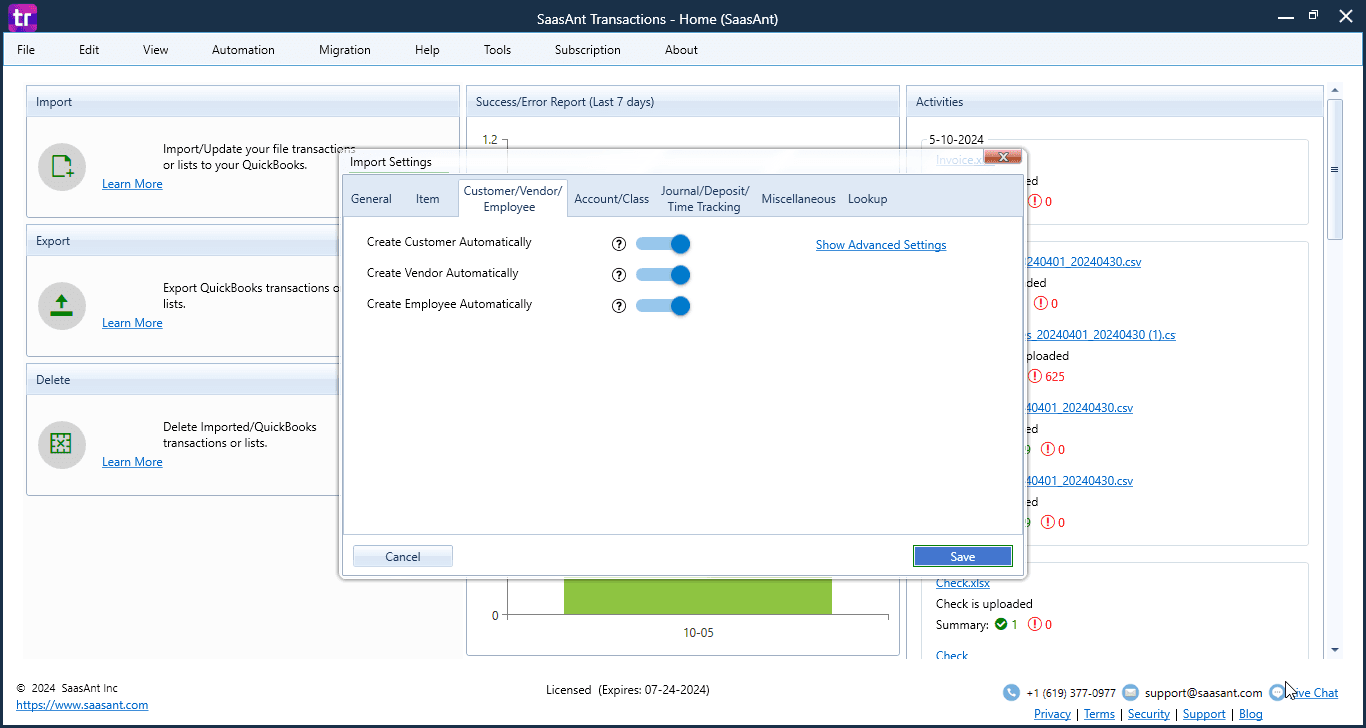
One of the most common problems when moving data between systems is that the name in the source file does not exactly match the name stored in QuickBooks.
SaasAnt provides several ways to locate the correct QuickBooks record.
How to Automatically Create a Missing Customer
Setting: Create Customer Automatically
Enable this option when a customer specified in the import file should be created if that customer cannot be found in QuickBooks.
Use this only when creating a new customer from the import is the intended result.
If a customer may already exist under a different name, first review the customer matching options below.
How to Match Customers When the Names Are Different
Setting: Find Customer By
Customers can be matched using:
Full Name
Full Name - Ignore Spaces
Company Name
First Name
Account Number
Resale Number
Custom Field
Lookup
Example: Source-system IDs are included in customer names
Suppose an older system exports a customer as:
CUST-1845 - Green Valley Services
while the QuickBooks customer is simply:
Green Valley Services
Matching only on Full Name may not suit this file structure.
If your QuickBooks data contains another reliable identifier such as Company Name, Account Number, or a Custom Field, select that matching method instead.
This is especially useful when data comes from systems that use different naming conventions.
Find Customer by Custom Field
Use this option when the value supplied in the file should be matched with a customer custom field stored in QuickBooks Desktop.
How to Create or Match Vendors
Create Vendor Automatically
Enable this option when a vendor from the import file should be created if that vendor cannot be found in QuickBooks.
Find Vendor/Supplier By
Vendor matching options include:
Full Name
Full Name - Ignore Spaces
Company Name
First Name
Account Number
Vendor Tax ID
Custom Field
Lookup
Choose the field that most reliably identifies the vendor in both your file and QuickBooks.
Find Vendor/Supplier by Custom Field
Use this when the vendor should be located using a value stored in a QuickBooks vendor custom field.
How to Create or Match Employees
Create Employee Automatically
Enable this option when an employee from the import file should be created if the employee does not already exist in QuickBooks.
Find Employee By
Employee matching options include:
Full Name
Full Name - Ignore Spaces
First Name
Account Number
Custom Field
Lookup
Find Employee by Custom Field
Use this when employee matching should be based on an associated QuickBooks custom field.
Account and Class Settings
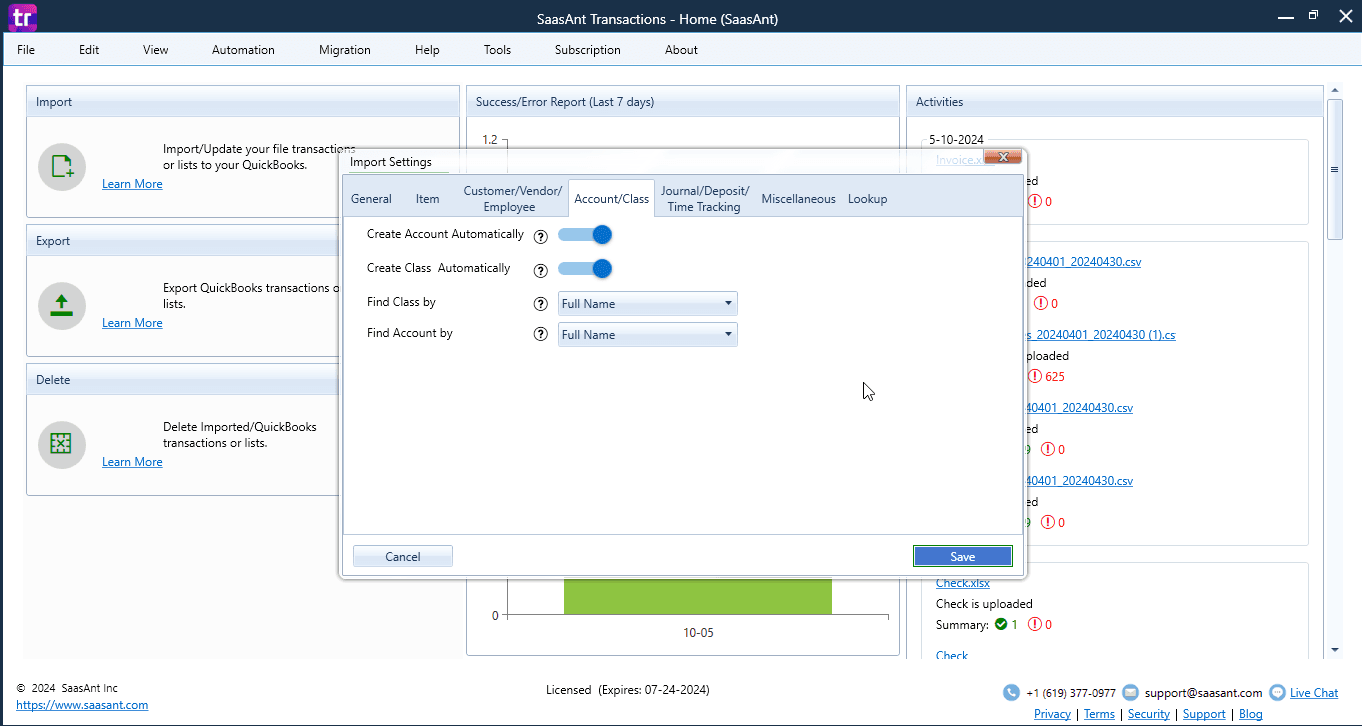
Create Account Automatically
Enable this setting when an account named in the import file should be created if the account cannot be found in QuickBooks.
Because the Chart of Accounts affects your accounting records, review account names and the intended accounting structure before automatically creating new accounts.
Create Class Automatically
Use this setting when a class referenced in your source file does not already exist and should be created as part of the import workflow.
Review your existing Class List first so that naming differences do not unintentionally create additional classes.
Journal Entry, Deposit, and Time Tracking Settings
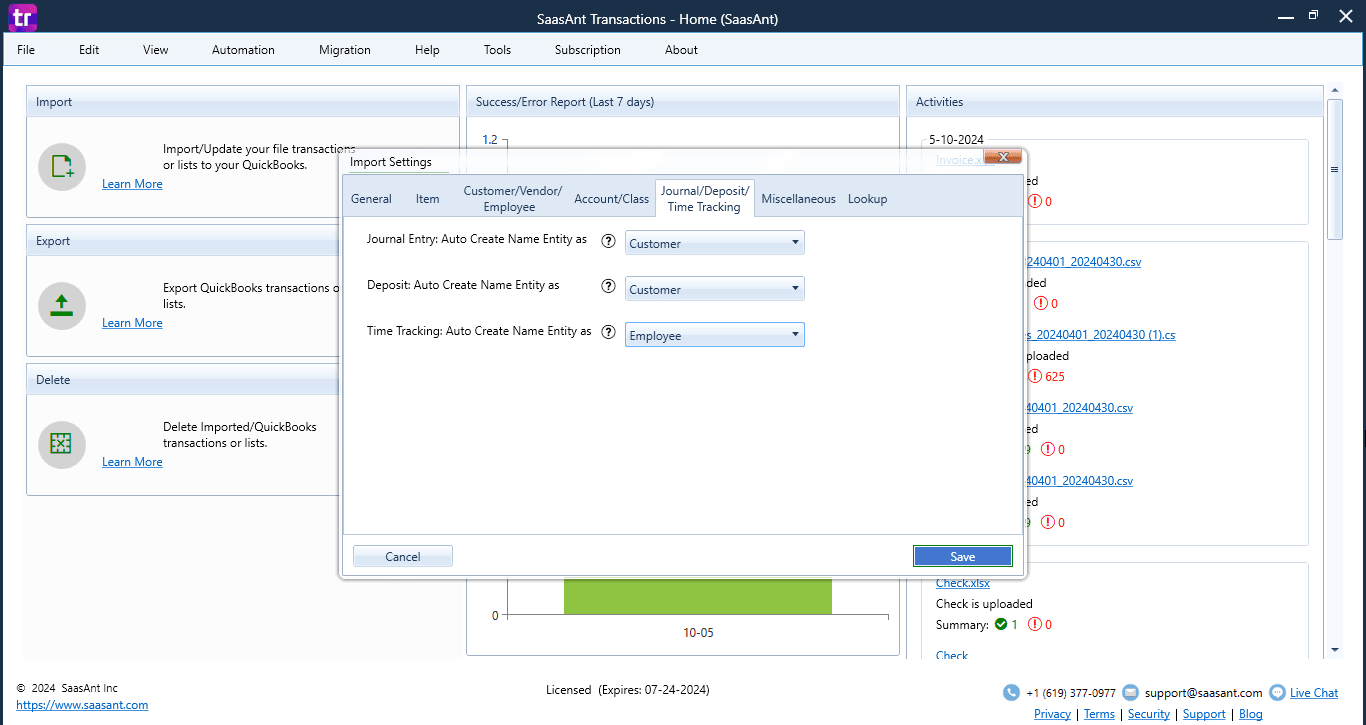
For some transaction types, the source file can contain a name that does not yet exist in QuickBooks.
SaasAnt allows you to specify which type of name entity should be created when one cannot be found.
Journal Entry: Auto Create Name Entity As
Select the type of entity SaasAnt should create when a name used in an imported Journal Entry cannot be found in QuickBooks.
Deposit: Auto Create Name Entity As
Select the entity type to create when a name used in an imported Deposit cannot be found.
Time Tracking: Auto Create Name Entity As
Select the entity type to create when a name used in imported Time Tracking data cannot be found.
Use these settings only when automatically creating the missing name is the intended result.
Additional Import Settings - Miscellaneous
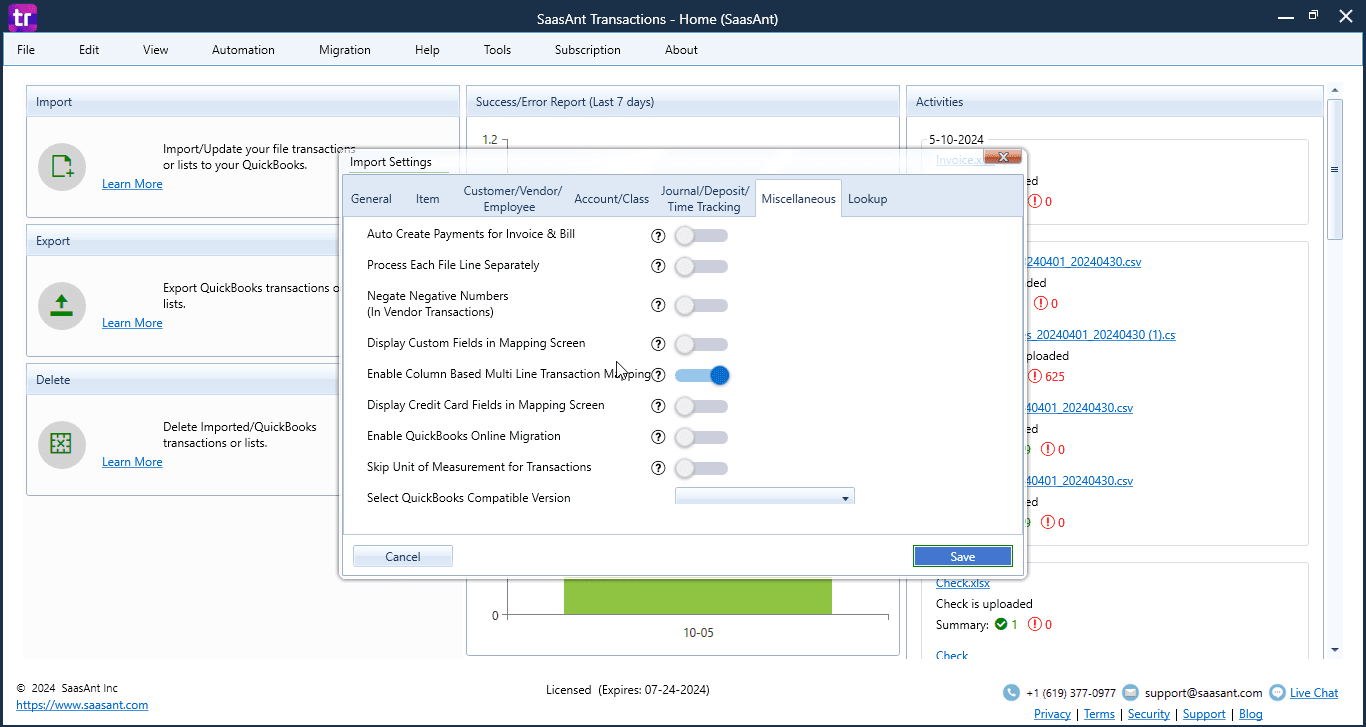
How to Create Payments Along with Imported Invoices or Bills
Setting: Auto Create Payments for Invoice & Bill
When this setting is enabled, SaasAnt creates the corresponding:
Receive Payment for an imported Invoice
Bill Payment for an imported Bill
Use this setting only when the imported Invoice or Bill should also have the corresponding payment transaction created.
If the invoice or bill is still unpaid, leave this setting disabled.
How to Control Whether Each Spreadsheet Row Becomes a Separate Transaction
Setting: Process Each File Line Separately
Normally, reference numbers can be used to group rows that belong to the same multiline transaction.
Turn Process Each File Line Separately on when each row should instead be treated as its own transaction.
Example: Multiline invoice
Your spreadsheet contains:
Invoice Number | Item | Amount |
INV-700 | Service A | 100 |
INV-700 | Service B | 150 |
INV-700 | Service C | 75 |
These rows can represent line items belonging to the same invoice because they share the same reference number.
If you enable Process Each File Line Separately, the grouping by reference number is ignored and each row is processed separately.
Choose the setting based on how the rows in your file are intended to become QuickBooks transactions.
How to Convert Negative Vendor Amounts to Positive Values
Setting: Negate Negative Numbers
Enable this setting when negative numbers in a vendor-transaction file should be converted to positive values during processing.
Review the source file and the intended QuickBooks transaction before enabling this option.
How to Import QuickBooks Custom Fields
Setting: Display Custom Fields in Mapping Screen
QuickBooks Desktop allows custom fields to be created for information that is specific to your business.
When Display Custom Fields in Mapping Screen is enabled, custom fields configured in QuickBooks are shown on the SaasAnt mapping screen.
You can then map the appropriate source-file column to the QuickBooks custom field.
Practical use case
A company may store an external customer ID, project code, internal product code, or another business-specific value in a QuickBooks custom field.
If that value also exists in your source file, enabling this option lets the field appear during mapping rather than limiting the import to standard fields.
How to Import a Multiline Transaction When Line Items Are Stored in Columns
Not every spreadsheet stores invoice items on separate rows.
Some files are structured like this:
Invoice | Item 1 | Amount 1 | Item 2 | Amount 2 |
INV-801 | Consulting | 200 | Setup | 100 |
Setting: Enable Column Based Multi Line Transaction Mapping
Enable this option when your line items are stored across multiple columns rather than multiple spreadsheet rows.
SaasAnt allows up to 20 line items to be mapped using this column-based structure.
This can save you from restructuring a source file into multiple rows before importing it.
How to Show Credit Card Fields on the Mapping Screen
Setting: Display Credit Card Fields in Mapping Screen
Enable this option when the import requires supported credit-card-related fields such as:
Card Number
Expiry Date
The relevant fields then become available during mapping.
Only map fields that are required for the transaction and that you are authorized to handle.
A Practical Way to Choose Import Settings Before Every Import
You do not need to enable every setting.
Before running an import, ask these questions:
Should QuickBooks use the numbers from my file?
Review Assign Transaction Reference From File.Does my file use a specific date format?
Set Date Format in File.Could some transactions already exist?
Configure Find Matching Transactions and the action for matched records.Could customers, vendors, employees, items, accounts, or classes be missing?
Decide whether they should be matched differently, created automatically, or corrected in the source data.Does my file contain multiple lines for the same transaction?
Check whether rows should be grouped or processed separately.Does my file contain custom fields, shipping, discounts, or handling charges?
Enable the appropriate mapping options.Do I want the entire file checked before anything is imported?
Enable Pre-Import Validation.
Then continue to the Review and Import screen, verify the records, and click Send to QuickBooks only after the file looks correct.
Frequently Asked Questions
Where are Import Settings in SaasAnt Transactions Desktop?
Open Edit → Import Settings from the top menu, or click Import Settings from the import screen.
Can I keep invoice or bill numbers from my Excel or CSV file?
Yes. Enable Assign Transaction Reference From File to use supported transaction reference numbers from the source file.
Can SaasAnt check whether an imported transaction already exists in QuickBooks?
Yes. Transactions can be matched using the Reference Number or QuickBooks Internal ID.
You can then choose what SaasAnt should do when a match is found.
What can SaasAnt do when it finds a matching transaction?
You can choose:
Create New Transaction
Ignore & Show Warning
Replace Existing Transaction
Append Existing Transaction
Remember that Replace Existing Transaction rewrites the complete matched transaction.
Can I validate the whole file before starting an import?
Yes. Enable Pre-Import Validation. SaasAnt validates the complete file and starts the import only after the full file passes validation.
Can SaasAnt create a customer or vendor if it does not exist?
Yes. Separate settings are available for automatically creating missing customers and vendors.
Before enabling them, check whether the name may already exist in QuickBooks under a different format and review the available matching options.
Can I match customers using something other than their full name?
Yes. Customer matching options include Full Name, Full Name with spaces ignored, Company Name, First Name, Account Number, Resale Number, Custom Field, and Lookup.
Can I import custom fields into QuickBooks Desktop?
You can enable Display Custom Fields in Mapping Screen to display custom fields already configured in QuickBooks during field mapping.
Can SaasAnt import multiline transactions?
Yes. SaasAnt supports multiline transaction structures. You can control whether rows sharing a reference number are grouped or each row is processed separately.
For files where line items are stored in separate columns, Enable Column Based Multi Line Transaction Mapping supports mapping up to 20 line items.
Can I import shipping, discount, and handling amounts from my file?
Yes. Enable Show Shipping/Discount Settings, select the appropriate QuickBooks items, and map the corresponding columns from your source file.
Can I select the date format used in my spreadsheet?
Yes. Use Date Format in File and select the format that matches your Excel or CSV file.